Questa traduzione potrebbe non riflettere gli aggiornamenti più recenti dalla guida originale. Aiuta ad aggiornare la traduzione o visualizza la guida d'origine.

Sostituzione WiFiGamePad Wii U
Introduzione
Vai al passo 1Questa guida ti aiuterà a rimuovere la scheda WiFi dal GamePad della Nintendo Wii U.
Cosa ti serve


-
-
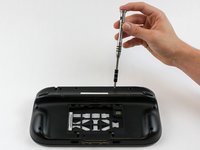
Appoggia il GamePad a faccia in giù e svita le due viti da 4,7 mm con un cacciavite a croce Phillips #00.
-
-
-
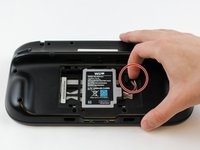
Con le dita, premi sul connettore della batteria e tiralo all'indietro.
-
Rimuovi la batteria dal suo alloggio.
-
-
-
-
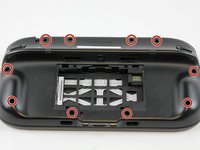
Svita le 10 viti da 9 mm attorno alla copertura esterna con un cacciavite Tri-Wing Y1.
-
Solleva la copertura posteriore.
-
-
-
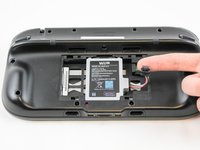
Scollega il connettore del motore della vibrazione dalla scheda madre con le dita.
I agree. A circle over the plug would have been better as the picture looks like you just pull on the wires lol.
Chris -
Thanks for the comment. I did get a set of tweezers and the negative cable broke anyway. They really could have done a better job at using a different connector for that.
Why in the world is this thing so tightly connected?
Thanks for the comment. I did get a set of tweezers to try to pull it out but still ended up breaking the negative cable. They really could have used a better set of cables and connectors for this.
You don’t have to do this step!!!! Just open the switch while keeping this wire intact!!!!!
-
-
Attrezzo utilizzato in questo passaggio:Tweezers$4.99
-
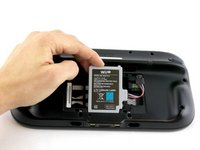
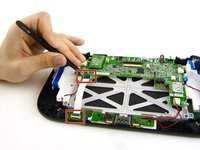
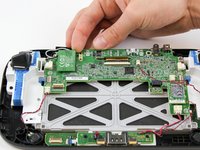
Apri la chiusura superiore ed inferiore che collegano il cavo a nastro bianco alla scheda madre con delle pinzette.
-
Scollega il cavo a nastro bianco con le pinzette.
Attention! You have to flip up gently the small plastic cap on top of the ribbon connector. Do not try to slide the plastic cap horizontally. This method holds for all ribbon connectors.
Isn’t it WiFi?
-
-
-
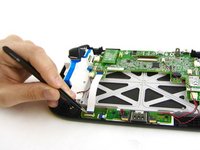
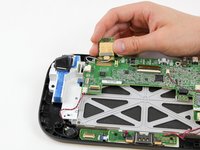
Solleva e rimuovi la scheda WiFi con le dita.
These little boards (Bluetooth and NFC) have a small connector but also have double sided tape holding them down. So you may need to apply more force than expected to remove these due to the tape.
Isn’t it Wi-Fi?
-
-
-
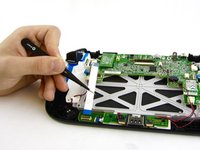
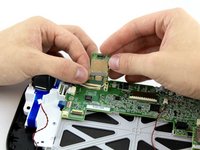
Scollega i cavi nero e bianco dal retro del modulo WiFi.
One important thing to note here is how the black and white wires are routed to the board. You should take a picture since if you do not route these the same way, the wires can interfere with the button or get trapped when you assemble the case back possible blocking a screw hole.
Isn’t it Wi-Fi?
Any idea what the name of the white wire is? I accidentally broke through mine.. having trouble finding a replacement
-
-
-
Solleva e rimuovi il modulo WiFi.
Isn’t it Wi-Fi?
Does it really matter?
Thanks a lot for the guide. I just fixed my gamepad and it appears to be working good. Just one question: why do you include the step in which you remove the flatflex cable to the other pcb? It seems unnecesary
-


Per rimontare il tuo dispositivo, segui le istruzioni in ordine inverso.
Per rimontare il tuo dispositivo, segui le istruzioni in ordine inverso.
Annulla: non ho completato questa guida.
Altre 21 persone hanno completato questa guida.
Un ringraziamento speciale a questi traduttori:
25%

Questi traduttori ci stanno aiutando ad aggiustare il mondo! Vuoi partecipare?
Inizia a tradurre ›
Team

USF Tampa, Team 1-6, Sullivan Spring 2016 Membro di USF Tampa, Team 1-6, Sullivan Spring 2016
USFT-SULLIVAN-S16S1G6
4 Membri
40 Guide realizzate
13 Commenti
I just completed this repair on our Game Pad, and it worked perfectly!
There were two things that I noted that may be of use to anyone else completing this repair. First, the 9mm screws on the back may be located under small stickers used to conceal the screw holes. If you take them up carefully with a knife or other flat blade, you can reuse them if desired. Second, I didn’t see the need to remove the white ribbon cable in step #6. I successfully completed the repair without that step.
I just completed this repair on our Game Pad, and the guide worked perfectly!
There were two things that I noticed that may be of help to someone else completing this repair. First, note that the 9mm screws holding the back on may be located under small black stickers used to hide the screw holes. If you take them up carefully with a knife or other flat blade, you should be able to reuse them if you desire. Second, I didn’t see a need to remove the white ribbon cable in Step #6. I successfully completed the repair without that step.
Cheers!
This fix worked perfectly - our Wii U was virtually unusable because of the severely limited range of the gamepad. My kids are thrilled that they can comfortably play again!
Worked perfectly, gamepad only worked within 2 ft of the console and now works 15ft away.
Instructions were concise, well illustrated and easy to complete.
Thanks a lot!
I went to do this - already have another chip - but I discovered there are no wires attached! The white and black wires shown are not in my gamepad at all. I’m amazed I can connect in the first place. Any idea how I can replace the wires that attach to the chip? Or work around it?
If you’re still looking 2 years later…
I replaced my laptop bluetooth antennae with a short one that I got from Amazon (I had damaged the connector on the original). Just crammed it into some empty space, left the original hanging attached to nothing.
Something like this is what you want: https://www.amazon.com/Hilitand-Internal...
Mine didn’t even have the sticky piece on the end; they were literally just 6 inches of wire with the connector. I’d be willing to gamble $5 it’ll work on a Wii U also.
tried to unscrew the 10 Tri-Wing size Y1 screw with my iFixit toolkit
unfortunately the tool is too “fat” and short, it cannot reach 4 screws on the corners of the gamepad.
having the iFixit toolkit and having to purchase an additional “slim” screwdriver it’s really a shame…
If I perform this operation will the internet be ruined? How's about the WiFi?
The Internet connection is on the Wii U console. It uses WiFi 5ghz to transmit and receive to and from the GamePad. If the GamePad's WiFi chip is damaged, the GamePad will no longer work.
hello my plan is to make the oem wii u wifi card into external usb wireless card is that possible ?
tried to unscrew the 10 Tri-Wing size Y1 screw with my iFixIt toolkit
unfortunately the tool is too “fat” and short, it cannot reach 4 screws on the corners of the gamepad.
having the iFixIt toolkit and needing to purchase an additional slim screwdriver it’s a shame…
Antonello Iannone - Replica