
Sostituzione Batteria Braun Oral-B Sonic Complete 4729
Introduzione
Vai al passo 1Importante: questa guida è SOLO per Braun Oral-B Sonic Complete 4729!!! Non per NESSUN altro spazzolino Braun o di qualsiasi altra marca!!!
La batteria del mio spazzolino è morta e devo sostituirla perché è un peccato buttare via un dispositivo elettronico solo perché la batteria è morta. L'ho già aperto per vedere che tipo di batteria c'è dentro.
Ora ho ordinato delle batterie NiCd sostitutive e devo aspettare che arrivino. Probabilmente potrebbero essere usate anche le batterie NiMH, almeno hanno lo stesso voltaggio ma potrebbero esserci dei problemi con il caricabatterie perché le batterie NiMH possono esplodere se sovraccaricate.
NOTA: Ci sono dei fili molto sottili all'interno dello spazzolino e potresti distruggere il tuo dispositivo mentre lo "Ripari". Ma a chi importa se il produttore dice che la tua unica opzione con una batteria morta è quella di portare il dispositivo in un centro di riciclaggio.
NOTA: Controlla le normative locali per il riciclaggio di rifiuti tossici (batterie NiCd)
Cosa ti serve
Ricambi
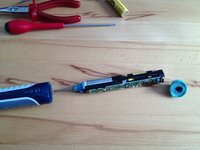
Strumenti


Mostra di più…
-
-
Spingi la parte inferiore dello spazzolino contro la manopola sul retro del caricabatterie. Gira in senso antiorario e la parte inferiore dovrebbe staccarsi. Appoggia la parte superiore dello spazzolino su una superficie dura e spingi fuori la parte interna.
-
-
-
-
Rimuovi il vecchio pacco batteria.
-
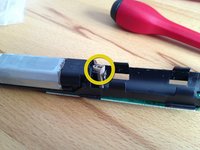
Le Batterie sono saldate al circuito stampato. Puoi usare il tuo saldatore se vuoi, ma penso che non sia davvero necessario. E probabilmente il meno è piuttosto difficile da lavorare perché si trova sotto altre cose (fig. 3; il cerchio segna il meno e il quadrato il collegamento più).
-
Se non stai usando un saldatore, devi staccare la protezione del filo dalle vecchie batterie per rimuoverle perché sono i tuoi connettori per le nuove batterie. La molla nel coperchio inferiore fornisce abbastanza tensione per mantenere la batteria in posizione e collegata senza saldare.
The connectors (tags) are welded to the battery, not soldered. Do not try to use a soldering iron to detach the tags from the battery - it won't work, and the heat could cause the battery to burst and cause injury.
Generally the new battery comes with new tags attached, so I think best practice is to unsolder the old tags from the circuit board.
-
-
-
Inserisci un nuovo pacco batteria.
-
Se hai dissaldato la vecchia batteria dal circuito stampato, devi saldare le protezioni dei fili dal nuovo pacco batteria al circuito stampato.
-
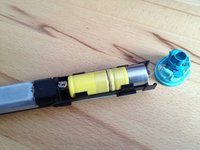
Altrimenti, inserisci semplicemente il nuovo pacco batteria e rimonta lo spazzolino. Ho usato un pezzo di cartone per assicurarmi che il positivo sia correttamente collegato (fig. 1).
-


Annulla: non ho completato questa guida.
Altre 5 persone hanno completato questa guida.
Un ringraziamento speciale a questi traduttori:
100%

Acn0w ci sta aiutando ad aggiustare il mondo! Vuoi partecipare?
Inizia a tradurre ›
15 Commenti
Do you need to buy 2 of these batteries? It looks like two separate batteries end to end.
sorry for the late reply. No you don't need two batteries. Actually its a 2/3 A battery that means its 2/3 as long as a full A-size battery. in my case they delivered two 1/3 A batteries in one shrinking wrap but there are also 2/3 A batteries in one piece.
ndjenny -
I /think/ any "2/3 A" size battery should work - I've ordered some NiMH ones with nearly double capacity - I anticipate that these will hold more, but take longer to charge up.
Keep in mind that the charger is not made for NiMH you must not overcharge a NiMH battery otherwise it may explode… So you do it at your own risk! Regards Andy
ndjenny -
Hello Tom,
the battery replacement worked very well but after sometimes the Toothbrush stopped working cause there was a crack where, i assume, moisture entered the housing and killed the electronics. So the new battery was still in good shape but the brush sometimes refused to turn on. It was to much hassle to finde the fault , thats why i replaced it last January.
Kind regards Andy
ndjenny -
Thanks for the response, Andy.
Could it have been because you didn't solder the connections?
Or are you fairly certain that it was a moisture intrusion issue?
Hello Tom,
i'm quite sure it wasn't caused by not soldering the battery in. It still worked but sometimes i had to push the button many times before it started stopped running and sometimes it started running by itself. there was also much of this white stuff all over the electronics which is a sign of water/moisture damage. I owned this brush vor over ten years and i not disappointed with it's quality taken in to account how many times it dropped to the ground. If you think about replacing the battery on yours, go for it. Its easy to do, inexpensive and if your brush has no cracks it should work until the replacement battery dies. I don't think its necessary to solder it to the board.
Kind regards Andy
ndjenny -
About the question NiCd batteries or NiMh; toothbrushbattery.com also use a NiMh battery in their tutorial.
I think the toothbrush does have an overcharging safety build-in. The toothbrush stops charging automatically after a few hours. The charging indicator light also stops pulsing then.
How do I know its the battery. Have not used the toothbrush for at least 15 years. When I plugged it in to charge for at least 17 hours the green light comes on solid for the entire time that the plug is in the receptacle. When I remove the toothbrush from the charger the light goes out and no power.
Marv -8-23-2021
If the battery is not used for 15 years it’s probably death. The charger is charging with very low power thus you cannot recondition it inside the device, you'd have to take it out and charge it with decent power and there would be a slight chance to revive it. But it’s still a very old battery and it’s probably not worth the effort.
In fact you know the battery is faulty but you can’t know if something else is gone bad to unless you change battery or power the device fro a different power source.
ndjenny -
If using a soldering iron, desoldering tool is useful. I was able to obtain the batteries and tab them together, shrink wrap, and resolder.
Aaron Giesick - Replica