Salta al contenuto principale

Cosa ti serve

Panoramica Video

Questo smontaggio non è una guida di riparazione. Per riparare il tuo HomePod, usa il nostro manuale di assistenza.

  1. Smontaggio HomePod, Smontaggio HomePod: passo 1, immagine 1 di 2 Smontaggio HomePod, Smontaggio HomePod: passo 1, immagine 2 di 2
    • Che genere di tecnologia Apple sta nascondendo qui dentro? Ecco quello che ci hanno raccontato:

    • Processore Apple A8

    • Woofer da 4" ad alta escursione con uscita suono dall'alto

    • Sistema a 7 tweeter con tecnologia beamforming

    • Sistema a 6 microfoni con tecnologia beamforming

    • Microfono per basse frequenze per calibrazione del woofer in tempo reale

    • Interfaccia touch nella parte superiore

    • Wi-Fi 802.11ac con MIMO + Bluetooth 5.0

    Could you guys give a more in-depth review of the logic board and the inter connectivity of it with the other components? I am wondering if it’s hackable to get rid of Siri in fevour of snips

    Daniel Shapira - Replica

  2. Smontaggio HomePod: passo 2, immagine 1 di 3 Smontaggio HomePod: passo 2, immagine 2 di 3 Smontaggio HomePod: passo 2, immagine 3 di 3
    • L'HomePod non è il più alto in questa gamma, ma è certamente il più inquietante.

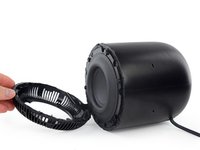
    • In ogni caso, mantiene il fattore di forma più o meno cilindrico tipico degli smart speaker a 360°.

    • A parte le proporzioni tra altezza e diametro, la differenza più evidente è che, diversamente dall'Amazon Echo e dal Google Home, l'HomePod è dotato di un alimentatore integrato e di un cavo di alimentazione non rimovibile (lo è se tiri abbastanza forte).

    • Non c'è un antiestetico trasformatore esterno da muro ed Apple ha nascosto molto bene il fatto che questo cavo non è rimovibile (ci ha fregati!). Il cavo ha anche un bel rivestimento esterno a treccia.

    Have you determined what the cord covering is made of? Soft cotton or tough fabric to slow down dog and child chewing?

    plink53 - Replica

    Power cord IS apparently removable if you pull hard on it., and you can plug it back into a proprietary connector. What else to expect from Apple.

    Peter Goedtkindt - Replica

    The power cord is actually removable, it has (pretty tight) connector in it.

    apz - Replica

    Actually, letting high voltage run along the power cord into the device without protecting earthing ground is a safety issue. Converting the voltage down inside the wart already fixes that.

    Christian Egger - Replica

    Double insulation ftw! See Class II devices: https://en.wikipedia.org/wiki/Appliance_...

    hugostonge -

    Oy…I’m confused with the switching to top to bottom top to bottom… If one wanted to get out the main board with the A8 on it, what’s the least destructive and relatively easier path…work from the bottom or work from the top?

    hometech99 - Replica

    You work from the top. I wrote up a disassembly guide, it’s on the device page. Remove the top touch surface cover, then the actual touch pad/LED portion and then the logic board is directly underneath. :)

    Nicholas Ouimet -

  3. Smontaggio HomePod: passo 3, immagine 1 di 3 Smontaggio HomePod: passo 3, immagine 2 di 3 Smontaggio HomePod: passo 3, immagine 3 di 3
    • Ci imbattiamo in un bel po' di informazioni legali stampate con grande discrezione sotto il piede:

    • Scritte per il rispetto delle regole FCC, dello smaltimento dell'e-waste e di regole USA, ma anche europee e australiane, nonostante il nostro modello abbia una spina (apparentemente) fissa di tipo americano, e una che sottolinea il doppio isolamento del dispositivo.

    • Un numero modello nuovo di zecca: A1639.

    • E una coppia di piccoli fori.

    • Uno strano posto per metterci dei microfoni. O forse questi fori sono per scopi barometrici?

    What’s the FCC ID?

    Narasimha Chari - Replica

    The tiny holes must be present to prevent a vacuum from forming when the base rests on a flat surface like a glass top.

    Leonard Peris - Replica

    I am 100% agree with Leonard, this tiny little hole is to release vacuum.

    As everybody know, silicone is a super sticky rubber, it has to have special treatment to reduce stiction.

    The vacuum will not only appears on glass furniture any sealed surface will create this issue.

    As we see the “residue gate“ currently have on wood furniture. The silicone will release some oil or “blooming“ on rubber technology. These oil is intends to let the elastomer softer as an internal lubricant(an internal lubricant is to soften the silicone rubber) but they will gradually release over time.

    Howard - Replica

    The Power Cord is actually not permanent. If you take a look close enough you can see it can be removed just has to be tugged hard enough!

    David - Replica

  4. Smontaggio HomePod: passo 4, immagine 1 di 3 Smontaggio HomePod: passo 4, immagine 2 di 3 Smontaggio HomePod: passo 4, immagine 3 di 3
    • Come prossimo passo, diamo la nostra prima bella occhiata alla retina acustica 3D realizzata in un pezzo solo di Apple.

    • I progettisti Apple hanno sviluppato questa griglia flessibile per essere trasparente sul piano acustico e al tempo stesso proteggere l'interno dell'HomePod da polvere e detriti.

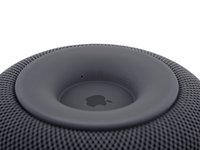
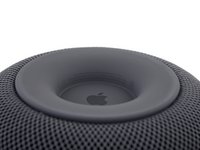
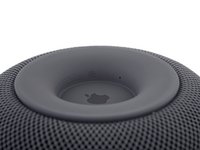
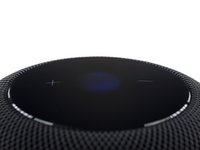
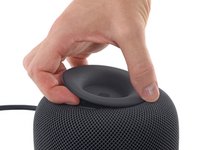
    • In cima all'HomePod abitano un'essenziale interfaccia touch (nel caso a Siri serva una pausa) e un indicatore a LED di aspetto piuttosto familiare.

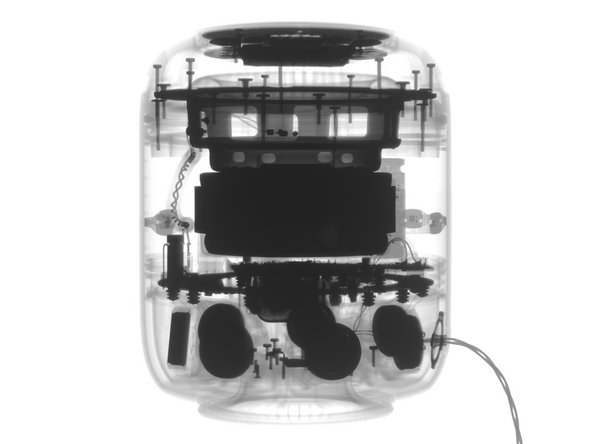
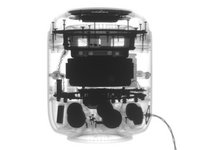
    • Grazie ai raggi X di Creative Electron, diamo uno sguardo all'interno: sembra che qui ci siano dei magneti enormi (evidenziati dalle macchie nere).

    Remarkably similar ‘x-ray’-style illustration featured on the ''apple.com/homepod/'' webpage.

    Bob Laughton - Replica

  5. Smontaggio HomePod: passo 5, immagine 1 di 3 Smontaggio HomePod: passo 5, immagine 2 di 3 Smontaggio HomePod: passo 5, immagine 3 di 3
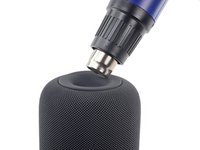
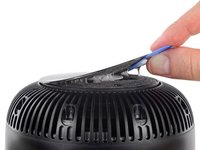
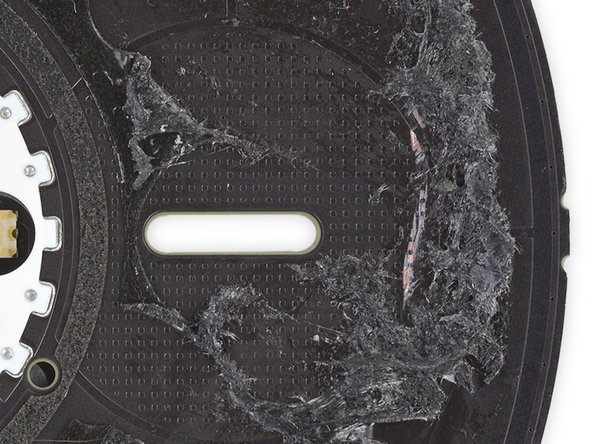
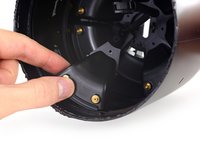
    • La nostra intelligenza artificiale a raggi X ci ha fatto scoprire delle viti sotto il piede, quindi abbiamo concentrato il fuoco sull'adesivo che lo tiene. Solo dopo un'accesa sparatoria con la pistola termica siamo stati in grado di sollevare e togliere il piede.

    • Pur sapendo che ci sono sotto delle viti, ci aspettiamo il peggio, dopo tutto questo lavoro con la colla...

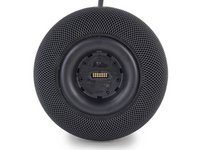
    • ... Ma siamo sollevati nello scoprire che queste viti Torx amiche del riparatore sono pronte per essere svitate. Sotto il piede di colla c'è una porta a 14 pin, probabilmente usata per collaudare o programmare gli HomePods tramite Pogo Pins in fase di assemblaggio.

    Where does the 14-pin POGO port terminate? It isn’t shown again after this step.

    joshshua - Replica

    yes any news on the pogo pins connection? No leaked schematics? It might be helpfull to connect the homepod to a pc for a firmware update like it’s possible with the mini?

    Oliver Stepniewski - Replica

    There is no way to downgrade them because the IPSW isn't public

    Shim -

  6. Smontaggio HomePod: passo 6, immagine 1 di 3 Smontaggio HomePod: passo 6, immagine 2 di 3 Smontaggio HomePod: passo 6, immagine 3 di 3
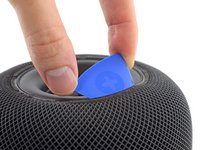
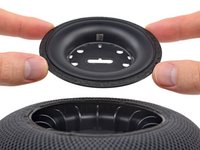
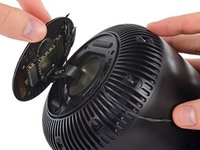
    • Si dà il caso che queste viti non siano nostre amiche come pensavamo. Dopo averle rimosse, la piastra inferiore di plastica bloccata dalle viti è... ancora bloccata. Sembra che la retina tenga giù la piastra di accesso.

    • Noi non vogliamo davvero tagliare questa retina, quindi facciamo scorrere un plettro lungo il bordo incollato della spugna e tiriamo fuori la piastra. Che cosa ne ricaviamo? Dell'altra plastica impregnablle che non porta da nessuna parte.

    • Ehi Siri, che cosa ci vuole per entrare dentro questa cosa?

    Is this the t5 or the tr6 security screwdriver?

    Ramon - Replica

    Those particular screws are T5. We didn’t encounter any security screws—just standard Torx.

    Jeff Suovanen -

    Mine has 3 smaller screws on the bottom as well

    phaseangle - Replica

  7. Smontaggio HomePod: passo 7, immagine 1 di 3 Smontaggio HomePod: passo 7, immagine 2 di 3 Smontaggio HomePod: passo 7, immagine 3 di 3
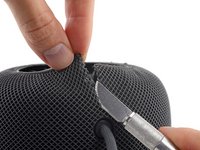
    • Probabilmente ci vuole qualcosa di affilato. Abbiamo fatto del nostro meglio per lasciare che la retina resti tutta in un pezzo, ma senza risultati. E va bene, non sarà la prima volta che dobbiamo tagliare degli strani tessuti.

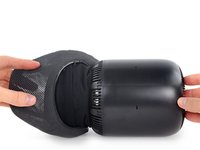
    • Facendoci largo tagliando la spessa retina 3D che integra sottili fili metallici, troviamo un rivestimento interno secondario in tessuto.

    • Questo involucro più fine e flessibile è intrappolato sotto la parte superiore dell'HomePad, quindi al momento lo lasciamo al suo posto.

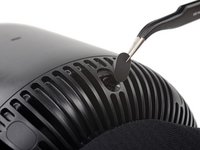
    • Per fortuna il case interno non è in un pezzo solo come la retina; scopriamo altre viti Torx nascoste sotto delle spinette (strane davvero) di gomma.

    Before you cut the fabric you can remove the cable! It’s a snap-in design which you can see here: https://www.youtube.com/watch?v=gjxILSOf...

    Dan - Replica

    If there’s a solid wall of plastic behind the mesh, why does it matter if the mesh is “acoustically transparent” or not?

    Drew Quinton - Replica

    The mesh covers the openings for the speakers and microphones as well, they’ve just extended the mesh from those areas to uniformally cover the entire device except the touch controls area.

    Urname -

    Urname, but those slit openings appear to be only for the microphones, are you sure, looks like from the photos that the tweeters have to blast through the plastic which would very much explain the muffled sound the HomePod produces.

    White Hawks -

    Interesting question - anybody tested the quality of the sound without the mesh?

    Jan - Replica

  8. Smontaggio HomePod: passo 8, immagine 1 di 2 Smontaggio HomePod: passo 8, immagine 2 di 2
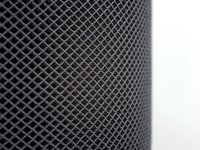
    • Ecco un beneficio del lavoro di cucito che abbiamo appena fatto: possiamo vedere di quale magica fibra è composta questa copertura.

    • Niente di magico, scopriamo che questa griglia flessibile è composta di due strati a rete nella parte superiore e inferiore che racchiudono tra loro dei minuscoli anellini metallici.

    • Questo tipo di costruzione permette alle onde sonore di attraversare il tessuto, con riflessioni nulle o trascurabili, mentre la polvere rimane fuori.

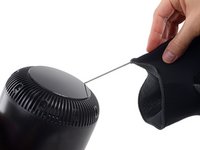
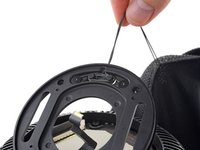
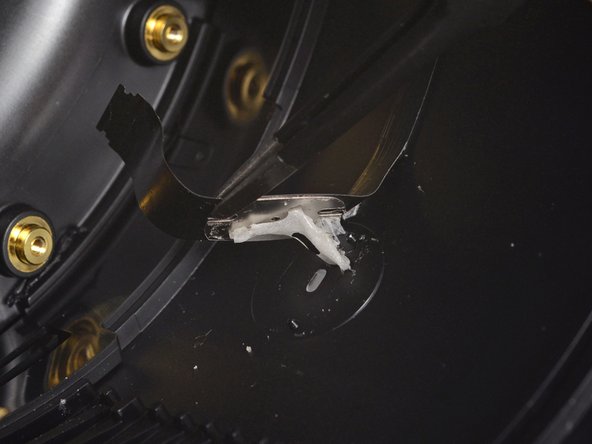
    • Ora che abbiamo tirato via la retina, vediamo che è percorsa da un cordoncino su tutta la larghezza! Forse questo significa che c'è un modo non distruttivo di raggiungere la parte superiore dell'HomePad?

    Yes, the sleeve slides off as shown in Kelsey’s video above this guide. :)

    fastasleep - Replica

    The outer mesh looks very similar to the paper based rope used in their retail bags.

    Tyler Selby - Replica

    Yes, it has a drawstring! Oops!!!

    Sean Farrar - Replica

    Thinking of dying this fabric, is that even possible?

    Karim - Replica

  9. Smontaggio HomePod: passo 9, immagine 1 di 2 Smontaggio HomePod: passo 9, immagine 2 di 2
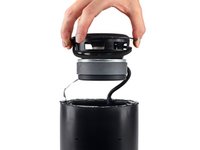
    • Cercando un accesso, stacchiamo il coperchietto rivestito di colla e scopriamo altre viti che apparentemente non portano da nessuna parte.

    • Un oggetto semplicissimo all'esterno si rivela un vero labirinto all'interno.

    • Dopo aver usato dell' altro calore ed essere passati attraverso un' altra piastra collosa, troviamo un altro strato ancora più all'interno e finalmente troviamo qualcosa.

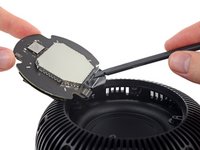
    • Sotto la porta numero tre, troviamo: una scheda ben schermata, un largo cavo a nastro e i punti di ancoraggio del cordoncino.

    How does the top plate respond to touch - it looks like a piece of plastic that isn’t connected to anything

    Paul Dale - Replica

    Great question. We think there’s a capacitive grid on the board below—see Step 10 for some updated info. But you’re right, the touch surface itself isn’t wired to anything.

    Jeff Suovanen -

    Great teardown! I’m super interested in how the light gets passed through from the “+ -” symboles shaped holes in the pcb, all the way out of the cover plastic.

    I have a hunch that it’s a transparant part, where they used a black film on the back side, with the + and - marks cut out, but I’m not sure.

    do you happen to know if they used a multi-layered material for the cover plastic?

    johan.vn.hulle - Replica

    The LEDs are mounted to the board and diffused through the clear plastic light guide you see to the left of the board in the first image in step 10, all the lights on the board shine through the semi-transparent plastic lid.

    Sam Goldheart -

    The LEDs are mounted to the board and diffused through the clear plastic light guide you see to the left of the board in the first image in step 10, all the lights on the board shine through the semi-transparent plastic lid.

    Sam Goldheart - Replica

  10. Smontaggio HomePod: passo 10, immagine 1 di 3 Smontaggio HomePod: passo 10, immagine 2 di 3 Smontaggio HomePod: passo 10, immagine 3 di 3
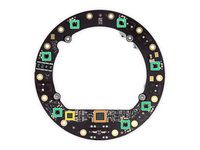
    • La rimozione della schermatura della scheda ci mostra gli artisti che danno vita allo spettacolo di luci sovrastante:

    • Driver LED Texas Instruments TLC 5971

    • System-on-Chip programmabile Cypress CY8C4245LQI-483

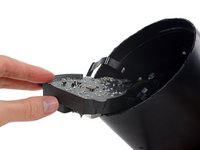
    • Il lato inverso della scheda ospita i LED e il diffusore che dà all'indicatore il suo look nebuloso.

    • I simboli più e meno sono ritagliati direttamente nella scheda e ognuno ha la sua piccola triade di LED e una guida luci per dirigere i fotoni dove ce n'è più bisogno.

    • La parte superiore della scheda (seconda foto) mostra uno schieramento ben organizzato di piccole sporgenze: probabilmente una griglia capacitiva,come nel Google Home, per registrare i tap e i tocchi con le dita sulla superficie soprastante.

    it looks like the + and - buttons have their own lights on the bottom side of the board (those 3 led bars on each side). if they wre lit purely from the array, how are they lit when the array is off, and how do they turn off when the array is on?

    Gregory Young - Replica

    I think you’re right about that! We didn’t look closely enough. The teardown has been updated to make that bit more accurate. Thanks for the tip!

    Jeff Suovanen -

  11. Smontaggio HomePod: passo 11, immagine 1 di 3 Smontaggio HomePod: passo 11, immagine 2 di 3 Smontaggio HomePod: passo 11, immagine 3 di 3
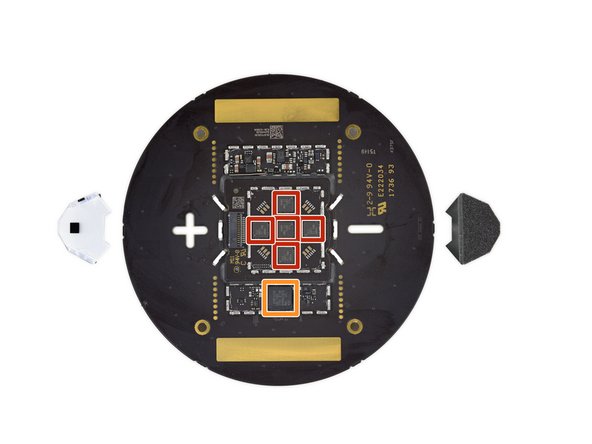
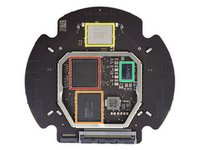
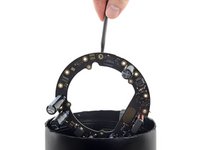
    • Il prossimo disco estratto supporta gli elaborati punti di attracco per il cordoncino; dietro c'è la scheda logica principale.

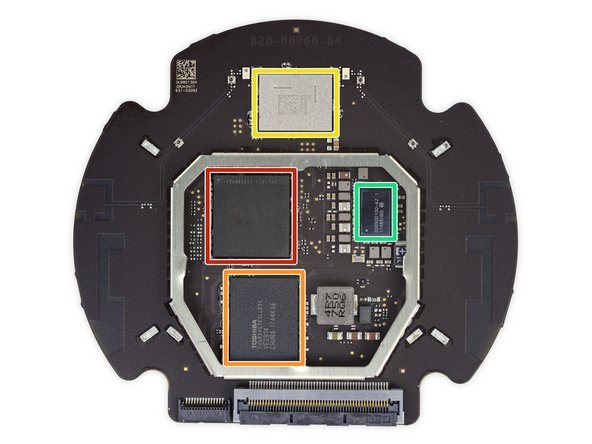
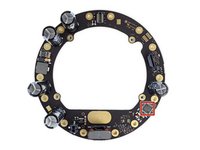
    • Quanto ai chip, troviamo:

    • SoC Apple A8 APL1011 SoC (l'abbiamo già visto in precedenza, ma faceva un lavoro diverso), probabilmente accoppiato a 1 GB di RAM integrata sotto

    • 16 GB di memoria flash NAND Toshiba THGBX4G7D2LLDYC

    • Modulo Wi-Fi/Bletooth USI 339S00450, probabilmente con un Broadcom BCM43572 intrappolato dentro

    • Apple/Dialog 338S00100-AZ PMIC

    • Interessante il fatto che il retro abbia alcune aree disabitate per componenti SMD, pochi chip e molte parti passive. Forse ci sono stati dei cambiamenti progettuali dell'ultima ora nello HomePod?

  12. Smontaggio HomePod: passo 12, immagine 1 di 3 Smontaggio HomePod: passo 12, immagine 2 di 3 Smontaggio HomePod: passo 12, immagine 3 di 3
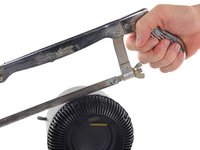
    • Ed eccoci qua, di fronte a una giunzione che sembra impenetrabile. Accendiamo il seghetto (e il nostro cutter a ultrasuoni) e stacchiamo l'obesissimo woofer.

    • Se il magnete di questo woofer sembra molto grande per un altoparlante di queste dimensioni, è perché lo è davvero. Le note basse più profonde e coinvolgenti dipendono dalla capacità dell'altoparlante di muovere molta aria.

    • Di solito, questa caratteristica è ottenuta aumentando il diametro del cono; Apple ha scelto invece di aumentare la corsa della bobina mobile (20 mm in questo caso), cosa che in cambio richiede un magnete più grosso. In questo modo il diametro dell'altoparlante resta piccolo, ma si può muovere ancora abbastanza aria per poter offrire bassi di qualità.

    Kinda disappointing that they cheeped out with a ferrite magnet and not neodymium.

    Adam Minter - Replica

    What is the info regarding the woofer?

    Xx Xx - Replica

    Could you tell us the DC resistance of the voice coil?

    TIA

    deckard - Replica

    This guy manages to disassembly in a non-destructive way: https://youtu.be/3AnAy6HvlbI?t=634

    Thiago - Replica

    il suffit de chauffer doucement , pour séparer les éléments

    Fafa pinto - Replica

    Caution!!!
    This is not the way to open the lid.... There is an non destructive way look at Nic's Fix he has mastered it. https://www.youtube.com/watch?v=FfGiuh_Q... 7:52 in

    Peter Ekberg - Replica

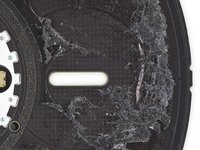
    • Dopo esserci aperti la strada a colpi di lama e di leva in questo altoparlante-fortezza, raggiungiamo l'ostacolo finale: un anello filettato.

    • Siamo portati a concludere che, a un certo punto, l'HomePod potesse essere svitato per separare il componente controllo/woofer dall'unità tweeter/alimentazione.

    • Ma non ci rimaniamo troppo male per aver buttato giù la porta: giudicando dall'adesivo presente sulla faccenda del tubo, le filettature non sono fatte per l'utente finale: questa cosa è stata chiusa con la colla.

    • Non sorprende che il prezzo delle riparazioni Apple sia pari all'80-85% di quello dell'intero dispositivo: non è così facile. Ma in ogni caso, se anche abbiamo sbagliato, condividete la magica procedura!

    Has anyone figured out a non destructive way inside? The fabric/mesh can be removed and reinstalled with out damage as can the brains, but there is no way I know of to access the speakers, power supply or amplifier board.

    Nicholas Ouimet - Replica

    @ouimetnick Someone did! See the update to Step 12, above.

    Jeff Suovanen -

    This guy manages to disassembly in a non-destructive way: https://youtu.be/3AnAy6HvlbI?t=634

    Thiago -

  13. Smontaggio HomePod: passo 14, immagine 1 di 3 Smontaggio HomePod: passo 14, immagine 2 di 3 Smontaggio HomePod: passo 14, immagine 3 di 3
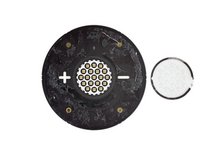
    • Lo strato successivo della nostra cipolla HomePod (o forse parfait?) È l'alimentazione in due parti, composta di un blocco interno che gestisce la conversione AC/DC e un anello esterno che distribuisce l'alimentazione a tutti gli otto speaker.

    • L'imponente hardware che gestisce la corrente alternata in ingresso è inondato di resina epossidica, probabilmente per impedire che le malefiche vibrazioni lo facciano a pezzi. L'alimentazione è inviata all'anello esterno tramite distanziali a vite conduttivi in stile MacBook Pro.

    How come you conclude “durability is not an issue” with a mofset GLUED, to a capacitor ?!

    How can you miss that ? This is why most electronic appliance fail after a few year.

    John Stewarts - Replica

    Judging from the appearance of the surface, the filling between the components is probably Silicone not Expoxy. Epoxy is avoided nowadays because of the toxic base components, difficult curing behaviour, bad flexibility after curing and limited thixotropy.

    Moritz Kaiser - Replica

    (For the uninitiated, like me): “thixotropy - the property of becoming less viscous when subjected to an applied stress.”

    jimwitte - Replica

    Could you tell us the value of the big main black colored capacitor above?

    @jstew that glue doesn’t hold anything down. It damps vibrations to prevent failure of the legs/solder joints.

    deckard - Replica

  14. Smontaggio HomePod: passo 15, immagine 1 di 3 Smontaggio HomePod: passo 15, immagine 2 di 3 Smontaggio HomePod: passo 15, immagine 3 di 3
    Attrezzo utilizzato in questo passaggio:
    Halberd Spudger
    $2.99
    Compra
    • Ed eccoci alla parte due dell'alimentazione, loStargate l'Halo l'anello di distribuzione dell'alimentazione, preso all'amo.

    • La parte esterna della nostra scheda di alimentazione intergalattica, ingombra di condensatori, ospita un MCU ARM STMicroelectronics STM32L051C8T7 a potenza ultrabassa.

    • Sull'altro lato, troviamo:

    • Amplificatore audio International Rectifier PowlRaudio 98-0431

    • 4350C Y01742 TWN

    • E, attorno al perimetro, sette amplificatori audio Analog Devices SSM35158 - si direbbe che siano gli amplificatori individuali per i tweeters!

    Stargate Halo

    They should have used this for some HomePod advertisement..

    jimwitte - Replica

  15. Smontaggio HomePod: passo 16, immagine 1 di 3 Smontaggio HomePod: passo 16, immagine 2 di 3 Smontaggio HomePod: passo 16, immagine 3 di 3
    • Stacchiamo a forza una piccola scheda dall'adesivo che la tiene aderente al cilindro e notiamo due chip ADC Conexant CX20810 ADC della Synaptics per il gruppo microfoni.

    • Non contenta, la scheda ha anche lei un proprio microfono, probabilmente il microfono a bassa frequenza per la calibrazione del woofer.

    • Questo microfono essenzialmente non fa che ascoltare l'output del woofer e, tramite una sofisticata elaborazione del segnale, regola con precisione il woofer per ottenere la miglior resa possibile e al tempo stesso mantiene in linea con le altre frequenze il livello dei bassi.

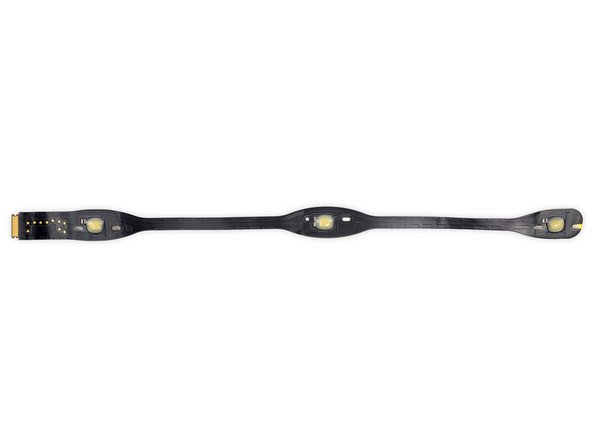
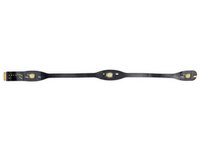
    • Torniamo al resto dei microfoni: sono alloggiati in due lunghe strisce da tre microfoni ciascuno. Ogni striscia è tenacemente incollata all'interno del case, con i microfoni posizionati su canali a forma di imbuto.

    Woofer mic probably does (real time) analog feedback to perform correction of nonlinear distortion. Not necessarily with DSP. AFAIK the first company to mass produce a product (subwoofer) with this feature was Velodyne in the 90s.

    deckard - Replica

    can you also tell mic is from which company?

    Shweta - Replica

  16. Smontaggio HomePod: passo 17, immagine 1 di 2 Smontaggio HomePod: passo 17, immagine 2 di 2
    • Tiriamo fuori dall'HomeBody un altro anello filettato e alla fine ecco Biancaneve e i sette tweeter, completi di rispettivi distanziali a vite conduttivi.

    • Giusto: questi distanziali dorati alimentano i tweeter.

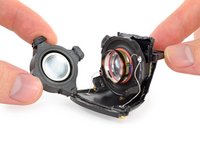
    • Dando un'occhiata a una delle uscite, ne ricaviamo cattive sensazioni. O forse è il tweeter che è nervoso.

    • La minuscola trombetta ripiegata che si trova davanti al tweeter è una tipica soluzione usata dai progettisti di sistemi audio per aumentare l'efficienza di un altoparlante e controllare la direzione del suono. È lo stesso concetto utilizzato nel grammofono.

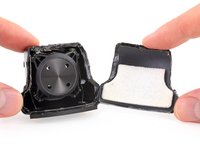
    • È ora di scatenare il cutter ultrasonico per stappare questa unità!

  17. Smontaggio HomePod: passo 18, immagine 1 di 2 Smontaggio HomePod: passo 18, immagine 2 di 2
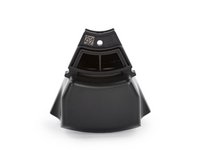
    • Una volta aperto il gruppo, possiamo osservare meglio il tweeter, con sfoghi e trombetta, che dà all'HomePod il suo sound "preciso".

    • Gli sfoghi sui lati del rocchetto della bobina mobile e i quattro fori nella parte posteriore del tweeter evitano che l'aria vada in pressione dietro la cupola del tweeter mentre questa si muove.

    • La riduzione della pressione evita che la cupola - e la musica - siano distorte mentre il tweeter si muove avanti indietro diverse migliaia di volte al secondo.

    • Per ora non abbiamo trovato alcuna traccia di tweeter in diamante... che cosa ha da dirci in merito, Dr. Geaves?

    Is this oil at the edge of a voice coil?

    Anton Akusok - Replica

    I think what you’re referring to might be the potting epoxy. The golden brown liquid-looking stuff on the coils?

    Ted -

    Also I’m baffled by a sentence in the post linked about diamond tweeters, what does “accurately reproducing audio above and beyond the limits of human hearing” even mean? Isn’t that a little paradoxical?

    Ted -

    I guess its for your dog who’s hearing is better than ours ;-}

    Dan -

    Maybe we have to update the adage “If a tree falls in a forest beyond the limits of human hearing, does it make a sound?” :P

    Sam Goldheart -

    the oil is probably ferrofluid to cool the tweeter and improve it’s magnetic properties

    ed - Replica

    Ohh, right that makes more sense… It would sound horrible if it was solid the way it’s so thick and uneven on the coil. Scratch what I said about “potting epoxy”

    Ted -

    You gotta wonder though, with the vents on the other side of the driver, doesn’t this mean that the ferrofluid would degrade that much more quickly? Maybe it’s only meant to be used for 5-7 years, which is reasonable for laptops, etc, but if I’m going to buy a speaker, I’d want to get one that sounds great, and keeps sounding great for a long time…

    Ted -

    There is no oil in that photo.

    Slab Riprock - Replica

    That is indeed ferrofluid. It doesn’t leak out because the magnetic field keeps it in place. Tweeter manufacturers have been using it for decades, and the tweeters live for decades.

    deckard - Replica

  18. Smontaggio HomePod: passo 19, immagine 1 di 1
    • Ed eccoci con tutti i pezzi di questa abitazione Siri.

    • Sapete come Apple si è lanciata in queste cose? Ci è sfuggito qualche concetto? Fatecelo sapere nei commenti, mentre ci raccomandiamo di guardare il nostro video dello smontaggio su YouTube.

    • È finalmente ora di dare un punteggio di riparabilità. Ci sono molti fattori positivi ma, dato che la procedura d'apertura non è davvero reversibile, ci comporteremo di conseguenza nel punteggio.

    Salut Apple,Je suis André!

    j’ai mon Home pad il s’allume mais il ne foctionne pas,ça arrive brusquement.que puis je faire?

    Andre Ejanuel - Replica

  19. Considerazioni Finali
    • L'HomePod è solido come un carro armato. La durata nel tempo non dovrebbe essere un problema.
    • La retina esterna, pur essendo in un pezzo solo, può essere staccata senza danneggiarla grazie a un malefico ma astuto cordino.
    • Tutti i fissaggi a vite sono della varietà standard Torx: nessuna fastidiosa vite antiapertura.
    • L'uso estremamente intelligente di distanziali a vite conduttivi evita la presenza di cataste di cavi tra gli strati multipli di componenti.
    • Adesivi molto tenaci bloccano la copertura dell'interfaccia touch, il gruppo microfoni, il piede di gomma e (più fastidioso di tutti) il principale punto di accesso in cima al dispositivo, che pure sembrava pensato per essere svitato senza particolari problemi.
    • Benché sembra che ci sia un metodo di accedere all'interno non distruttivo, noi non siamo riusciti a decodificarlo. Senza un manuale di riparazione, la posta di successo sono molto esili.
    Punteggio Riparabilità
    1
    Riparabilità 1 su 10
    (10 è il più facile da riparare)

Un ringraziamento speciale a questi traduttori:

en it

78%

Questi traduttori ci stanno aiutando ad aggiustare il mondo! Vuoi partecipare?
Inizia a tradurre ›

82 Commenti

Thanks guys, very interesting report!

Thomas Ungricht - Replica

The power cable is actually user removable and replaceable. You just have to pull on it *really* hard. https://www.youtube.com/watch?v=gjxILSOf...

Andrew spoelstra - Replica

Very good teardown! Thanks!

Juan Miguel - Replica

Apparently the AC cable is replaceable, yet not meant to be user-replaced: https://9to5mac.com/2018/02/10/remove-ho...

coffee - Replica

What is the DAC?

Wayne Wilmot - Replica

My best guess would be Digital to Analog Converter :)

Rok -

I can’t seem to understand how the sound from the tweeters comes out. The whole thing looks like a solid plastic tube except at the top where the woofer is. I see the tiny holes for the microphones, but how is sound dispersed from the tweeters?

Nick McConnell - Replica

I was wondering the same thing. I remember The Verge mentioning that the tweeters actually fire downwards and reflect off the table, but I can’t figure out how that works either…

Jared -

It does seem like they’re down firing out of the bottom. It’s just odd there’s so much “transparent mesh” all through the sides of the speaker and no sound actually coming from the sides.

Nick McConnell -

Look closely at the step 7, this thing has vents on the top and bottom

Gleb Kozinets -

In step 17 you can see two small trapezoid/squares at the bottom that match the vents in the tweeter, these are the only openings in the bottom (the test port being plugged by the rubber foot). I think Gleb is confusing the gaps in the top (to the left where the mesh is still attached) for the bottom.

Sam Goldheart -

“It does seem like they’re down firing out of the bottom. It’s just odd there’s so much “transparent mesh” all through the sides of the speaker and no sound actually coming from the sides.“

that is for the microphones…see the holes around the outside of the cylinder?

Benjamin David -

Did any previous Apple products use BMR speakers? There was some speculation with the 12” Macbook but I didn’t see confirmation.

tipoo - Replica

Outstanding Teardown. Impressive tech but whose drivers is Apple using - both for the woofer and the tweeters - any branding or codes that can be decoded?

Thank You for sacrificing that poor HomePod to satisfy our curiosity.

Nikon1 - Replica

It looks like if you had opened the top first you might have been able to release the draw string and not have to cut the mesh…

receng - Replica

Yep! We did mention that in the teardown. ;)

Jeff Suovanen -

But the guide still says that you have to cut it. Might want to edit that out.

Zachary Canoy -

Hi Zachary! This is not a guide, and isn’t meant to be used to repair a device. Teardowns are just meant to be a look at our first attempt to disassemble something, rather than explaining the best way to replace a part like a guide would. In the interest of giving readers a genuine look at our experience, we like to leave teardowns as they are, mistakes and all.

Adam O'Camb -

Step 15: Think you should look for what amplifiers drive the tweeters; looking closely at the underside of that PCB there are some parts labelled “SSM” - which may be Analog Devices IIRC?

Tony Doy - Replica

Good catch! Thanks for the tip. We’ve added a note to that step.

Jeff Suovanen -

I know ifixit wants everything to be repairable but I also want everything not to fall apart. Your comment about all the adhesive holding things in place is why I would consider getting this outrageous speaker. I suggest you add a second score for durability and give it at least a 9 until you can determine if the power cord can actually be removed and replaced for less than $300. I’d like to see how durable all the other speakers are. Just because you can repair them doesn’t mean everyone WANTS to have to repair them. Even if a couple of the tweeters fail, I’m sure you’ll still get some really good sound out of it.

plink53 - Replica

I’m with you on this…seeing how well this is constructed, tightened and sealed up to prevent the many vibrations from loosening things up, that, if not done that way, could easily have caused this to make vibration noises or break over time. This is some pretty ingenious engineering —hardware, and, from what I’ve read, software — if I could, I’d run out and buy a couple of these right now!

Benjamin David -

Do you recall the 1 TB Time Machine?  I thought that thing was built solid, but it lasted exactly one day past the warranty expiration date.  Failed due to a massive design flaw (no fan).  With that much power going to drive the huge magnet on that speaker, I doubt it will last.  The epoxy will solidify with no way for the heat to escape, then break apart after repeated use of playing music.  You may say air will flow through with the movement of the cone, but I don’t think it will be static enough to properly cool over repeated use.  That thing will break one day after the warranty expires.

John Schafer -

Thanks you very much !

I think, we must be take care of our HomePod.

Kanon Shinya Yagami - Replica

Would using a hack saw to open, pretty much basically make this un-repairable? I would think that would be a 0 for repairability

mcfarlandaaron1 - Replica

It gets 1 point for the few things you can get at non-destructively. It only gets 1 point because that’s a small fraction of the total system.

Dan Neely -

You guessed that the epoxy keeps the speaker from rattling its power supply apart, but it might just as likely prevent buzzin/rattling sound from vibrating parts , since this thing seems to be quite the power shaker.

WaltFrench - Replica

Is it really built like a tank? Wow!

junpei.futami - Replica

The idea that everything has to be repairable is utter nonsense and needs to go away. Just stop it with that. 99.9% of consumers cannot repair things, for gods’ sakes so many people don’t even know how to cook! The reason things are hard to repair these days is because of 3 main factors:

1) They would be more expensive to manufacture if they used lots of nice machine screws all over rather than glue. This cost would be passed to us.

2) If they were built weaker to make it easier to take apart, unless they are designed in a more expensive way, they would be less durable and in the case of this speaker, you’d hear buzzing and rattling noises after a while. No thanks.

3) Repairing would require detailed repair manuals, spare parts that are packaged for individual resale, logistics of all that resale. And out of millions how many need repair before outdated? Have you taken these facts into account? Easy to just want want want, how about think through what that desire actually entails and how complex it would be!

JRX16 - Replica

Horses for courses. I think 99.9% is way off. I have been tearing stuff apart since childhood and love to DIY. Curiosity is a huge factor. It does not always end well but iFixit has been invaluable and I consider it another tool in my repair kit! Another great job.

Troy Douglas Sutler III -

With respect, this is a ridiculous thing to say. You’re at a website called iFixIt. What do you THINK people care about here? If this were a random tech site, then sure— repairability is probably not a priority. But at a website dedicated specifically to repairing electronics… I think you’re in the wrong place, my friend.

Benjamin A -

This kind of attitude is why there are overflowing landfills, chemicals in our water, and plastic in our oceans. The unfortunate thinking of racing headlong toward disaster being averted by some new magic technology to reverse our foolish ways—or we’ll move to Mars—is a sad commentary on our society today.

1) When devices that are put together with screws already, and then glued or taped shut (iMac,) so as to avoid repair, 99.9% of the reason why is to force consumers to buy again.

2) No speakers I own cannot be repaired, and the drivers are easily more powerful than those on the HomePod.

3) Actually, this argument sounds like a direct plug for iFixit.com! Repairing isn’t for everyone, but many used to have this necessary skill and many still have an interest. Clearly, we are a consumer society who are not meant to be self-sufficient, lest our benevolent-overlord companies lose profit margins (aww, poor, sad Apple.) Planned obsolescence also goes against the very nature of we who would like to repair.

technicalmac -

I’m just tired of DIYers insisting that non-DIYers subsidize the extra cost of making everything repairable. If you want to repair something, figure out how to do it, but don’t ask everyone else to subsidize your tinkering hobby.

Benf -

Hey Benf! This isn’t just about hobbies and personal repairs! Every one of these devices will eventually need to be retired, either recycled and shredded, or put in a landfill. If the device is too hard open, it’s usually too hard to recycle, it’s not monetarily worth it to attempt it. That means the device, and all the manufacturing energy and materials are going to waste. Repairability means thinking about the full life of the device. Plenty of manufacturers are successfully building repairable devices—Apple included, with little visible cost to the user (Compare a Note8 $950 USD, score of 4, to an iPhone 8 Plus $800 USD, score of 6). Also as a note: I would guess that leaving the glue out of the threads is probably not a wild cost increase that requires customer subsidy.

Sam Goldheart -

Sam Lionheart, I agree with you. Sadly, I highly suspect the reason for the repair costs being as high as they are is because Apple won't even try to repair your old unit if it breaks. They'll just throw it in the bin and ship you a new one.

Anton -

It’d be fun to see how it is built!

FanMac - Replica

It’d be fun to see how it is built!

I wonder if Apple could be “persuaded” to do that - to make “assembly videos” for all to see? Or maybe - given that it’s Apple - for a 1.99 Apple iTunes purchase. $0.99 if you just want to see one, $2.99 gets you six, $9.99 gets you the whole lot. Not sure how many people they could get to pay once the novelty had warn of though.

jimwitte -

I’m really curious what was supposed to be on the unpopulated SMD slot on the back of the main board. Also, the shieldings on the side hasn’t been opened in the shot.

Yang Jackie - Replica

The tweeter firing direction is pretty clearly downward per the see-through picture on https://www.apple.com/homepod/

Tim Anderson - Replica

I do see that, just seems like such a small area (per image in step 7) for all the sound to come out compared to the size of the speaker, but I guess that’s part of the magic of getting the mics to work while sound is blaring.

Nick McConnell -

HF sound doesn’t need a big space, the wavelengths are quite short, so the tweets flowing out the bottom seems logical. The horns will control dispersion somewhat, and possibly add efficiency (not much really), plus essentially they are there to change the direction of the sound.

Also re: getting mics to work while sound is blaring, that’s the easiest part to conceive of how to do. Since the sound is digital and it knows what’s playing, it should possible to “subtract” that sound from the incoming waveforms from the mic(s) in real-time, so it can “hear” you no matter what is playing or how loud.

ed -

Nice job, really enjoyed your teardown! Will look forward to learning of Apples disassembly voodoo.

johnarer - Replica

You have it all wrong. There is no right to repair. Apple made it durable. JRX16, great comment. I find it far more dubious that a company that sells tools and repair knowledge is agitating for legislation that gives consumers repair rights than a company that uses adhesives to manufacture a durable and well made product. iFixit is the solution in search of a problem.

MojoFix - Replica

Just a random person on the internet here: I want to be able to repair stuff I buy.

Repairability is good for the environment.

Benjamin Grunmaurer -

I think you’re on the wrong website. This site exists for those of us who DO believe that there is a right to repair, and who DO put value in products that can be repaired easily, whether that’s by someone with some skill, or by a layman who doesn’t want to fork out 85% of the cost of his product again to get it fixed.

While it is absolutely your right to disagree with this view, you are the one on this site, looking at this teardown, of your own free will, so if you don’t put any stock in what this site, or it’s many users think, then you are more than welcome to go, buy your durable adhesive secured speaker and not worry about us. But, please keep those views to yourself as the other 99% of the users here would very much like to be able to repair our speakers.

- Also, just an aside, the repair information on this site is available for free.

Joe -

Repairability is good for the environment only if the number of people willing and able to do repairs is high enough to offset the greater materials cost of building something both durable and repairable. Repairability has a cost of its own that can’t be ignored.

I’m very skeptical that enough DIYers exist to offset the higher cost, but it’s not an issue of opinions but simply a factual question that requires research.

The other aspect to consider is that DIYers are asking non-DIYers to subsidize the extra cost for them of making a repairable device.

Benf -

2 unanswered questions: 1st, is the power supply designed to work anywhere in the world with Apple only needing to plugin a different power cable before they ship it off? 2nd, what is the make/model of the tweeter or did Apple make their own?

oldtech - Replica

A picture of a hacksaw, seriously? Why include a sensationalist picture of “hacking at the device to fix it”? That’s very misleading to those who miss the details that a hacksaw was NOT used. I understand that not everyone is going to have a sonic cutter; but that leads me to my next point…

iFixit was so rushed to get this article out on Monday that they just King Kong’ed their way into it without re-evaluating what was the correct way. Couldn’t you have heated the outer edge of the unit to loosen the glue on the thread of the sub? Couldn’t you have unglued the top to gain access to the draw string so that you didn’t have to cut the fiber mesh?

It sounds like the major complaint was use of adhesive everywhere; but I do not believe it is unreasonable to consider Apple would do that for a device that instead to have a high rate and amplitude of vibrations, like a multi-driver speaker.

People use these tear downs as guides for fixing their device. I hope iFixit redos this article with a more sane approach.

Eric Swanson - Replica

This is not, in any way, meant to be used as a guide. That’s clearly stated in the banner right at the top. ;) If someone decides to take a hacksaw to their HomePod, that’s on them. Regarding the glue, unfortunately there’s no way to see where it’s located or even that there’s glue at all until you have the thing open.

Jeff Suovanen -

iFixit explicitly states at the top of each of their tear-downs: “This teardown is not a repair guide.” I for one love the humor iFixit exhibits in their tear-downs. Maybe you should take a look at one or two others, you will see various forms of this humor reproduced throughout.

Caleb Baker -

I’ve got a bone to pick, and it’s possible there’s a logical explanation to this I’m not seeing. Why did this score a 1/10, but the Surface Laptop scored a 0/10. I’m pretty sure both of these were destroyed to disassemble them. I don’t want to cry “fan-boy” but I consider both of these absolutely non-self-repairable and both are overpriced for their respective category. !&&* you cannot even replace a single component on this, at least the surface adapter’s AC cord can be swapped for a non-us plug (or vice-versa).

schnabel45 - Replica

It had a few bits accessable without the hacksaw. They weren’t able to get at anything in the Surfacebook without cutting the fabric earning it an even worse score.

Dan Neely -

Great post! A question posed here rather than another site simply because there are smart folks here… Why are mics inside the unit being used to tune/modify the woofer? Why not instead do software-side processing before the sound is put out, based on analysis of the soundwave and clear understanding of the internal acoustics during hardware design? If anything, I would think once the sound is emitted from the speaker you might take into account external factors like specific room acoustics, or even air pressure(?) and then accordingly modify the sound. In that case, I’d think the mics are on the outside, not the inside. But what do I know.

Anthony McGhee - Replica

somehow the speaker/microphone combination reminds me of the motion-feedback speakers that Philips promoted in the mid 1970’s.

Michael Frank -

Seems to me that the 6 Mics listen to the outside through little tubes in the housing. They are glued over little openings, which can be seen in the second picture of step 7.

Christian -

> Why not [tune/modify the woofer] software-side processing before the sound is put out, based on analysis of the soundwave and clear understanding of the internal acoustics during hardware design?

Is that really possible though? The acoustics I presume (might) be affected by whether it's sitting on glass or wood (or hung from the ceiling?!), whether it's next to a wall, maybe air dynamics (pressure, humidity, etc). And then there's maybe a "random factor" - most of us here have probably seen plots of the famous Lorentz Attractor.

But then, what exactly does "tuning the ["sub"]woofer" even *mean*? I would assume identifying whether it's creating some frequency that's making a buzz with relation to the case/table/whatever, and getting rid of it. But is there anything else going on?

jimwitte -

I don’t understand the comments about products not being repairable.

There does not need to be a conflict between product lifetime, ease to repair. IFixit compared the HomePod to a tank. Well in fact you can repair tanks. And you can repair comparable speakers - for example the Sonos 3.

In the past, basically all speakers have been repaireable. And I haven’t heard “buzzing and rattling noises ” being a problem. Also with more easy to repair high-end connected speakers eg from Sonos or Raumfeld, rattling noise is not an issue.

I indeed believe it ultimately comes down to cost. Cheaper production. And not wanting to stock spare parts. Apple want to maximise their profit - which of course is their right. In fact that is the goal of every company, I guess. Even though a gross margin of ~40% or ~88,000,000,000 US$ should allow for adding a few screws.

Joking aside - I think we have a responsibility for our children, reducing waste, by products repairable and recyclable - for both glueing is not the best choice.

Oliver - Replica

There are pros and cons about product repairability against cost efficiency as well as build quality. We have seen the failure of modular phone (project Ara?) which is a clear indicator that modularity/repairability (since you can swap out any component) evidently not the best selling point. Consumer prefer a neat, smooth and well built product which doesn’t break when get dropped, bent when seated on than an average, highly repairable product. It’s just not ‘sexy’ to be repairable and we have to deal with it.

That aside, why do we want repairability in the first place? Actually we don’t… but the environment need it. Imagine top of the line product that is sold in number of 100 millions get depreciated and broken after 2-3 year because 1 hard to replace component is design to fail in that period of time (planned obsolescence), we’d get ~1,7 thousand tons of electronic waste every single year.

If you as a company design unrepairable stuff, step up your game with environmental responsibility.

cyber_lee91 -

Was anyone able to identify the maker of the microphones?

Claus Stetter - Replica

I want to know the MIC brand!!

Nao -

Great tear down!

Super informative and humorous!

Justin Armant - Replica

Very cool! Hopefully I will never buy one, so I will never need to fix it ;)

dave white - Replica

Personally, I believe it is everyone right and responsibility to be able to repair just as its their right not to do so if they choose. The point in question is choice. If wr are not given choice then hardware becomes more like software and is only ever leased. In my view a slippery slope designed simply to extract more money and condoning poor or inadequate design.

David Newton - Replica

A bit of an example from history on repairability …

The 1970s British TV manufacturers used to make fine TVs featuring a main chassis with daughter boards for the various bit and bobs - making them very repairable.

The Japanese manufacturers, e.g. Sony, competed making sets using as few boards as possible - not very repairable.

The British sets often experienced problems caused by issues associated with the various boards, those issues *required* repairs - which though easy to perform meant expensive engineer callouts and downtime!

There were, essentially, zero British TV manufacturers pretty soon, everyone wanted the cheaper, more reliable - yet less fixable - Japanese models!

YES repairability is GOOD, but surely not so if in achieving that repairability the kits becomes unreliable!

Guy - Replica

^ this ^

Funny that the Japanese were at first bashed for being unrepairable!

Ahmad Rahmati -

The argument against repairability has added weight for a high-quality speaker. You really don’t want anything inside to move that is not supposed to move, least you get vibrational resonances that can cause buzzes or distort the sound. And you want everything to stay put during many years of service under lots of good vibrations. That is a compelling reason to eschew easily removable covers and fasteners and go for lots of glue and epoxy. Sounds like the HomePod is built to last, but $39 for the second year AppleCare warrantee may be a wise investment.

reinhold - Replica

So I guess you should’ve started from the top-down instead of the bottom-up. Also, there are no pictures or view of the underside of the HomePod after you removed the access plate. Would like to have seen how the opening of the tweeters looked and how the sound is dispersed. I sort of see some fins or slots but that’s about it.

Player Onesix - Replica

Apple claim that the rings from HomePod on furniture is the result of oil coming out of the silicone pad on the bottom. Does that pad appear to actually be made of silicone? There should not be any oil in silicone to have such a reaction. Some variant of SEBS rubber could. That is the over mold found on power tools or a hacksaw handle.

Kemal NottaTurk - Replica

Replying to

[…]

The 1970s British TV manufacturers used to make fine TVs featuring a main chassis with daughter boards for the various bit and bobs - making them very repairable.

The Japanese manufacturers, e.g. Sony, competed making sets using as few boards as possible - not very repairable.

The British sets often experienced problems caused by issues associated with the various boards, those issues *required* repairs - which though easy to perform meant expensive engineer callouts and downtime!

There were, essentially, zero British TV manufacturers pretty soon, everyone wanted the cheaper, more reliable - yet less fixable - Japanese models!

YES repairability is GOOD, but surely not so if in achieving that repairability the kits becomes unreliable!

[http:///User/2379205/Guy|Guy]

“I repaired video games in the 1980s. The CRTs were from Japan and card based. Repair=card swap. This, the norm in commercial gear. Consumer gear is throw away.

Now the HomePod appears to be quite modular. One just can’t get into it in 15 seconds as it should be.

Kemal NottaTurk - Replica

so there is only a tiny opening in the case in front of each tweeter, which seem to block the sound, then they put a mesh around the case to let sound move freely …

francoborgo - Replica

Super random, specific question: where do you get replacement blades for your ultrasonic cutter??

Thx!

Greg - Replica

So far we’ve not had to replace the blade on our unit, but, for the one we have, these blades should fit the bill.

Sam Goldheart -

Did you manage to reassemble it back and working?

Denis DS - Replica

Great disassemble video. Could you re-assable it again and get it to work?

Jim - Replica

Anyone figure out a non destructible way into this? No easy truck discovered 2 years later?

Nicholas Ouimet - Replica

Is there a way I can get a replacement cable?

Ian Mak - Replica

Any way to remove the brains, microphone, and amp and output to external speakers? I’d like to 3D print a smaller enclosure that forgoes the homepod’s speakers and leverages in-wall or in-ceiling speakers.

Matthew Bial - Replica

Unlikely. The microphones in the enclosure work with the A8 to provide the best sound for the woofer and 7 tweeters. This is their adaptive EQ/spatial sound. This isn’t a dumb speaker like SONOS or regular Bluetooth speaker. If it didn’t have an adaptive EQ/Spatial sound, you probably could. What you are looking for is a HomePod mini with an AUX out jack, and they don’t exist. Closest thing is an AirPort Express, but it doesn’t have Siri or a touch surface. Basically Apple needs to make something like Amazon’s Echo Input device.

Nicholas Ouimet -

Hello everyone !  I am looking to buy power supply for HomePod.  Can you help me get one?  Thanks

Ihor - Replica

Hello

mine is 110V and I was travelling in Europe and there is 220V , Which part should be changed ?

Thanks

Mazen Helwani - Replica

Do you think it would be possible to disconnect the MEMS microphones to have a Homepod with all the features without any capability to listen?

Felancey MC - Replica

This teardown should be re-done to accommodate for the much more clever approach to open the box – without any destruction! I have rarely seen a more destructive teardown than this one...

Mischa Sprecher - Replica

Aggiungi Commento

Visualizza Statistiche:

Ultime 24 Ore: 23

Ultimi 7 Giorni: 146

Ultimi 30 Giorni: 716

Tutti i Tempi: 335,852