Salta al contenuto principale

Samsung Galaxy S8 Rear Camera Bezel Replacement

Cosa ti serve

  1. Samsung Galaxy S8 Rear Camera Bezel Replacement, Back Glass Assembly: passo 1, immagine 1 di 1
    • Opening your phone will compromise its waterproof seals. Have replacement adhesive ready before you proceed, or take care to avoid liquid exposure if you reassemble your phone without replacing the adhesive.

    • Heat an iOpener and apply it to a long edge of the S8 for about 2 minutes.

    • You may need to reheat and reapply the iOpener several times to get the phone warm enough. Follow the iOpener instructions to avoid overheating.

    • A hair dryer, heat gun, or hot plate may also be used, but be careful not to overheat the phone—the OLED display and internal battery are both susceptible to heat damage.

    • As you're waiting for the adhesive to soften, move on and read the following step to get an idea of where to pry.

  2. Samsung Galaxy S8 Rear Camera Bezel Replacement: passo 2, immagine 1 di 2 Samsung Galaxy S8 Rear Camera Bezel Replacement: passo 2, immagine 2 di 2
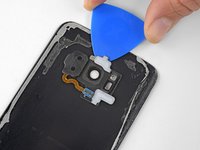
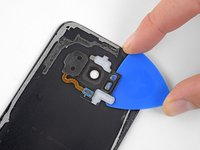
    • In the following steps you will be cutting through the adhesive around the edge of the rear glass panel.

    • The adhesive on the rear case is laid out as seen in the first image.

    • The prying pattern as seen from the outside of the phone is as follows:

    • Thick portions of adhesive

    • Thin areas of adhesive

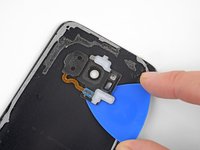
    • Avoid prying here, to protect the fingerprint sensor.

  3. Samsung Galaxy S8 Rear Camera Bezel Replacement: passo 3, immagine 1 di 3 Samsung Galaxy S8 Rear Camera Bezel Replacement: passo 3, immagine 2 di 3 Samsung Galaxy S8 Rear Camera Bezel Replacement: passo 3, immagine 3 di 3
    • Once the back panel is warm to the touch, apply a suction cup as close to the heated edge of the phone as you can while avoiding the curved edge.

    • The suction cup will not make a good seal on the curved portion of the glass.

    • If the phone's back cover is cracked, the suction cup may not stick. Try lifting it with strong tape, or superglue the suction cup in place and allow it to cure so you can proceed.

    • Lift on the suction cup, and insert an opening pick under the rear glass.

    • Due to the curved glass, you will be pushing up, rather than inserting parallel to the plane of the phone.

  4. Samsung Galaxy S8 Rear Camera Bezel Replacement: passo 4, immagine 1 di 1
    • Once you have the tool firmly inserted into the glass, reheat and reapply the iOpener to soften the adhesive.

  5. Samsung Galaxy S8 Rear Camera Bezel Replacement: passo 5, immagine 1 di 2 Samsung Galaxy S8 Rear Camera Bezel Replacement: passo 5, immagine 2 di 2
    • Slide the opening pick down the side of the phone, separating the adhesive.

    • Go slowly so that the tool doesn't slip out of the seam. If cutting becomes difficult, reheat and reapply the iOpener.

  6. Samsung Galaxy S8 Rear Camera Bezel Replacement: passo 6, immagine 1 di 3 Samsung Galaxy S8 Rear Camera Bezel Replacement: passo 6, immagine 2 di 3 Samsung Galaxy S8 Rear Camera Bezel Replacement: passo 6, immagine 3 di 3
    • Repeat the previous heating and cutting procedure for the remaining three sides of the phone.

    • Leave an opening pick on each side as you continue to the next to prevent the adhesive from resealing.

  7. Samsung Galaxy S8 Rear Camera Bezel Replacement: passo 7, immagine 1 di 2 Samsung Galaxy S8 Rear Camera Bezel Replacement: passo 7, immagine 2 di 2
    • The fingerprint sensor cable connects the phone to the rear glass near the main camera. The cable is very short and should disconnect as the rear glass is removed.

    • As you lift the glass, peek in to be sure the orange cable with a blue connector has disconnected.

    • Use the opening picks to slice through any remaining adhesive and open the phone slightly.

    • If the fingerprint sensor cable seems snagged or stays taut do not open the phone any further. Disconnect the connector with the point of a spudger before proceeding.

    • During reassembly, in order to reconnect the fingerprint sensor cable, first angle the back cover into position until the cable connector lines up perfectly over its socket. Then, use the flat end of your spudger to gently snap the connector into place by pressing it straight down.

    • Remove the glass from the phone.

  8. Samsung Galaxy S8 Rear Camera Bezel Replacement: passo 8, immagine 1 di 1
    • To install a new back cover:

    • Use tweezers to peel away any remaining adhesive from the phone's chassis. Then clean the adhesion areas with high concentration isopropyl alcohol (at least 90%) and a lint-free cloth to prep the surface for the new adhesive.

    • Peel the adhesive backing off of the new rear glass, carefully line up one edge of the glass against the phone chassis, and firmly press the glass onto the phone.

    • Follow this guide to reinstall the old back cover, or to install a back cover without pre-installed adhesive.

    • Be sure to turn on your phone and test your repair before installing new adhesive and resealing the phone.

    • If desired, you may reinstall the back cover without replacing the adhesive. Remove any large chunks of adhesive that might prevent the back cover from sitting down flush. After installation, heat the back cover and apply pressure to secure it. It won't be waterproof, but the glue is usually more than strong enough to hold.

    • You may also need to transfer the camera bezel to your new part. If that's the case, follow our camera bezel replacement guide.

  9. Samsung Galaxy S8 Rear Camera Bezel Replacement, Rear Camera Bezel: passo 9, immagine 1 di 1
    • Prepare an iOpener and apply it to the rear camera bezel at the top of the rear glass for at least two minutes.

    • You may need to reheat and reapply the iOpener several times to get the phone warm enough. Follow the iOpener instructions to avoid overheating.

    • A hair dryer, heat gun, or hot plate may also be used, but be careful not to overheat and melt any plastic components.

  10. Samsung Galaxy S8 Rear Camera Bezel Replacement: passo 10, immagine 1 di 3 Samsung Galaxy S8 Rear Camera Bezel Replacement: passo 10, immagine 2 di 3 Samsung Galaxy S8 Rear Camera Bezel Replacement: passo 10, immagine 3 di 3
    • Insert an opening pick under top edge of the rear camera bezel.

    • Slide the opening pick around the edges of the camera bezel to separate the adhesive securing it to the rear glass.

    • Do not pry on the side that sits against the fingerprint sensor.

  11. Samsung Galaxy S8 Rear Camera Bezel Replacement: passo 11, immagine 1 di 1
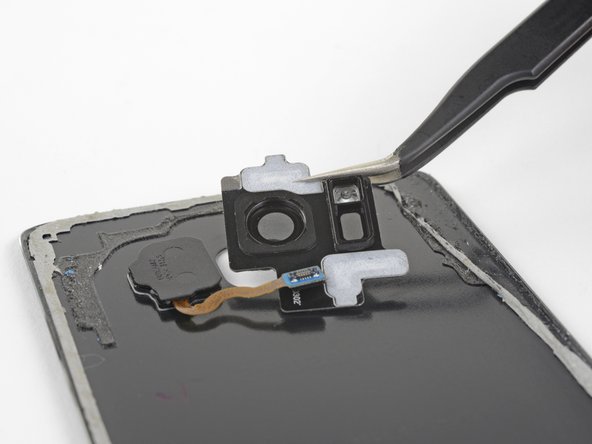
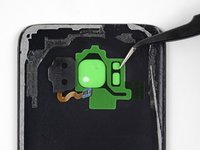
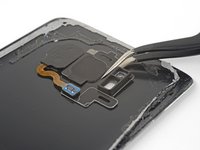
    • Use an opening pick or tweezers to lift the camera bezel away from the rear glass.

    • Take care to avoid catching the camera bezel on the fingerprint cable as you remove it.

    • If you encounter resistance, use an opening pick to cut any remaining adhesive.

  12. Samsung Galaxy S8 Rear Camera Bezel Replacement: passo 12, immagine 1 di 1
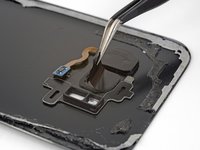
    • Use a spudger to scrape away any adhesive where the camera bezel adheres to the rear glass.

    • Clean the adhesion area with high concentration isopropyl alcohol (at least 90%) and a lint-free cloth. Swipe in one direction only, not back and forth. This will help prep the surface for the new adhesive.

  13. Samsung Galaxy S8 Rear Camera Bezel Replacement: passo 13, immagine 1 di 2 Samsung Galaxy S8 Rear Camera Bezel Replacement: passo 13, immagine 2 di 2
    Attrezzo utilizzato in questo passaggio:
    Tesa 61395 Tape
    $5.99
    Compra
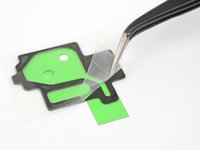
    • Peel away the clear backing from the camera bezel adhesive strip, exposing the adhesive on one side.

    • Very carefully line up the rear camera and flash cutouts on inside of the rear glass with the same cutouts on the adhesive strip.

    • Set the adhesive strip on the rear glass and make sure it does not overlap the edges of the camera or flash cutouts at all.

    • Use your fingers or the flat edge of a spudger to press the adhesive down so that it bonds to the glass.

    • If your part did not come with pre-cut adhesive, use high-bond double-sided tape, such as Tesa 61395, or pieces of a pre-cut adhesive sheet to secure the camera bezel.

  14. Samsung Galaxy S8 Rear Camera Bezel Replacement: passo 14, immagine 1 di 1
    • Peel the green backing away from the adhesive strip. Make sure the adhesive does not come off of the glass with the backing.

  15. Samsung Galaxy S8 Rear Camera Bezel Replacement: passo 15, immagine 1 di 2 Samsung Galaxy S8 Rear Camera Bezel Replacement: passo 15, immagine 2 di 2
    • Line up the rear camera bezel with the cutouts on the rear glass, then set it down on the adhesive. Make sure the side with the camera lens cover protruding is facing the rear glass.

    • Make sure the camera lens cover is completely seated in the rear glass's camera cutout so that the bezel lays flat against the glass.

    • Use your fingers to apply even pressure to the bezel for 30 seconds to make sure the adhesive bonds properly.

    • Right before you install the rear glass and seal the phone, peel off the black backing covering the camera glass.

Conclusione

To reassemble your device, follow the above steps in reverse order.

After you've completed the repair, follow this guide to test your repair.

Take your e-waste to an R2 or e-Stewards certified recycler.

Repair didn’t go as planned? Check out our Answers community for troubleshooting help.

Altre 3 persone hanno completato questa guida.

Adam O'Camb

Membro da: 04/11/15

194.899 Reputazione

416 Guide realizzate

0 Commenti

Aggiungi Commento

Visualizza Statistiche:

Ultime 24 Ore: 2

Ultimi 7 Giorni: 8

Ultimi 30 Giorni: 30

Tutti i Tempi: 4,178