
Sostituzione adesivo schermo Samsung Galaxy S8

Introduzione
Vai al passo 1Segui questa guida per sostituire gli adesivi dello schermo del Galaxy S8. Questa procedura è pensata per essere usata insieme alla guida alla sostituzione dello schermo del Galaxy S8.
Cosa ti serve
Ricambi

Strumenti


Mostra di più…
-
-
Rimuovi ogni traccia di adesivo e sporco dalla scocca del telefono. Pulisci le aree di incollaggio con alcol isopropilico ad alta concentrazione (superiore al 90%) e un panno privo di lanugine.
-
Tira fuori le strisce adesive e disponile per farti un'idea di dove andranno.
-
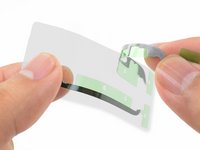
Stacca la protezione trasparente in plastica dalla grande striscia adesiva pretagliata, esponendo una delle facce dell'adesivo.
-
-
-
Allinea con cura uno dei bordi dell'adesivo al bordo corrispondente della scocca del telefono.
-
Appoggia l'adesivo sulla scocca senza premerlo.
-
Se l'adesivo non è allineato correttamente, staccalo con delicatezza.
-
Una volta che l'adesivo è allineato, usa le dita per premerlo sulla scocca.
-
-
-
-
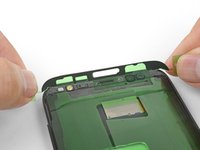
Stacca una delle strisce adesive terminali dalla protezione in plastica trasparente.
-
Afferra la striscia dalle due linguette verdi alle estremità e allineala con la scocca del telefono.
-
Appoggia l'adesivo sul telefono senza premere. Accertati che tutti gli intagli siano allineati correttamente con i punti corrispondenti sulla scocca.
-
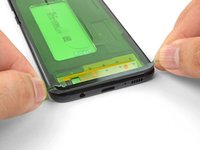
Una volta che l'adesivo è allineato, premilo con le dita per bloccarlo in posizione.
-
Ripeti la procedura per la striscia adesiva rimasta.
-
-
-
Continua a rimontare il tuo dispositivo finché non sei pronto ad attaccare lo schermo.
-
Stacca e rimuovi la protezione in plastica verde da tutte le strisce adesive per esporre l'adesivo dalla parte dello schermo.
-
Allinea lo schermo sulla parte superiore dell'adesivo.
-
Fissa l'adesivo attorno a tutto il perimetro del telefono premendolo con le dita.
-
Applica alcuni libri pesanti sulla parte superiore dello schermo per un'ora per favorire un buon incollaggio.
-


Segui questo link per ritornare alla guida alla sostituzione dello schermo del Galaxy S8.
Segui questo link per ritornare alla guida alla sostituzione dello schermo del Galaxy S8.
Annulla: non ho completato questa guida.
Altre 23 persone hanno completato questa guida.
Un ringraziamento speciale a questi traduttori:
100%


Questi traduttori ci stanno aiutando ad aggiustare il mondo! Vuoi partecipare?
Inizia a tradurre ›


5 Commenti
My set of adhesive strips were a mirror image of these pictures, meaning the strips when solely attached to the green plastic liner were arranged to adhere to the back cover, not onto the phone! This is likely a production issue with the green plastic liner and clear plastic backing being swapped. Like in these pictures here, the seal strips stay aggressively with the green plastic liner upon pealing off the clear plastic liner; however, they were then an incorrect mirror image when trying to position then to the phone. This forced me to painstakingly use scotch tape the position and secure edges of the green plastic to the phone first (sticky side of strips facing up), and then lower the back cover down onto the phone, to adhere the strips to the back cover first. Then, lift off the back cover to removed the green liner, exposing adhesive to apply to the phone-side. Trust me, I didn’t install the strips upside down, or mirrored. This is just the way all my strips came, and there was no other workaround.
Hi Kevin,
First, I’m sorry to hear of your troubles! I’m glad you came up with a system to get the adhesive on. Very ingenious!
I looked into this issue and found that the adhesive you got is correct. Unlike the screen adhesive, which should be applied to the frame first, the back cover adhesive should be applied to the back cover first. Unfortunately, we don’t have any explicit guides for the back cover adhesive. However, I will edit the device guides to clarify that point.
Thanks for bringing this observation up!
Thank you for the rapid response, Arthur. You’re very welcome. I presume IFixIt sources these strips from a common supplier, also serving competitors. These multi-piece strips have very fine hole, notch, and angular details demanding a level of placement precision not easily achievable by adhering them on the back cover first — especially if intended to restore a level of water resistance. Ifitit stands out above it’s competitors, as the kit was excellent. It might further differentiate itself by provided a template to nest into the back cover first, creating a guide. Again, thank you for your product and support. Excellent.
I will keep your feedback in mind about the template. As for water resistance, replacing the back cover adhesive will unfortunately still compromise the water resistance, unless you use an adhesive press.
Ön cam değişimi için de bir yazı yazarmsınız