Salta al contenuto principale

Samsung Galaxy A15 Battery Replacement

Cosa ti serve

  1. Samsung Galaxy A15 Battery Replacement, Prepare the phone for disassembly: passo 1, immagine 1 di 3 Samsung Galaxy A15 Battery Replacement, Prepare the phone for disassembly: passo 1, immagine 2 di 3 Samsung Galaxy A15 Battery Replacement, Prepare the phone for disassembly: passo 1, immagine 3 di 3
    • Let the phone's battery drain below 25% before starting this repair. A charged lithium-ion battery may catch fire if damaged.

    • Unplug all cables and completely power off the phone.

    • Press and hold the power and volume down buttons at the same time to bring up the shutdown menu.

  2. Samsung Galaxy A15 Battery Replacement, Heat the right edge: passo 2, immagine 1 di 1
    • Heat an iOpener and apply it to the right edge of the back cover for two minutes.

    • A hair dryer may also be used, but be careful not to overheat the phone—the display, internal battery, and plastic back are susceptible to heat damage. The phone should be just too hot to touch comfortably.

  3. Samsung Galaxy A15 Battery Replacement: passo 3, immagine 1 di 1
    • While you're waiting for the adhesive to soften, here is some useful information:

    • There's adhesive securing the back cover around the perimeter of the frame.

    • There is an additional layer of adhesive towards the bottom of the phone. Apart from this area, you should not be deeper than 4 mm from the edge.

  4. Samsung Galaxy A15 Battery Replacement, Insert an opening pick: passo 4, immagine 1 di 3 Samsung Galaxy A15 Battery Replacement, Insert an opening pick: passo 4, immagine 2 di 3 Samsung Galaxy A15 Battery Replacement, Insert an opening pick: passo 4, immagine 3 di 3
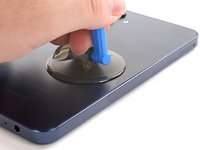
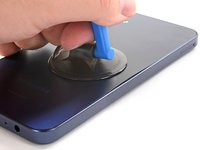
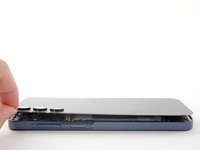
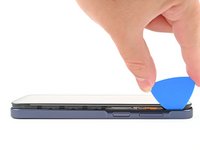
    • Apply a suction handle to the back cover, as close to the center of the right edge as possible.

    • Pull up on the suction handle with strong, steady force to create a gap between the cover and the frame.

    • If you have trouble, apply more heat to further soften the adhesive.

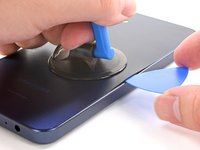
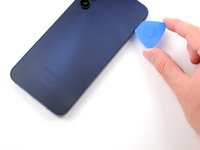
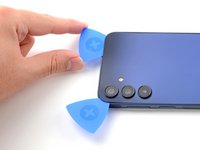
    • Insert an opening pick into the gap.

  5. Samsung Galaxy A15 Battery Replacement, Slice the adhesive: passo 5, immagine 1 di 3 Samsung Galaxy A15 Battery Replacement, Slice the adhesive: passo 5, immagine 2 di 3 Samsung Galaxy A15 Battery Replacement, Slice the adhesive: passo 5, immagine 3 di 3
    • Slide the opening pick along the right edge between the back cover and the frame to slice through the adhesive.

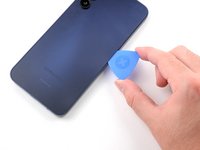
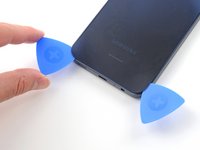
    • Leave the opening pick in the bottom right corner to keep the adhesive from resealing.

  6. Samsung Galaxy A15 Battery Replacement: passo 6, immagine 1 di 1
    • Reheat your iOpener and apply it to the bottom of the back cover for two minutes.

  7. Samsung Galaxy A15 Battery Replacement: passo 7, immagine 1 di 3 Samsung Galaxy A15 Battery Replacement: passo 7, immagine 2 di 3 Samsung Galaxy A15 Battery Replacement: passo 7, immagine 3 di 3
    • Insert another opening pick in the bottom right corner and slide it along the bottom edge to slice through the adhesive.

    • Leave this opening pick in the bottom left edge to prevent the adhesive from resealing.

  8. Samsung Galaxy A15 Battery Replacement: passo 8, immagine 1 di 1
    • Reheat your iOpener and apply it to the left side of the back cover for two minutes.

  9. Samsung Galaxy A15 Battery Replacement: passo 9, immagine 1 di 3 Samsung Galaxy A15 Battery Replacement: passo 9, immagine 2 di 3 Samsung Galaxy A15 Battery Replacement: passo 9, immagine 3 di 3
    • Insert another opening pick in the bottom left corner and slide it along the left edge to slice through the adhesive.

    • Leave this opening pick in the top left corner to prevent the adhesive from resealing.

    • Only insert the pick up to 4 mm deep to avoid damaging the rear cameras or flash.

  10. Samsung Galaxy A15 Battery Replacement: passo 10, immagine 1 di 1
    • Reheat your iOpener and apply it to the top of the back cover for two minutes.

  11. Samsung Galaxy A15 Battery Replacement: passo 11, immagine 1 di 2 Samsung Galaxy A15 Battery Replacement: passo 11, immagine 2 di 2
    • Insert another opening pick in the top left corner at the same depth and slide it along the top edge to slice through the adhesive.

    • Leave this opening pick in the top right corner to prevent the adhesive from resealing.

  12. Samsung Galaxy A15 Battery Replacement, Unfasten the camera clips: passo 12, immagine 1 di 3 Samsung Galaxy A15 Battery Replacement, Unfasten the camera clips: passo 12, immagine 2 di 3 Samsung Galaxy A15 Battery Replacement, Unfasten the camera clips: passo 12, immagine 3 di 3
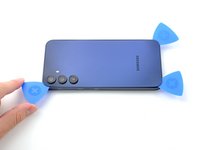
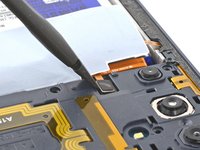
    • Insert an opening pick along the top edge of the phone and twist it gently to unfasten the camera clips.

    • Slide the opening pick around the edge of the camera modules to unfasten the remaining camera clips.

    • Only insert the pick up to 4 mm to avoid damaging the rear cameras or flash.

  13. Samsung Galaxy A15 Battery Replacement, Slice remaining adhesive: passo 13, immagine 1 di 3 Samsung Galaxy A15 Battery Replacement, Slice remaining adhesive: passo 13, immagine 2 di 3 Samsung Galaxy A15 Battery Replacement, Slice remaining adhesive: passo 13, immagine 3 di 3
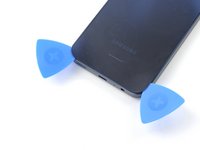
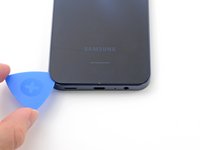
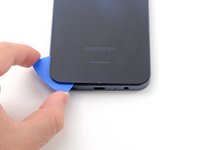
    • Once the adhesive around the edges is loose, insert an opening pick deeper into the bottom edge from the bottom left corner.

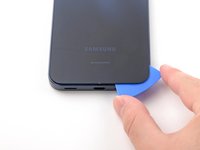
    • Slide the pick deeper into the phone across the bottom edge, slicing the remaining adhesive.

  14. Samsung Galaxy A15 Battery Replacement, Remove the back cover: passo 14, immagine 1 di 3 Samsung Galaxy A15 Battery Replacement, Remove the back cover: passo 14, immagine 2 di 3 Samsung Galaxy A15 Battery Replacement, Remove the back cover: passo 14, immagine 3 di 3
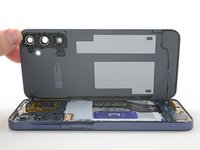
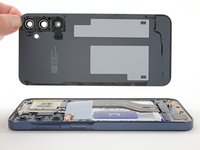
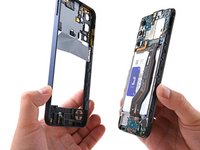
    • Lift and remove the back cover.

    • During reassembly:

    • This is a good point to power on the phone and test all functions before sealing it up. Be sure to power the phone back down completely before you continue working.

    • Remove any adhesive chunks with a pair of tweezers or your fingers. Apply heat and isopropyl alcohol (90% or greater) if you're having trouble removing the adhesive.

    • If you're using custom-cut adhesives, follow this guide.

    • If you're using double-sided tape, follow this guide.

  15. Samsung Galaxy A15 Battery Replacement, Remove the SIM tray: passo 15, immagine 1 di 3 Samsung Galaxy A15 Battery Replacement, Remove the SIM tray: passo 15, immagine 2 di 3 Samsung Galaxy A15 Battery Replacement, Remove the SIM tray: passo 15, immagine 3 di 3
    Attrezzo utilizzato in questo passaggio:
    iFixit Precision 4 mm Screwdriver Bit
    $2.99
    • Insert a SIM card eject tool, bit, or a straightened paperclip into the hole on the SIM tray, located towards the top of the phone on the left edge.

    • Press in firmly to eject the tray and remove it.

  16. Samsung Galaxy A15 Battery Replacement, Remove the frame screws: passo 16, immagine 1 di 1
    • Remove the fifteen 4 mm-long screws connecting the frame to the chassis.

  17. Samsung Galaxy A15 Battery Replacement, Disconnect the fingerprint button: passo 17, immagine 1 di 2 Samsung Galaxy A15 Battery Replacement, Disconnect the fingerprint button: passo 17, immagine 2 di 2
    • Use the flat end of a spudger to pry up and disconnect the fingerprint button press connector from the motherboard.

  18. Samsung Galaxy A15 Battery Replacement, Unfasten the frame clips: passo 18, immagine 1 di 3 Samsung Galaxy A15 Battery Replacement, Unfasten the frame clips: passo 18, immagine 2 di 3 Samsung Galaxy A15 Battery Replacement, Unfasten the frame clips: passo 18, immagine 3 di 3
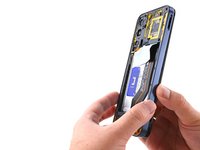
    • Flip the phone over so the screen is facing up.

    • Insert an opening pick between the screen and the SIM card tray cutout to form a gap between the frame and the phone.

    • Slide the opening pick down the left edge of the device to unfasten the frame clips.

  19. Samsung Galaxy A15 Battery Replacement: passo 19, immagine 1 di 3 Samsung Galaxy A15 Battery Replacement: passo 19, immagine 2 di 3 Samsung Galaxy A15 Battery Replacement: passo 19, immagine 3 di 3
    • Continue sliding the opening pick around the perimeter of the phone until all of the clips are unfastened.

    • If the opening pick comes out of the phone, re-insert it at the last unfastened corner.

  20. Samsung Galaxy A15 Battery Replacement, Remove the frame: passo 20, immagine 1 di 2 Samsung Galaxy A15 Battery Replacement, Remove the frame: passo 20, immagine 2 di 2
    • Pull the frame straight off of the phone.

  21. Samsung Galaxy A15 Battery Replacement, Disconnect the battery: passo 21, immagine 1 di 2 Samsung Galaxy A15 Battery Replacement, Disconnect the battery: passo 21, immagine 2 di 2
    • Use the flat end of a spudger to lift up and disconnect the battery press connector from the motherboard.

  22. Samsung Galaxy A15 Battery Replacement, Disconnect the interconnect cable: passo 22, immagine 1 di 2 Samsung Galaxy A15 Battery Replacement, Disconnect the interconnect cable: passo 22, immagine 2 di 2
    • The connector labeled "OCTA" is not connected to the board but rather the display cable connector. Make sure you disconnect the connectors from each other.

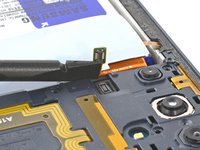
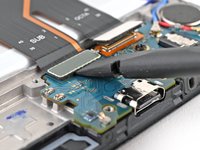
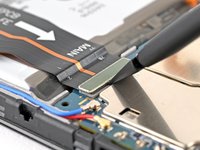
    • Insert the flat end of a spudger under the overhang of the top "OCTA" cable connector.

    • Pry up the top connector away from the bottom one until they're disconnected.

  23. Samsung Galaxy A15 Battery Replacement: passo 23, immagine 1 di 2 Samsung Galaxy A15 Battery Replacement: passo 23, immagine 2 di 2
    • Use the flat end of a spudger to pry up the "SUB" connector from the daughterboard and disconnect it.

  24. Samsung Galaxy A15 Battery Replacement: passo 24, immagine 1 di 2 Samsung Galaxy A15 Battery Replacement: passo 24, immagine 2 di 2
    • Use the flat end of a spudger to pry up the "MAIN" connector from the motherboard and disconnect it.

  25. Samsung Galaxy A15 Battery Replacement, Remove the interconnect cable: passo 25, immagine 1 di 2 Samsung Galaxy A15 Battery Replacement, Remove the interconnect cable: passo 25, immagine 2 di 2
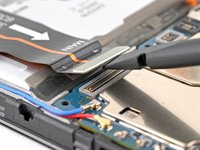
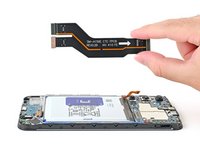
    • Pick up the interconnect cable and remove it from the phone.

  26. Samsung Galaxy A15 Battery Replacement, Peel up the pull tabs: passo 26, immagine 1 di 2 Samsung Galaxy A15 Battery Replacement, Peel up the pull tabs: passo 26, immagine 2 di 2
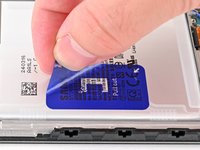
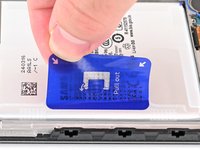
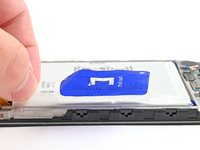
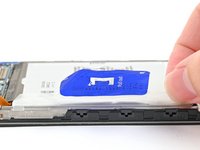
    • Peel up the blue battery pull tab until you can grab it with your fingers.

  27. Samsung Galaxy A15 Battery Replacement: passo 27, immagine 1 di 3 Samsung Galaxy A15 Battery Replacement: passo 27, immagine 2 di 3 Samsung Galaxy A15 Battery Replacement: passo 27, immagine 3 di 3
    • Use your fingers to peel the two small tabs from the top and bottom corners of the battery's left edge.

    • If these tabs aren't fully separated, you won't be able to lift the battery in the next step.

  28. Samsung Galaxy A15 Battery Replacement, Separate the battery adhesive: passo 28, immagine 1 di 2 Samsung Galaxy A15 Battery Replacement, Separate the battery adhesive: passo 28, immagine 2 di 2
    • Take care not to crease or bend the battery—it can leak dangerous chemicals and/or catch fire.

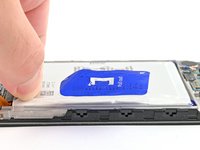
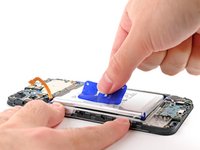
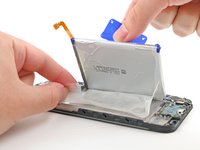
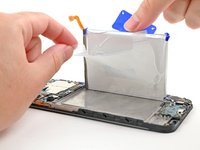
    • With one hand, fold the two upper and lower tabs out of the way of the battery and firmly hold down the frame.

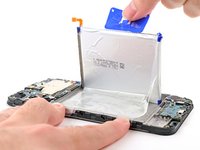
    • Pull up on the blue battery pull tab with strong, steady force until the battery is separated from its adhesive in the phone.

    • If the battery doesn't budge, apply a few drops of isopropyl alcohol (90% or greater) beneath the battery, wait a few minutes, and try again.

  29. Samsung Galaxy A15 Battery Replacement, Remove the battery adhesive: passo 29, immagine 1 di 2 Samsung Galaxy A15 Battery Replacement, Remove the battery adhesive: passo 29, immagine 2 di 2
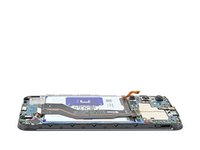
    • Completely peel off the remaining battery adhesive attached to the frame of the phone.

  30. Samsung Galaxy A15 Battery Replacement, Remove the battery: passo 30, immagine 1 di 1
    • Remove the battery and its film.

Conclusione

Compare your new replacement part to the original part—be sure to remove adhesive backings from the new part before installing.

To reassemble your device, follow these instructions in reverse order.

For optimal performance, calibrate your newly installed battery: Charge it to 100% and keep charging it for at least two more hours. Then use your phone until it shuts off due to low battery and won't turn back on. Finally, charge it uninterrupted to 100%.

Repair didn’t go as planned? Try some basic troubleshooting, or ask our Answers community for help.

Altre 10 persone hanno completato questa guida.

Nick Schultz

Membro da: 03/24/24

36.887 Reputazione

224 Guide realizzate

Team

iFixit Membro di iFixit

Staff

123 Membri

23.603 Guide realizzate

1Commento della guida

In deutsch wäre toll

Blacky 06 - Replica

Aggiungi Commento

Visualizza Statistiche:

Ultime 24 Ore: 16

Ultimi 7 Giorni: 105

Ultimi 30 Giorni: 506

Tutti i Tempi: 8,101