Salta al contenuto principale
Unisciti alla Community delle riparazioni - Crea un account
Samsung Epix LCD Display Replacement

Samsung Epix LCD Display Replacement

Mark Wyse

Mark Wyse e 8 altri collaboratori

Ultimo aggiornamento il 5 lug 2023

Nessuna stima
Moderato
Pallini!
Introduzione Migliore
Dettagli Mancanti

Introduzione

Vai al passo 1

This guide shows you how to access the LCD display inside your phone.

Cosa ti serve

Strumenti

  • Phillips #00 Screwdriver
    Phillips #00 Screwdriver
  • iFixit Opening Tool
    iFixit Opening Tool
  • Spudger
    Spudger

Mostra di più…

  1. Samsung Epix LCD Display Replacement, Battery: passo 1, immagine 1 di 1
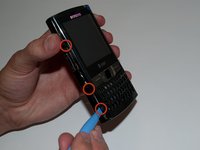
    • Just below the phone's camera, press the button and hold it

    • While the button is held down, slide the back panel off to remove it completely.

  2. Samsung Epix LCD Display Replacement: passo 2, immagine 1 di 1
    • Grasp the bottom corners of the battery with two fingers and gently lift.

    • Gently lift the battery and remove it from the phone.

  3. Samsung Epix LCD Display Replacement, LCD Display: passo 3, immagine 1 di 1
    • Remove the rubber screw cover in the top left corner by prying upwards with an opening tool.

  4. Samsung Epix LCD Display Replacement: passo 4, immagine 1 di 1
    • Use a Phillips #00 screwdriver to remove the six screws on the back of the phone.

    • The upper right screw is 4.5 mm and the others are 6.5 mm.

  5. Samsung Epix LCD Display Replacement: passo 5, immagine 1 di 2 Samsung Epix LCD Display Replacement: passo 5, immagine 2 di 2
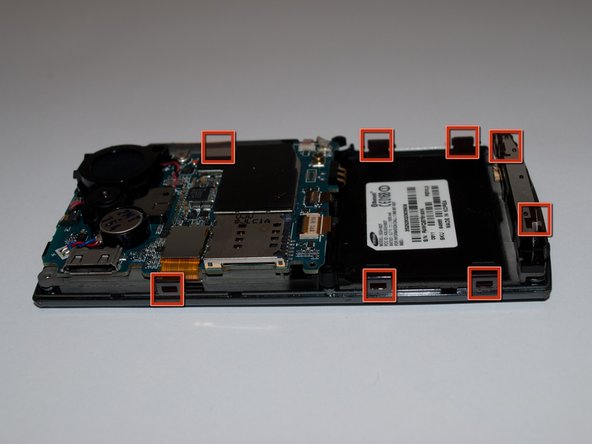
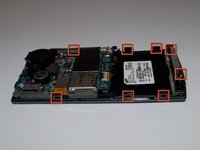
    • Slide the opening tool along the seam on the side of the phone and turn it slightly to unhook the eight clips.

    • There are three clips on each side and two at the bottom of the phone.

  6. Samsung Epix LCD Display Replacement: passo 6, immagine 1 di 1
    • Once all eight of the clips have been unhooked, lift the back panel off of the phone.

    • Be careful not to remove the front panel. It will still be connected to the phone chassis by a ribbon cable on the motherboard.

  7. Samsung Epix LCD Display Replacement: passo 7, immagine 1 di 1
    • Using an opening tool, undo the ZIF connector halfway up the right side.

    • Carefully remove ribbon cable.

  8. Samsung Epix LCD Display Replacement: passo 8, immagine 1 di 1
    • Remove the front faceplate by lifting it off of the phone chassis.

  9. Samsung Epix LCD Display Replacement: passo 9, immagine 1 di 1
    • Using the opening tool, unlatch the LCD ribbon cable.

  10. Samsung Epix LCD Display Replacement: passo 10, immagine 1 di 1
    • Using an opening tool or spudger, pry under the lower left and right corners of the LCD screen.

    • The LCD is held in place to the chassis with adhesive strips.

    • Do not pry excessively hard. You may damage the circuitry on the back of the LCD.

  11. Samsung Epix LCD Display Replacement: passo 11, immagine 1 di 1
    • Lift the LCD display out from phone chassis.

Conclusione

To reassemble your device, follow these instructions in reverse order.

Un'altra persona ha completato questa guida.

Preparati per le riparazioni future

Acquista tutti

Mark Wyse

Membro da: 04/19/11

62 Reputazione

2 Guide realizzate

Team

Cal Poly, Team 15-15, Regan Spring 2011 Membro di Cal Poly, Team 15-15, Regan Spring 2011

CPSU-REGAN-S11S15G15

5 Membri

5 Guide realizzate

0Commenti sulla guida

Aggiungi Commento

Visualizza Statistiche:

Ultime 24 Ore: 1

Ultimi 7 Giorni: 4

Ultimi 30 Giorni: 8

Tutti i Tempi: 1,961