Resealing Procedure

Introduzione
Vai al passo 1Use this guide to close and reseal your Apple Watch Series 4 after disassembly.
Cosa ti serve


-
-
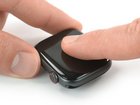
Align the screen and press it down firmly onto the adhesive.
-
For best results, apply heat from your iOpener, heat gun, or hair dryer to help set the adhesive.
-
After the screen sits in place apply some pressure for a few hours by wrapping the watch with a couple rubber bands, or placing it under a heavy book or two.
With the removal of force touch as a feature on the Apple Watch, is the final step of this process still applicable? It would be a pity of the removal of this feature causes somebody to think that failed in their repair attempt and disposed of their otherwise functional watch.
Is the adhesive strip just as good as say, B-7000 flexible glue for waterproofing?
I bought the iFixit batteri and also the adhesive strip, managed to get it all assembled in the end. In my opinion the hardest part of the whole process is to seat the adhesive. It’s all incredibly small, I would recommend a stationary magnifying glass with lamp. After carefully scraping off the old adhesive from the Force Touch sensor (was intact and glued to screen), I positioned the tape with tweezers onto watch body, gradually positioning it on each corner at a time. It’s not done in one go, I spent probably 15-20min to make it fit as evenly as I could. Feels like it requires the steady hands of a heart surgeon.
Hopefully it’s now watertight, Fingers crossed.
-


Take your e-waste to an R2 or e-Stewards certified recycler.
Repair didn’t go as planned? Check out our Answers community for troubleshooting help.
Take your e-waste to an R2 or e-Stewards certified recycler.
Repair didn’t go as planned? Check out our Answers community for troubleshooting help.
Annulla: non ho completato questa guida.
Altre 12 persone hanno completato questa guida.
Preparati per le riparazioni future
Acquista tutti


2Commenti sulla guida
Ist der Kasten dann auch, zumindest theoretisch, wasserdicht?
Ja. An den kritischen Stellen - Öffnungen für Mikro, Lautsprecher, Digital Crown, Druckknopf - wurde ja nichts gemacht.