Salta al contenuto principale
Nikon Coolpix S7000 Shutter Button Replacement

Nikon Coolpix S7000 Shutter Button Replacement

Nicholas Leon-Schetina

Nicholas Leon-Schetina e un altro collaboratore

Ultimo aggiornamento il August 10, 2020

5 - 10 minuti
Facile

Introduzione

Vai al passo 1

If you notice the camera shutter button isn't depressing or is too easily pressed, you may have to adjust or replace the button or button assembly. This guide will show you how to repair the individual parts that comprise the shutter button.

Cosa ti serve

  1. Nikon Coolpix S7000 Shutter Button Replacement, Shutter Button: passo 1, immagine 1 di 2 Nikon Coolpix S7000 Shutter Button Replacement, Shutter Button: passo 1, immagine 2 di 2
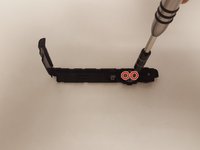
    • Remove the outer frame of the camera by unscrewing the screws around its sides with a JIS J000 screwdriver.

    • Screw locations.

  2. Nikon Coolpix S7000 Shutter Button Replacement: passo 2, immagine 1 di 2 Nikon Coolpix S7000 Shutter Button Replacement: passo 2, immagine 2 di 2
    • Remove outer camera frames by carefully pulling the frame apart from the body of the camera.

  3. Nikon Coolpix S7000 Shutter Button Replacement: passo 3, immagine 1 di 2 Nikon Coolpix S7000 Shutter Button Replacement: passo 3, immagine 2 di 2
    • Once the shutter button assembly is removed from the camera shell, carefully remove the black tape on the underside of the metal plate.

    • Black tape.

    • Do not discard the tape as you will reapply it when putting the shutter assembly back together.

  4. Nikon Coolpix S7000 Shutter Button Replacement: passo 4, immagine 1 di 3 Nikon Coolpix S7000 Shutter Button Replacement: passo 4, immagine 2 di 3 Nikon Coolpix S7000 Shutter Button Replacement: passo 4, immagine 3 di 3
    • Unscrew the two screws on each side of the metal plate to remove the plate and springs underneath it.

    • Push the button through the assembly to release it and then carefully remove the button cover to reveal the coiled spring and bottom cover.

    • Locations of the two screws.

    • Be very careful not to lose the two metal plate springs and the coiled spring when disassembling. A slow and steady hand will help prevent the springs from ejecting.

Conclusione

To reassemble your device, follow these instructions in reverse order.

Team

USF Tampa, Team S2-G3, Lacy Spring 2017 Membro di USF Tampa, Team S2-G3, Lacy Spring 2017

USFT-LACY-S17S2G3

4 Membri

10 Guide realizzate

1Commento della guida

shutter keeps trying to open. clicks slighly and does not open

Beatrix - Replica

Aggiungi Commento

Visualizza Statistiche:

Ultime 24 Ore: 0

Ultimi 7 Giorni: 3

Ultimi 30 Giorni: 19

Tutti i Tempi: 785