Salta al contenuto principale

Nikon Coolpix L330 Lens Barrel Assembly Replacement

Cosa ti serve

  1. Nikon Coolpix L330 Lens Barrel Assembly Replacement, Back Housing: passo 1, immagine 1 di 3 Nikon Coolpix L330 Lens Barrel Assembly Replacement, Back Housing: passo 1, immagine 2 di 3 Nikon Coolpix L330 Lens Barrel Assembly Replacement, Back Housing: passo 1, immagine 3 di 3
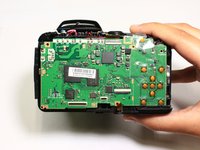
    • There are six screws attaching the back housing to the camera. Remove the screws from the body with a PH000 screw head.

    • Two 1.5x2.5mm screws on the right side.

    • Two 1.5x2.5mm screws on the underside.

    • Two 1.5x2.5mm screw on the left side.

  2. Nikon Coolpix L330 Lens Barrel Assembly Replacement: passo 2, immagine 1 di 2 Nikon Coolpix L330 Lens Barrel Assembly Replacement: passo 2, immagine 2 di 2
    • After removing the screws, use a metal spudger or plastic opening tool to push the back cover out.

    • The metal spudger can damage the plastic housing, so use caution when applying any pressure to it. Use a plastic opening tool to reduce the risk of damage to the housing.

    • Remove the back housing of the camera by lifting it directly up.

    • The back cover may be slightly tight, therefore more force may be needed to lift it up.

  3. Nikon Coolpix L330 Lens Barrel Assembly Replacement, LCD Screen: passo 3, immagine 1 di 2 Nikon Coolpix L330 Lens Barrel Assembly Replacement, LCD Screen: passo 3, immagine 2 di 2
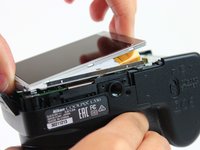
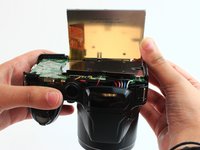
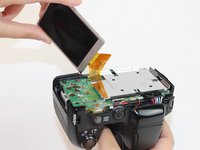
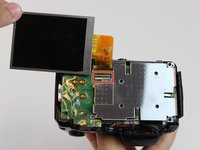
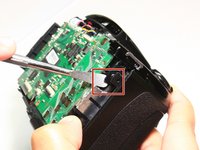
    • Insert the tips of your fingers into the space between the screen and back-plate.

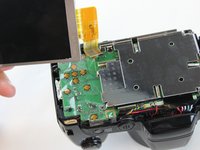
    • Gently lift the screen up and out of the frame.

    • The screen is still held by a flexible display cable, therefore only lift the screen 0.5'' out of the back-plate.

  4. Nikon Coolpix L330 Lens Barrel Assembly Replacement: passo 4, immagine 1 di 2 Nikon Coolpix L330 Lens Barrel Assembly Replacement: passo 4, immagine 2 di 2
    • Tilt the screen so that the display cable forms a hinge with the backplate.

    • Rotate the display 180 degrees so that it faces you.

  5. Nikon Coolpix L330 Lens Barrel Assembly Replacement: passo 5, immagine 1 di 3 Nikon Coolpix L330 Lens Barrel Assembly Replacement: passo 5, immagine 2 di 3 Nikon Coolpix L330 Lens Barrel Assembly Replacement: passo 5, immagine 3 di 3
    • The display cable has a ZIF (zero insertion force) connector on the end. This has a tab that has to be pushed out before the cable can be safely removed.

    • Using a plastic opening tool or fingernail, pop up the black clip holding the display cable. This will release the cable.

    • Slide the display cable out of the connector.

    • The display cable can be damaged due to excessive bending, therefore avoid putting unnecessary strain on it.

  6. Nikon Coolpix L330 Lens Barrel Assembly Replacement, Motherboard: passo 6, immagine 1 di 1
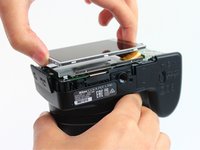
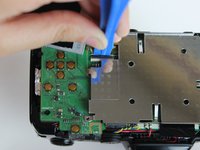
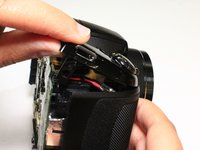
    • Remove the screws from the silver back-plate with a PH000 screw head.

    • Two 1.5x2.5mm screws on the left side.

    • One 1.5x2.5mm screw on the right side.

  7. Nikon Coolpix L330 Lens Barrel Assembly Replacement: passo 7, immagine 1 di 1
    • The marked red box contains a highly charged capacitor. Check the charge using a voltmeter and discharge it first before continuing. Discharge capacitor guide.

    • Remove the screws holding the motherboard with a PH000 screw head.

    • Two 1.5x2.5mm screws on the right side.

  8. Nikon Coolpix L330 Lens Barrel Assembly Replacement: passo 8, immagine 1 di 1
    • Using a plastic opening tool or fingernail, pop up the black clips holding the ribbon cables. This will release the cables.

    • Slide the ribbon cables out of the connectors.

  9. Nikon Coolpix L330 Lens Barrel Assembly Replacement: passo 9, immagine 1 di 3 Nikon Coolpix L330 Lens Barrel Assembly Replacement: passo 9, immagine 2 di 3 Nikon Coolpix L330 Lens Barrel Assembly Replacement: passo 9, immagine 3 di 3
    • Remove the black sticker covering the electrical connections.

    • Desolder the eight wires from the motherboard.

  10. Nikon Coolpix L330 Lens Barrel Assembly Replacement: passo 10, immagine 1 di 3 Nikon Coolpix L330 Lens Barrel Assembly Replacement: passo 10, immagine 2 di 3 Nikon Coolpix L330 Lens Barrel Assembly Replacement: passo 10, immagine 3 di 3
    • Insert a plastic opening tool into the marked position. Push the tool towards the right to release the clip.

    • Using a thumb and forefinger, push the plastic cover up until it is at a 45 degree angle.

    • Pull the cover back and up to release it.

  11. Nikon Coolpix L330 Lens Barrel Assembly Replacement: passo 11, immagine 1 di 2 Nikon Coolpix L330 Lens Barrel Assembly Replacement: passo 11, immagine 2 di 2
    • The motherboard is still held in place by soldered connections.

    • Carefully desolder the connections .

    • The front cover has been removed in this picture, however the procedure is still the same.

  12. Nikon Coolpix L330 Lens Barrel Assembly Replacement: passo 12, immagine 1 di 1
    • Remove the motherboard by lifting it directly up.

  13. Nikon Coolpix L330 Lens Barrel Assembly Replacement, Lens Barrel Assembly: passo 13, immagine 1 di 1
    • Remove the three 2.90x1.75mm screws using a PH000 screw head.

  14. Nikon Coolpix L330 Lens Barrel Assembly Replacement: passo 14, immagine 1 di 2 Nikon Coolpix L330 Lens Barrel Assembly Replacement: passo 14, immagine 2 di 2
    • Gently push the lens barrel up and out of the case.

  15. Nikon Coolpix L330 Lens Barrel Assembly Replacement: passo 15, immagine 1 di 1
    • If the camera has grinding gears which lead to inefficient lens extension, this additional procedure will replace them.

    • Remove the three 1.25x4.75mm screws using a PH000 screw head.

  16. Nikon Coolpix L330 Lens Barrel Assembly Replacement: passo 16, immagine 1 di 3 Nikon Coolpix L330 Lens Barrel Assembly Replacement: passo 16, immagine 2 di 3 Nikon Coolpix L330 Lens Barrel Assembly Replacement: passo 16, immagine 3 di 3
    • Black tape covers the motor assembly.

    • Remove the tape using a pair of tweezers.

  17. Nikon Coolpix L330 Lens Barrel Assembly Replacement: passo 17, immagine 1 di 3 Nikon Coolpix L330 Lens Barrel Assembly Replacement: passo 17, immagine 2 di 3 Nikon Coolpix L330 Lens Barrel Assembly Replacement: passo 17, immagine 3 di 3
    • Lift the top part of the gear housing up and away from the main housing.

    • Check the gears to see if they are damaged and need replacing.

Conclusione

To reassemble your device, follow these instructions in reverse order.

Un'altra persona ha completato questa guida.

Rajeev

Membro da: 02/09/16

596 Reputazione

4 Guide realizzate

Team

USF Tampa, Team 2-10, Cagle Spring 2016 Membro di USF Tampa, Team 2-10, Cagle Spring 2016

USFT-CAGLE-S16S2G10

4 Membri

14 Guide realizzate

0 Commenti

Aggiungi Commento

Visualizza Statistiche:

Ultime 24 Ore: 1

Ultimi 7 Giorni: 4

Ultimi 30 Giorni: 21

Tutti i Tempi: 1,405