Salta al contenuto principale
Nerf N-Strike Firestrike Laser Trigger Replacement

Nerf N-Strike Firestrike Laser Trigger Replacement

Jong Wan Kim

Jong Wan Kim e 2 altri collaboratori

Ultimo aggiornamento il November 28, 2017

5 minuti
Molto facile
Vigilanza sulla Grammatica

Introduzione

Vai al passo 1

This guide will walk you through opening your Nerf N-Strike Firestrike and removing the laser trigger. Many screws must be removed before opening the casing so be careful not to misplace any.

After the casing is removed and the Nerf gun is opened, you will see two triggers near the lower portion of the gun. The smaller of the two triggers is the laser trigger and this is what you will be removing. Just grab it from the side with two fingers and pull straight up to remove the laser trigger.

Cosa ti serve

Strumenti

  1. Nerf N-Strike Firestrike Laser Trigger Replacement, Remove battery cover: passo 1, immagine 1 di 1
    • Use a #1 Phillips screwdriver to remove the 10 -mm screw that secures the battery plate, then remove the battery cover using your hands.

  2. Nerf N-Strike Firestrike Laser Trigger Replacement: passo 2, immagine 1 di 2 Nerf N-Strike Firestrike Laser Trigger Replacement: passo 2, immagine 2 di 2
    • Slide out the two AAA batteries using your fingers.

  3. Nerf N-Strike Firestrike Laser Trigger Replacement, Blaster Casing: passo 3, immagine 1 di 1
    • Remove the seven 10-mm black Phillips screws from the blaster casing with a #1 Phillips Screwdriver.

  4. Nerf N-Strike Firestrike Laser Trigger Replacement: passo 4, immagine 1 di 2 Nerf N-Strike Firestrike Laser Trigger Replacement: passo 4, immagine 2 di 2
    • Slowly pull apart the blaster casing, starting at the battery location.

    • Keep pulling apart slowly until it separates completely. Be cautious as to not send the internal components flying.

  5. Nerf N-Strike Firestrike Laser Trigger Replacement: passo 5, immagine 1 di 2 Nerf N-Strike Firestrike Laser Trigger Replacement: passo 5, immagine 2 di 2
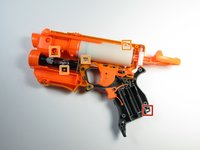
    • For reassembly, ensure that the chrome nut gets put back in the proper location, signified by the red box.

    • For reassembly, ensure that all the parts are lined up correctly on the dowels, signified by the four orange boxes.

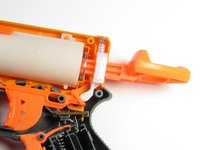
    • For reassembly, note the location of the springs as highlighted in the second photo.

  6. Nerf N-Strike Firestrike Laser Trigger Replacement, Laser Trigger: passo 6, immagine 1 di 2 Nerf N-Strike Firestrike Laser Trigger Replacement, Laser Trigger: passo 6, immagine 2 di 2
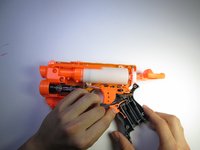
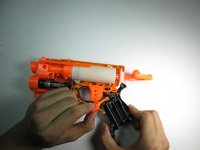
    • Remove the laser trigger by grabbing the trigger with your fingers and pulling it up and out.

Conclusione

To reassemble your device, follow these instructions in reverse order.

Jong Wan Kim

Membro da: 04/22/15

461 Reputazione

2 Guide realizzate

Team

Cal Poly, Team 15-6, Amido Spring 2015 Membro di Cal Poly, Team 15-6, Amido Spring 2015

CPSU-AMIDO-S15S15G6

3 Membri

8 Guide realizzate

0 Commenti

Aggiungi Commento

Visualizza Statistiche:

Ultime 24 Ore: 0

Ultimi 7 Giorni: 4

Ultimi 30 Giorni: 15

Tutti i Tempi: 1,732