Salta al contenuto principale

Motorola Moto G Stylus 5G (2022) Screen Replacement

Cosa ti serve

  1. Motorola Moto G Stylus 5G (2022) Screen Replacement, Remove the stylus: passo 1, immagine 1 di 3 Motorola Moto G Stylus 5G (2022) Screen Replacement, Remove the stylus: passo 1, immagine 2 di 3 Motorola Moto G Stylus 5G (2022) Screen Replacement, Remove the stylus: passo 1, immagine 3 di 3
    • Push the button at the base of the stylus to partially eject it.

    • Remove the stylus.

  2. Motorola Moto G Stylus 5G (2022) Screen Replacement, Eject the SIM card tray: passo 2, immagine 1 di 2 Motorola Moto G Stylus 5G (2022) Screen Replacement, Eject the SIM card tray: passo 2, immagine 2 di 2
    • Insert a SIM card eject tool or a straightened paperclip into the hole adjacent to the SIM card tray.

    • Press firmly to eject the tray.

  3. Motorola Moto G Stylus 5G (2022) Screen Replacement, Remove the SIM card tray: passo 3, immagine 1 di 2 Motorola Moto G Stylus 5G (2022) Screen Replacement, Remove the SIM card tray: passo 3, immagine 2 di 2
    • Grab and remove the SIM card tray from the phone.

    • When reinserting the SIM card, make sure it's in the proper orientation inside the tray.

  4. Motorola Moto G Stylus 5G (2022) Screen Replacement, Heat the edge: passo 4, immagine 1 di 1
    • Discharge your battery to 25% or lower and power off your phone before you begin.

    • Heat an iOpener and apply it to the edge of the back cover with the SIM card slot for two minutes.

    • A hair dryer or heat gun may also be used, but be careful not to overheat the phone—the display and internal battery are both susceptible to heat damage.

  5. Motorola Moto G Stylus 5G (2022) Screen Replacement, Insert an opening pick: passo 5, immagine 1 di 3 Motorola Moto G Stylus 5G (2022) Screen Replacement, Insert an opening pick: passo 5, immagine 2 di 3 Motorola Moto G Stylus 5G (2022) Screen Replacement, Insert an opening pick: passo 5, immagine 3 di 3
    • Apply a suction cup to the back cover, as close to the center of the right edge as possible.

    • Pull up on the suction cup with strong, steady force to create a gap between the cover and the frame.

    • Insert an opening pick into the gap.

  6. Motorola Moto G Stylus 5G (2022) Screen Replacement, Slice the right adhesive: passo 6, immagine 1 di 3 Motorola Moto G Stylus 5G (2022) Screen Replacement, Slice the right adhesive: passo 6, immagine 2 di 3 Motorola Moto G Stylus 5G (2022) Screen Replacement, Slice the right adhesive: passo 6, immagine 3 di 3
    • Slide your opening pick back and forth along the right edge to slice through the adhesive.

    • Leave the pick in at the bottom right corner to prevent the adhesive from resealing.

  7. Motorola Moto G Stylus 5G (2022) Screen Replacement, Slice the bottom adhesive: passo 7, immagine 1 di 2 Motorola Moto G Stylus 5G (2022) Screen Replacement, Slice the bottom adhesive: passo 7, immagine 2 di 2
    • Insert a second opening pick into the bottom right corner.

    • Slide this opening pick along the bottom edge to the bottom left corner to slice through the adhesive.

    • Leave the pick inserted to prevent the bottom edge from resealing.

  8. Motorola Moto G Stylus 5G (2022) Screen Replacement, Slice the left adhesive: passo 8, immagine 1 di 3 Motorola Moto G Stylus 5G (2022) Screen Replacement, Slice the left adhesive: passo 8, immagine 2 di 3 Motorola Moto G Stylus 5G (2022) Screen Replacement, Slice the left adhesive: passo 8, immagine 3 di 3
    • Insert a third opening pick into the bottom right corner.

    • Slide this opening pick along the left edge to slice the adhesive.

    • Don't worry about slicing under the camera bezel. It's separate from the back cover and will be removed later.

    • Leave the pick inserted in the top left corner to prevent the left edge from resealing.

  9. Motorola Moto G Stylus 5G (2022) Screen Replacement, Slice the top adhesive: passo 9, immagine 1 di 2 Motorola Moto G Stylus 5G (2022) Screen Replacement, Slice the top adhesive: passo 9, immagine 2 di 2
    • Insert a fourth pick into the top left corner.

    • Slide the pick to the top right corner to slice the top adhesive.

  10. Motorola Moto G Stylus 5G (2022) Screen Replacement, Slice around the camera bezel: passo 10, immagine 1 di 1
    • Slide an opening pick between the camera bezel and the back cover.

    • The back cover's adhesive is particularly strong around the camera bezel.

    • Slide the opening pick around the camera bezel to separate the back cover from the frame.

  11. Motorola Moto G Stylus 5G (2022) Screen Replacement, Remove the back cover: passo 11, immagine 1 di 3 Motorola Moto G Stylus 5G (2022) Screen Replacement, Remove the back cover: passo 11, immagine 2 di 3 Motorola Moto G Stylus 5G (2022) Screen Replacement, Remove the back cover: passo 11, immagine 3 di 3
    • Grab and remove the back cover by lifting it away from the phone.

    • If your back cover is still sticking to the frame, slide the pick around the edges of the phone to slice through any remaining adhesive.

    • Reassembly notes:

    • To adhere the back cover with custom-cut adhesives, follow this guide.

    • To adhere the back cover with tape, follow this guide.

  12. Motorola Moto G Stylus 5G (2022) Screen Replacement, Heat the camera bezel: passo 12, immagine 1 di 1
    • Heat an iOpener and apply it to the camera bezel for two minutes.

    • A hair dryer or heat gun may also be used, but be careful not to overheat the phone—the display and internal battery are both susceptible to heat damage.

  13. Motorola Moto G Stylus 5G (2022) Screen Replacement, Slice the adhesive: passo 13, immagine 1 di 3 Motorola Moto G Stylus 5G (2022) Screen Replacement, Slice the adhesive: passo 13, immagine 2 di 3 Motorola Moto G Stylus 5G (2022) Screen Replacement, Slice the adhesive: passo 13, immagine 3 di 3
    • Insert an opening pick under the camera bezel.

    • Slide the pick around the perimeter of the bezel to slice the adhesive.

    • If it feels stuck, apply more heat to further loosen the adhesive.

  14. Motorola Moto G Stylus 5G (2022) Screen Replacement, Remove the camera bezel: passo 14, immagine 1 di 3 Motorola Moto G Stylus 5G (2022) Screen Replacement, Remove the camera bezel: passo 14, immagine 2 di 3 Motorola Moto G Stylus 5G (2022) Screen Replacement, Remove the camera bezel: passo 14, immagine 3 di 3
    • Grab and remove the camera bezel.

    • Reassembly notes:

    • This is a good point to test your phone before sealing it up. Follow this guide to perform a hardware test. Be sure to power your phone back down completely before you continue working.

    • To adhere the camera bezel with custom-cut adhesives, follow this guide.

    • To adhere the camera bezel with tape, follow this guide.

  15. Motorola Moto G Stylus 5G (2022) Screen Replacement, Unfasten the motherboard cover: passo 15, immagine 1 di 1
    • Use a Phillips screwdriver to remove the eleven 4.1 mm-long screws securing the motherboard cover.

    • If you can't find all the screws, check under any leftover adhesive residue.

  16. Motorola Moto G Stylus 5G (2022) Screen Replacement, Unclip the right edge: passo 16, immagine 1 di 3 Motorola Moto G Stylus 5G (2022) Screen Replacement, Unclip the right edge: passo 16, immagine 2 di 3 Motorola Moto G Stylus 5G (2022) Screen Replacement, Unclip the right edge: passo 16, immagine 3 di 3
    • Insert a spudger between the bottom right corner of the cover and the frame.

    • Pry up to release the clips securing the cover.

    • Slide the spudger toward the top of the cover and pry to release the right edge.

  17. Motorola Moto G Stylus 5G (2022) Screen Replacement, Remove the motherboard cover: passo 17, immagine 1 di 2 Motorola Moto G Stylus 5G (2022) Screen Replacement, Remove the motherboard cover: passo 17, immagine 2 di 2
    • Grip the right edge of the cover and pull it off the motherboard.

  18. Motorola Moto G Stylus 5G (2022) Screen Replacement, Disconnect the battery: passo 18, immagine 1 di 2 Motorola Moto G Stylus 5G (2022) Screen Replacement, Disconnect the battery: passo 18, immagine 2 di 2
    • Use the point of a spudger to pry up the battery's press connector.

    • When you disconnect connectors like these, be careful not to dislodge the small surface-mounted components surrounding the socket.

    • To re-attach press connectors, carefully align and press down on one side until it clicks into place, then repeat on the other side. Don't press down on the middle. If the connector is misaligned, the pins can bend, causing permanent damage.

  19. Motorola Moto G Stylus 5G (2022) Screen Replacement, Disconnect the display: passo 19, immagine 1 di 2 Motorola Moto G Stylus 5G (2022) Screen Replacement, Disconnect the display: passo 19, immagine 2 di 2
    • Use the pointed end of your spudger to pry and disconnect the display's press connector.

  20. Motorola Moto G Stylus 5G (2022) Screen Replacement, Disconnect the antenna cable: passo 20, immagine 1 di 2 Motorola Moto G Stylus 5G (2022) Screen Replacement, Disconnect the antenna cable: passo 20, immagine 2 di 2
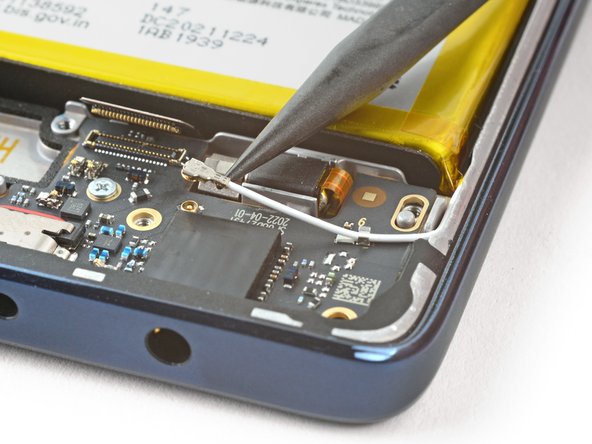
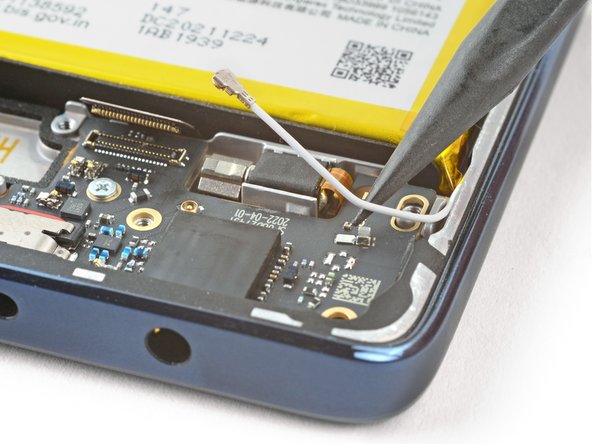
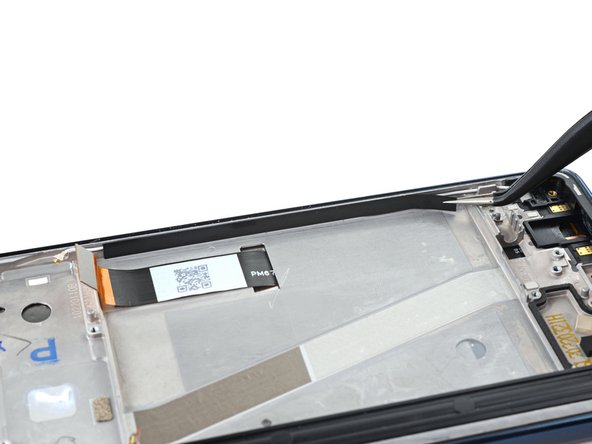
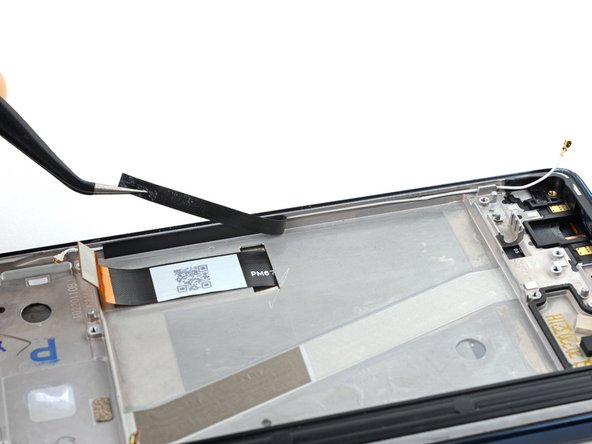
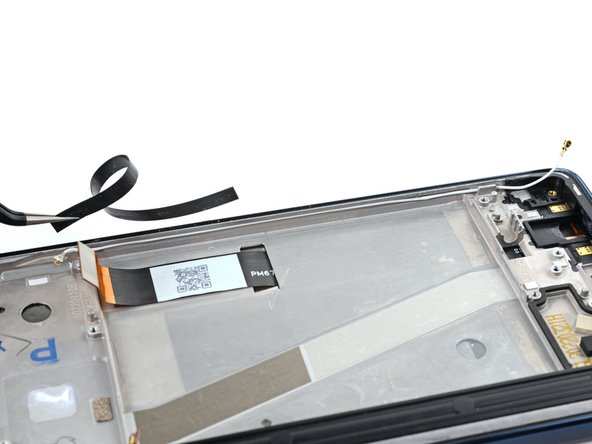
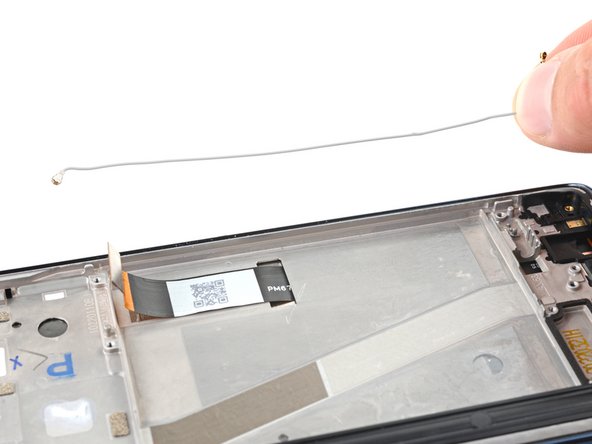
    • Use the pointed end of your spudger to pry and disconnect the white antenna cable.

    • Pry on only the metal head of the connector. Avoid lifting the cable itself as much as possible.

    • During reassembly, these can be tricky to reconnect. Hold the connector in place over its socket and press down with the flat end of a spudger. The connector should snap into place.

  21. Motorola Moto G Stylus 5G (2022) Screen Replacement, Disconnect the board connector: passo 21, immagine 1 di 2 Motorola Moto G Stylus 5G (2022) Screen Replacement, Disconnect the board connector: passo 21, immagine 2 di 2
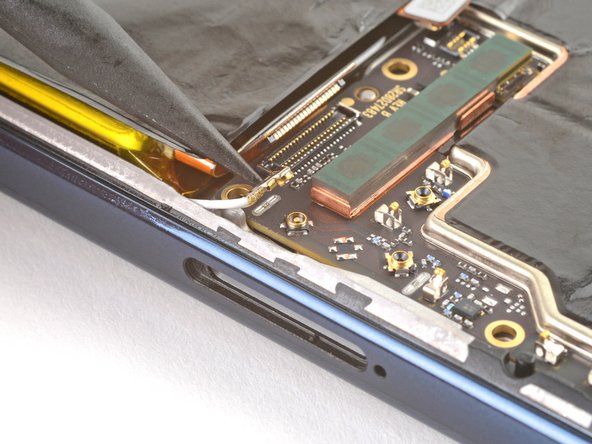
    • Use the pointed end of a spudger to pry up and disconnect the board cable's press connector.

  22. Motorola Moto G Stylus 5G (2022) Screen Replacement, Disconnect the upper 5G mmWave antenna: passo 22, immagine 1 di 2 Motorola Moto G Stylus 5G (2022) Screen Replacement, Disconnect the upper 5G mmWave antenna: passo 22, immagine 2 di 2
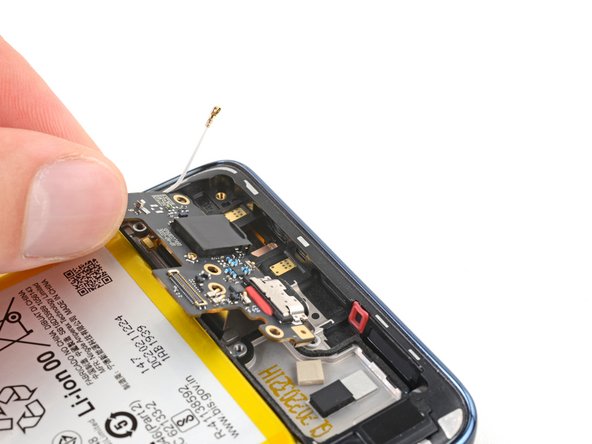
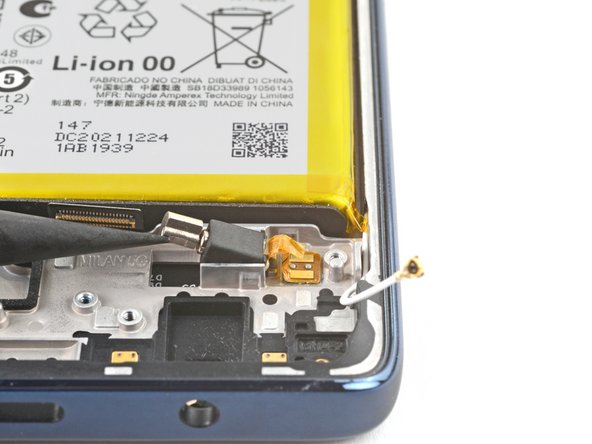
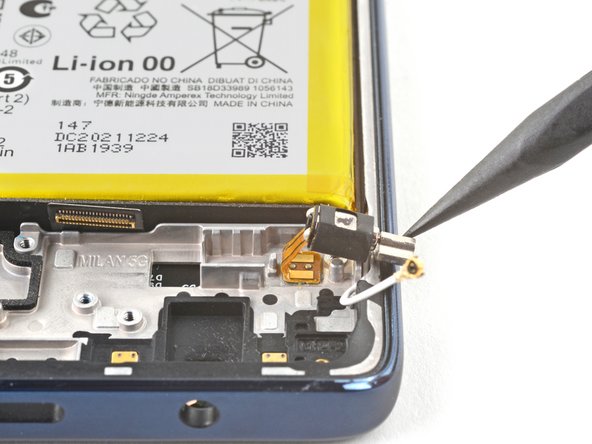
    • Use the pointed end of a spudger to pry up and disconnect the 5G mmWave antenna's press connector.

  23. Motorola Moto G Stylus 5G (2022) Screen Replacement, Unfasten the motherboard: passo 23, immagine 1 di 1
    • Use your Phillips screwdriver to remove the 3 mm-long screw securing the motherboard.

  24. Motorola Moto G Stylus 5G (2022) Screen Replacement, Reposition the graphite film: passo 24, immagine 1 di 3 Motorola Moto G Stylus 5G (2022) Screen Replacement, Reposition the graphite film: passo 24, immagine 2 di 3 Motorola Moto G Stylus 5G (2022) Screen Replacement, Reposition the graphite film: passo 24, immagine 3 di 3
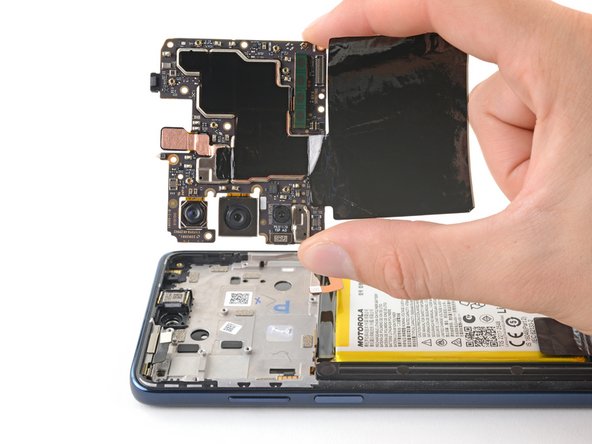
    • Lift and fold the graphite film off the battery and flip it onto the motherboard.

    • Use caution not to tear the film. It's adhered lightly to the battery.

  25. Motorola Moto G Stylus 5G (2022) Screen Replacement, Remove the motherboard: passo 25, immagine 1 di 3 Motorola Moto G Stylus 5G (2022) Screen Replacement, Remove the motherboard: passo 25, immagine 2 di 3 Motorola Moto G Stylus 5G (2022) Screen Replacement, Remove the motherboard: passo 25, immagine 3 di 3
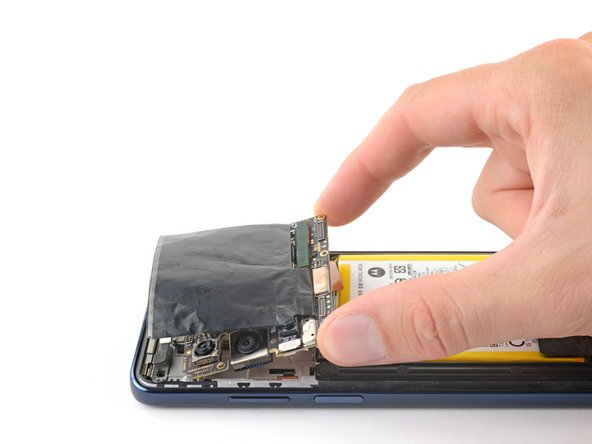
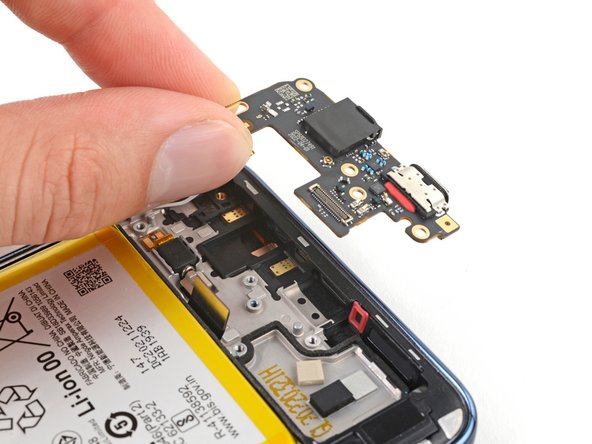
    • Grab the motherboard from the bottom edge and lift it from its recess.

    • Be sure the loose cables don't catch on the motherboard as it's removed.

    • During reassembly, make sure no cables or connectors become trapped underneath the motherboard.

  26. Motorola Moto G Stylus 5G (2022) Screen Replacement, Unfasten the loudspeaker: passo 26, immagine 1 di 1
    • Use your Phillips screwdriver to remove the six 4.1 mm-long screws from the loudspeaker.

  27. Motorola Moto G Stylus 5G (2022) Screen Replacement, Pry the loudspeaker assembly: passo 27, immagine 1 di 2 Motorola Moto G Stylus 5G (2022) Screen Replacement, Pry the loudspeaker assembly: passo 27, immagine 2 di 2
    • Insert the point of a spudger between the frame and the right edge of the loudspeaker.

    • Pry and release the right edge of the loudspeaker.

    • The loudspeaker is secured loosely to the frame by small clips.

  28. Motorola Moto G Stylus 5G (2022) Screen Replacement, Remove the loudspeaker assembly: passo 28, immagine 1 di 2 Motorola Moto G Stylus 5G (2022) Screen Replacement, Remove the loudspeaker assembly: passo 28, immagine 2 di 2
    • Grab the loudspeaker by its right edge and remove it.

  29. Motorola Moto G Stylus 5G (2022) Screen Replacement, Disconnect the board connector: passo 29, immagine 1 di 2 Motorola Moto G Stylus 5G (2022) Screen Replacement, Disconnect the board connector: passo 29, immagine 2 di 2
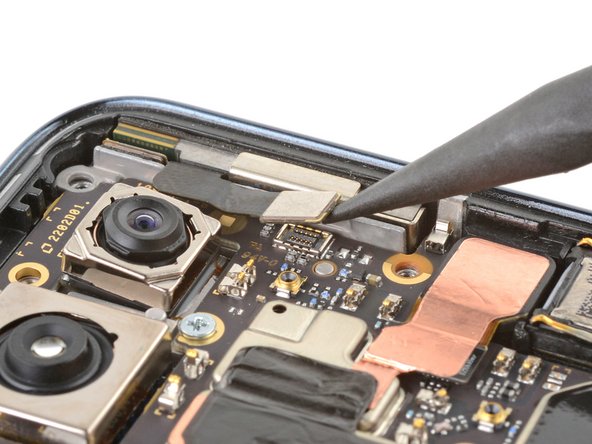
    • Use the point of a spudger to pry and disconnect the daughterboard cable's press connector.

  30. Motorola Moto G Stylus 5G (2022) Screen Replacement, Disconnect the antenna cable: passo 30, immagine 1 di 3 Motorola Moto G Stylus 5G (2022) Screen Replacement, Disconnect the antenna cable: passo 30, immagine 2 di 3 Motorola Moto G Stylus 5G (2022) Screen Replacement, Disconnect the antenna cable: passo 30, immagine 3 di 3
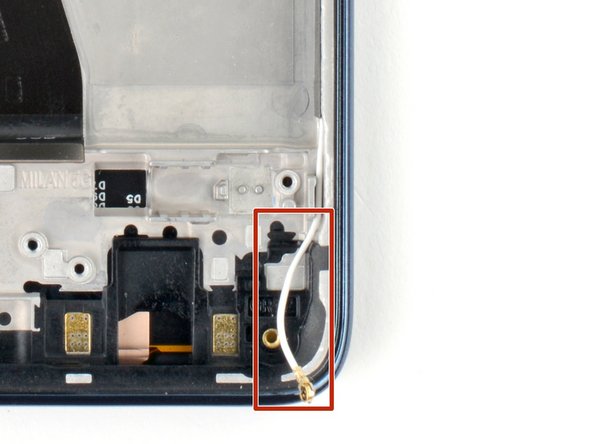
    • Use the point of your spudger to pry and disconnect the white antenna cable.

    • Pry on only the metal head of the connector. Avoid lifting the cable itself as much as possible.

    • Free the cable from the clip in the top-right of the daughterboard.

    • During reassembly, these can be tricky to reconnect. Hold the connector in place over its socket and press down with the flat end of a spudger. The connector should snap into place.

    • During reassembly, be sure to secure the cable to the clip in the daughterboard.

  31. Motorola Moto G Stylus 5G (2022) Screen Replacement, Unfasten the daughterboard: passo 31, immagine 1 di 1
    • Use a Phillips screwdriver to remove the 3 mm-long screw securing the daughterboard.

  32. Motorola Moto G Stylus 5G (2022) Screen Replacement, Remove the daughterboard: passo 32, immagine 1 di 3 Motorola Moto G Stylus 5G (2022) Screen Replacement, Remove the daughterboard: passo 32, immagine 2 di 3 Motorola Moto G Stylus 5G (2022) Screen Replacement, Remove the daughterboard: passo 32, immagine 3 di 3
    • Grab and lift the top edge of the daughterboard.

    • Make sure the daughterboard doesn't snag on any loose cables as you lift it out.

    • Remove the daughterboard from its recess.

  33. Motorola Moto G Stylus 5G (2022) Screen Replacement, Soften the adhesive: passo 33, immagine 1 di 2 Motorola Moto G Stylus 5G (2022) Screen Replacement, Soften the adhesive: passo 33, immagine 2 di 2
    • The vibration motor cable is strongly adhered to the frame. Before attempting to peel it, follow this step to weaken the adhesive securing it.

    • Apply highly-concentrated isopropyl alcohol (over 90%) to the flex cable.

    • Alternatively, use a heated iOpener, hair dryer, or heat gun to soften the adhesive.

    • Use caution to not overheat the battery or surrounding components.

  34. Motorola Moto G Stylus 5G (2022) Screen Replacement, Reposition the vibration motor: passo 34, immagine 1 di 3 Motorola Moto G Stylus 5G (2022) Screen Replacement, Reposition the vibration motor: passo 34, immagine 2 di 3 Motorola Moto G Stylus 5G (2022) Screen Replacement, Reposition the vibration motor: passo 34, immagine 3 di 3
    • While you wait for the adhesive to soften, remove the vibration motor from its recess:

    • Insert the point of your spudger between the motor counterweight and the frame.

    • Pry the motor out of its recess and flip it to the right.

  35. Motorola Moto G Stylus 5G (2022) Screen Replacement, Remove the vibration motor: passo 35, immagine 1 di 3 Motorola Moto G Stylus 5G (2022) Screen Replacement, Remove the vibration motor: passo 35, immagine 2 di 3 Motorola Moto G Stylus 5G (2022) Screen Replacement, Remove the vibration motor: passo 35, immagine 3 di 3
    • The vibration motor's flex cable is very fragile. Work slowly to prevent tearing the cable.

    • With blunt nose tweezers, grab the base of the flex cable as close to the frame as possible.

    • Slowly and steadily peel the cable from the frame.

    • If the cable feels stuck or re-adheres, apply more isopropyl alcohol or heat.

    • Remove the vibration motor from the frame.

    • Apply new adhesive to your vibration motor before installing it in the frame.

  36. Motorola Moto G Stylus 5G (2022) Screen Replacement, Remove the earpiece speaker: passo 36, immagine 1 di 3 Motorola Moto G Stylus 5G (2022) Screen Replacement, Remove the earpiece speaker: passo 36, immagine 2 di 3 Motorola Moto G Stylus 5G (2022) Screen Replacement, Remove the earpiece speaker: passo 36, immagine 3 di 3
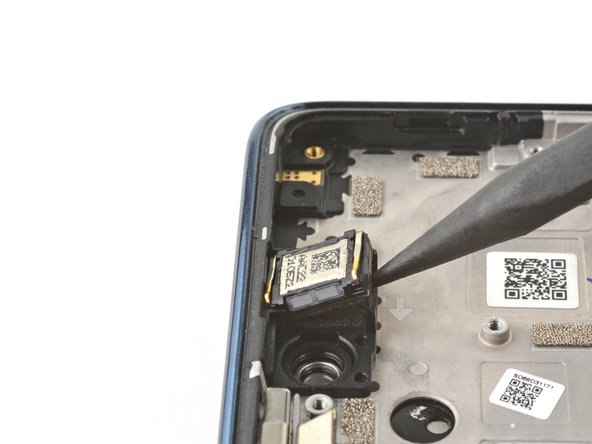
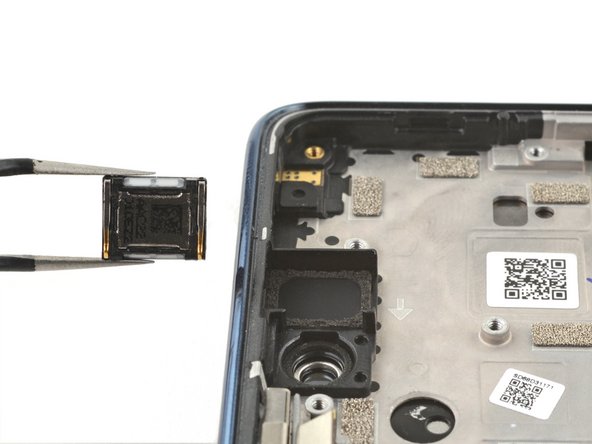
    • Use the pointed end of a spudger to pry the bottom edge of the earpiece speaker up out of the frame.

    • Remove the earpiece speaker from its recess.

    • During reassembly, orient the speaker so the raised sides of the connectors are closest to the front-facing camera.

  37. Motorola Moto G Stylus 5G (2022) Screen Replacement, Soften the antenna bracket's adhesive: passo 37, immagine 1 di 3 Motorola Moto G Stylus 5G (2022) Screen Replacement, Soften the antenna bracket's adhesive: passo 37, immagine 2 di 3 Motorola Moto G Stylus 5G (2022) Screen Replacement, Soften the antenna bracket's adhesive: passo 37, immagine 3 di 3
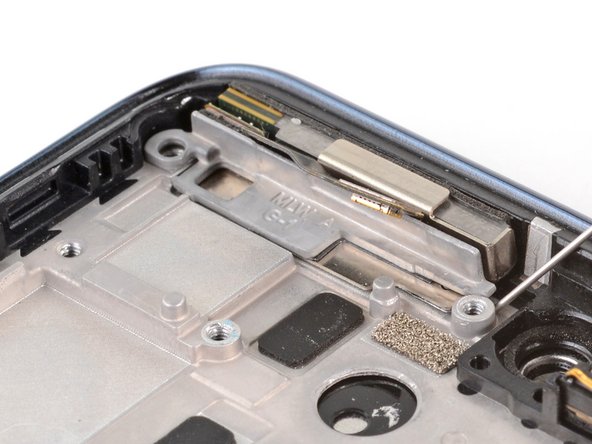
    • Heat an iOpener and apply it to the antenna bracket in the upper left of the frame for two minutes.

    • A hair dryer or heat gun may also be used, but be careful not to overheat the phone—the display and internal battery are both susceptible to heat damage.

    • Alternatively, use highly-concentrated isopropyl alcohol (over 90%) between the bracket and upper left of the frame.

  38. Motorola Moto G Stylus 5G (2022) Screen Replacement, Remove the 5G mmWave antenna bracket: passo 38, immagine 1 di 3 Motorola Moto G Stylus 5G (2022) Screen Replacement, Remove the 5G mmWave antenna bracket: passo 38, immagine 2 di 3 Motorola Moto G Stylus 5G (2022) Screen Replacement, Remove the 5G mmWave antenna bracket: passo 38, immagine 3 di 3
    • Insert the pointed end of a spudger between the right side of the 5G mmWave antenna bracket and the frame.

    • Pry up the bracket.

    • A strong metal tape holds the bracket to the frame. Work slowly to avoid tearing this adhesive tape.

    • Remove the bracket from its recess.

    • During reassembly, remove the old adhesive from the bracket and frame, then apply new adhesive.

  39. Motorola Moto G Stylus 5G (2022) Screen Replacement, Soften the adhesive with heat: passo 39, immagine 1 di 1
    • Heat an iOpener and apply it to the left edge of the screen for two minutes.

    • A hair dryer, heat gun, or hot plate may also be used, but be careful not to overheat the phone—the display and internal battery are both susceptible to heat damage.

  40. Motorola Moto G Stylus 5G (2022) Screen Replacement, Soften the adhesive with isopropyl alcohol: passo 40, immagine 1 di 2 Motorola Moto G Stylus 5G (2022) Screen Replacement, Soften the adhesive with isopropyl alcohol: passo 40, immagine 2 di 2
    • Additionally, you may use highly-concentrated isopropyl alcohol (over 90%) to further loosen the adhesive securing the battery.

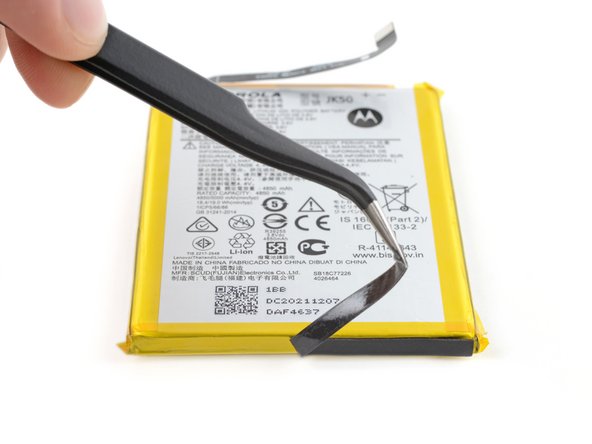
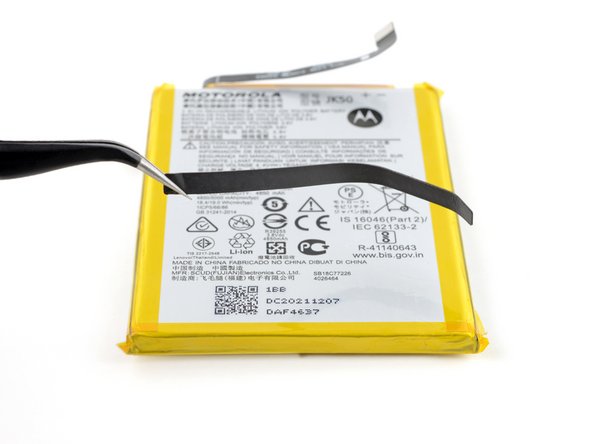
    • Apply the isopropyl alcohol into the gaps between the sides of the battery and the frame.

    • Wait one minute to allow the isopropyl alcohol to penetrate.

  41. Motorola Moto G Stylus 5G (2022) Screen Replacement, Pry the battery: passo 41, immagine 1 di 3 Motorola Moto G Stylus 5G (2022) Screen Replacement, Pry the battery: passo 41, immagine 2 di 3 Motorola Moto G Stylus 5G (2022) Screen Replacement, Pry the battery: passo 41, immagine 3 di 3
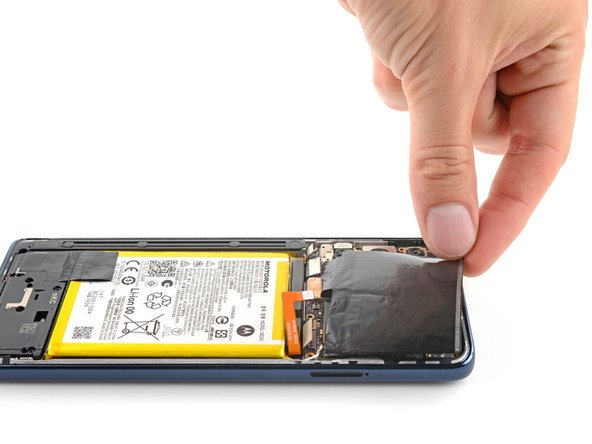
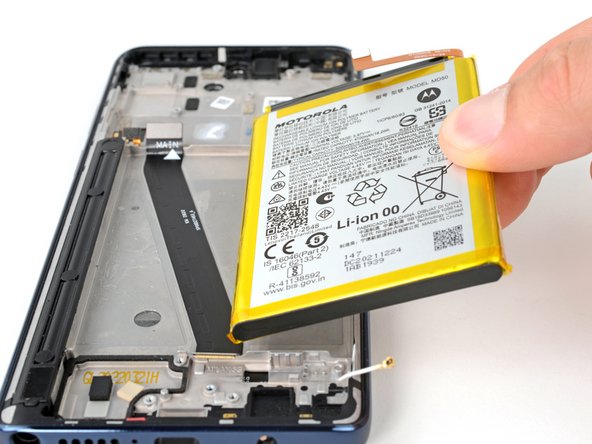
    • Place a suction handle on the center of the battery.

    • Insert an opening pick between the right edge of the battery and the frame.

    • Use a steady force to pull on the suction handle and simultaneously pry with the pick.

    • Don't use excessive force on the battery. Slow, consistent pressure is all that is required to free it from the frame.

    • Apply more isopropyl alcohol if the battery re-adheres.

  42. Motorola Moto G Stylus 5G (2022) Screen Replacement, Remove the battery: passo 42, immagine 1 di 2 Motorola Moto G Stylus 5G (2022) Screen Replacement, Remove the battery: passo 42, immagine 2 di 2
    • Remove the battery from its recess.

    • Don't reinstall a damaged or deformed battery, as doing so is a potential safety hazard.

    • Use this guide to install a battery with custom-cut adhesives, or use this guide to install a battery with an adhesive sheet.

  43. Motorola Moto G Stylus 5G (2022) Screen Replacement, Remove the foam strip: passo 43, immagine 1 di 3 Motorola Moto G Stylus 5G (2022) Screen Replacement, Remove the foam strip: passo 43, immagine 2 di 3 Motorola Moto G Stylus 5G (2022) Screen Replacement, Remove the foam strip: passo 43, immagine 3 di 3
    • If you're reusing your old battery, skip this step.

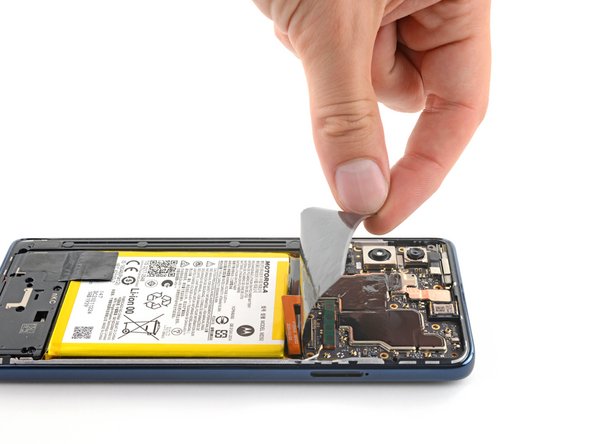
    • Peel and remove the foam strip from the bottom of the battery.

    • Apply the foam strip onto your new battery.

  44. Motorola Moto G Stylus 5G (2022) Screen Replacement, Soften the board cable's adhesive: passo 44, immagine 1 di 1
    • The iOpener may stick to the residue left over from the battery. Clean the surrounding surface with some isopropyl alcohol to prevent this.

    • Heat an iOpener and apply it to the board cable for two minutes.

    • A hair dryer, heat gun, or hot plate may also be used, but be careful not to overheat the phone—the display is susceptible to heat damage.

  45. Motorola Moto G Stylus 5G (2022) Screen Replacement, Remove the board cable: passo 45, immagine 1 di 3 Motorola Moto G Stylus 5G (2022) Screen Replacement, Remove the board cable: passo 45, immagine 2 di 3 Motorola Moto G Stylus 5G (2022) Screen Replacement, Remove the board cable: passo 45, immagine 3 di 3
    • Peel and remove the board cable from the frame.

    • Don't fold or sharply bend the cable.

  46. Motorola Moto G Stylus 5G (2022) Screen Replacement, Reassembly information: passo 46, immagine 1 di 3 Motorola Moto G Stylus 5G (2022) Screen Replacement, Reassembly information: passo 46, immagine 2 di 3 Motorola Moto G Stylus 5G (2022) Screen Replacement, Reassembly information: passo 46, immagine 3 di 3
    • This step shows how to replace the conductive adhesive for the board cable during reassembly. If your frame has this adhesive preinstalled, skip this step.

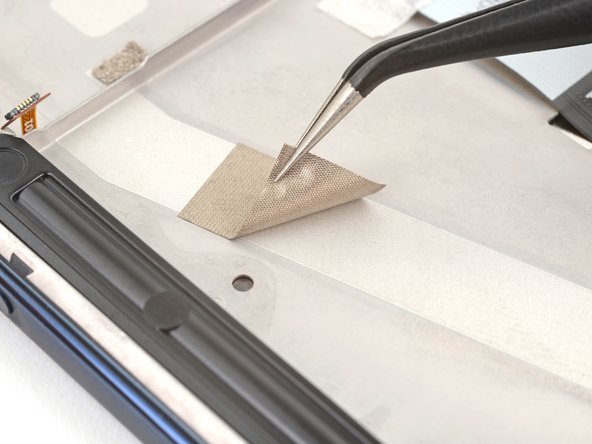
    • If necessary, cut the adhesive blocks to fit into contours of the cable channel. The adhesive doesn't need fit the contours perfectly.

    • Peel the adhesive blocks from the adhesive sheet.

    • Place the adhesives in the board cable channel. Space them evenly through the channel.

    • Peel any remaining plastic liners to expose the adhesive.

  47. Motorola Moto G Stylus 5G (2022) Screen Replacement, Remove the antenna cable tape: passo 47, immagine 1 di 3 Motorola Moto G Stylus 5G (2022) Screen Replacement, Remove the antenna cable tape: passo 47, immagine 2 di 3 Motorola Moto G Stylus 5G (2022) Screen Replacement, Remove the antenna cable tape: passo 47, immagine 3 di 3
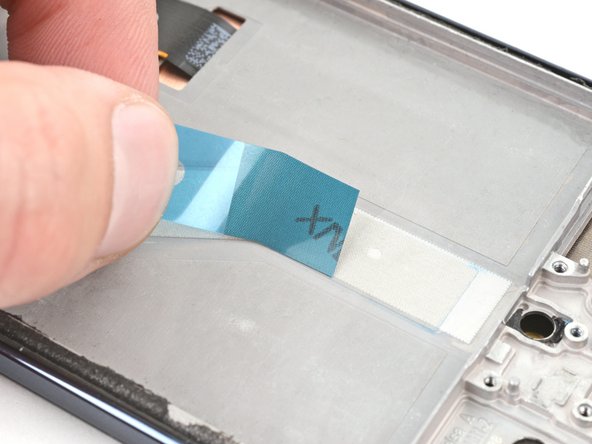
    • Use your tweezers to peel and remove the black tape securing the antenna cable.

    • During reassembly, you may reuse the tape if the adhesive is intact. If not, follow this guide to use a pre-cut adhesive strip instead.

  48. Motorola Moto G Stylus 5G (2022) Screen Replacement, Reassembly information: passo 48, immagine 1 di 2 Motorola Moto G Stylus 5G (2022) Screen Replacement, Reassembly information: passo 48, immagine 2 di 2
    • The extra antenna cable length on either side of the frame is very important for its alignment.

    • Leave no extra length in the cable where it connects to the motherboard, and all of its available length to the daughterboard.

  49. Motorola Moto G Stylus 5G (2022) Screen Replacement, Remove the antenna cable: passo 49, immagine 1 di 2 Motorola Moto G Stylus 5G (2022) Screen Replacement, Remove the antenna cable: passo 49, immagine 2 di 2
    • Grab and lift the antenna cable from the frame.

  50. Motorola Moto G Stylus 5G (2022) Screen Replacement: passo 50, immagine 1 di 1
    • The screen is all that remains.

Conclusione

Compare your new replacement part to the original part—be sure to transfer remaining components and remove adhesive backings from the new part before installing.

To reassemble your device, follow these instructions in reverse order.

Take your e-waste to an R2 or e-Stewards certified recycler.

Repair didn’t go as planned? Try some basic troubleshooting, or ask our Answers community for help.

Altre 7 persone hanno completato questa guida.

Clay Eickemeyer

Membro da: 09/19/22

66.769 Reputazione

453 Guide realizzate

Team

iFixit Membro di iFixit

Staff

135 Membri

17.198 Guide realizzate

5 Commenti

This is a decent guide. I'm going to attempt to do this repair myself. I did it successfully twice on my Samsung Note 9 which seemed a lot less complicated but we will see. Thanks for the clearly written guide with plenty of pics, side notes, and for not bashing alternative products and methods and actually adding them in as options. This is a one of a kind guide so far in my book. You should write all guides for everything. All others should be removed from the internet.

r.dunne71 - Replica

Good luck with your repair! Thank you for the kind feedback.

Clay Eickemeyer -

When I removed the motherboard I notice a white paste-type substance on the frame. is it important if so what is it so I could find a replacement?

James R - Replica

Hi James,

The substance is a light coating of thermal paste. While this guide doesn't mandate that you replace it, you can check this guide out for general instructions. For context, thermal paste helps dissipate heat from the motherboard to larger components on the phone. It won't affect your phone's functionality, but is preferred to keep it cool.

Clay Eickemeyer -

Hello, looking for

Troubleshooting tips. I replaced the screen and now it will not power up. The repair went good and I have tried to double check the connections. One difference I did notice is this phone did not have the 5 g antenna mentioned in the guide. But I have bought a 5g screen. Also noticed a cable seed to be broke when opening it

Joey Stokes - Replica

Aggiungi Commento

Visualizza Statistiche:

Ultime 24 Ore: 19

Ultimi 7 Giorni: 162

Ultimi 30 Giorni: 757

Tutti i Tempi: 18,928