Salta al contenuto principale
Master and Dynamic MW50 Battery Replacement

Master and Dynamic MW50 Battery Replacement

Tyler Guffey

Tyler Guffey e 4 altri collaboratori

Ultimo aggiornamento il May 10, 2022

10 minuti
Moderato

Introduzione

Vai al passo 1

In order to safely replace or check other parts for this device, it is sometimes necessary to first disconnect the battery. This will also allow you to replace the battery if you determine it to be faulty. You will need to unsolder and solder to replace your battery, and there is an attached guide to show you how. You will be disassembling the right side of the headphones.

Cosa ti serve

Strumenti

Mostra di più…

iFixit guadagna commissioni quando acquisti tramite questi link.
  1. Master and Dynamic MW50 Battery Replacement, Master and Dynamic MW50 Disassembly: passo 1, immagine 1 di 3 Master and Dynamic MW50 Battery Replacement, Master and Dynamic MW50 Disassembly: passo 1, immagine 2 di 3 Master and Dynamic MW50 Battery Replacement, Master and Dynamic MW50 Disassembly: passo 1, immagine 3 di 3
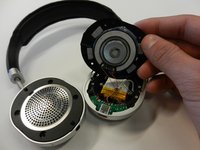
    • Pull the cushion off of the desired side by gripping the top of the headphones and pulling the cushion off.

  2. Master and Dynamic MW50 Battery Replacement: passo 2, immagine 1 di 1
    • Remove the four 5mm screws from the earpiece with a Y1 Triwing screwdriver.

  3. Master and Dynamic MW50 Battery Replacement: passo 3, immagine 1 di 1
    • Use the Jimmy to lift up the black cover to get inside the device.

  4. Master and Dynamic MW50 Battery Replacement, Battery: passo 4, immagine 1 di 2 Master and Dynamic MW50 Battery Replacement, Battery: passo 4, immagine 2 di 2
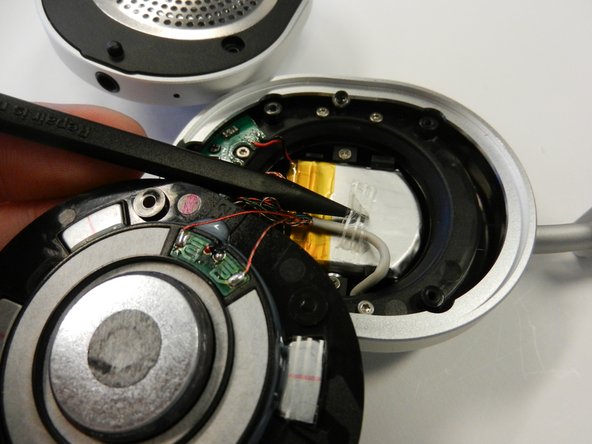
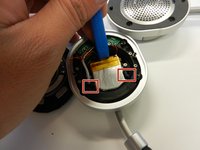
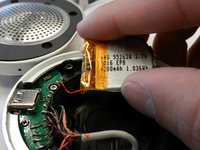
    • Remove the tape attaching the thicker white wire to the battery. You may consider keeping the tape to reattach the wire later.

  5. Master and Dynamic MW50 Battery Replacement: passo 5, immagine 1 di 1
    • Desolder the two wires circled here.

  6. Master and Dynamic MW50 Battery Replacement: passo 6, immagine 1 di 2 Master and Dynamic MW50 Battery Replacement: passo 6, immagine 2 di 2
    • Use an iFixit opening tool or something similar to pry out the battery.

    • There are two small tabs circled here that are holding the battery in. Push these down while prying to make the battery come out easier.

Conclusione

To reassemble your device, follow these instructions in reverse order.

Tyler Guffey

Membro da: 01/24/19

208 Reputazione

2 Guide realizzate

Team

Cal Poly, Team S1-G4, White Winter 2019 Membro di Cal Poly, Team S1-G4, White Winter 2019

CPSU-WHITE-W19S1G4

4 Membri

12 Guide realizzate

Un commento

Hi, do you know where it’s possible to buy replacement batteries??

Mike - Replica

Aggiungi Commento

Visualizza Statistiche:

Ultime 24 Ore: 1

Ultimi 7 Giorni: 6

Ultimi 30 Giorni: 50

Tutti i Tempi: 2,087