
Sostituzione disco rigido Mac mini versione fine 2012
Introduzione
Vai al passo 1Utilizzare questa guida per sostituire completamente il disco rigido del Mac mini.
Cosa ti serve
Kit di riparazione
Questi kit contengono tutti i ricambi e gli strumenti necessari per completare questa guida.


Ricambi


Strumenti


Mostra di più…
-
-
Posizionare i pollici negli incavi nel coperchio inferiore.
-
Ruotare il coperchio inferiore in senso antiorario finché il puntino bianco dipinto su di esso non è allineato con il cerchio in rilievo sul case esterno.
-
-
-
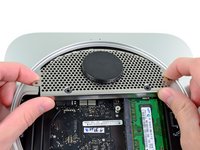
Rimuovere le due viti Torx T6 da 11,3 mm che fissano la ventola alla scheda logica, in prossimità della piastra dell'antenna.
-
-
-
-
Rimuovere le viti seguenti, che fissano la piastra dell'antenna al Mac mini:
-
Due viti Torx T8 da 6,6 mm
-
Due viti Torx T8 da 5 mm o viti esagonali da 2 mm (vanno bene entrambi i cacciaviti)
-
in fase di montaggio:
-
-
-
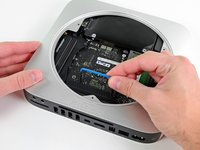
Utilizzare l'estremità piatta di un inseritore per scollegare il connettore del disco rigido dal connettore femmina sulla scheda logica.
-
-
-
Utilizzare i due fori evidenziati in rosso. Verificare che avvenga il contatto con il lato superiore del case esterno sotto la scheda logica prima di procedere con l'operazione.
-
Tirare con attenzione l'attrezzo verso la scheda I/O. La scheda logica e il gruppo della scheda I/O dovrebbero scorrere leggermente fuori dal case esterno.
-
Rimuovere l'attrezzo per la rimozione della scheda logica per Mac mini.
-
-
-
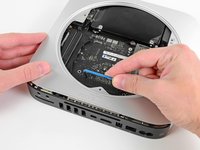
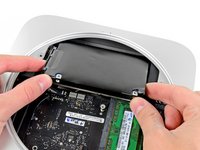
Premere contemporaneamente le due levette di plastica nei lati all'estrema sinistra e destra della scheda I/O verso la parte centrale di quest'ultima, rimuovendola dal case esterno.
-
Estrarre il gruppo della scheda logica dal case esterno solo finché il bordo della scheda I/O non si trova a circa 1,27 cm dal bordo del case esterno in alluminio.
-
-
-
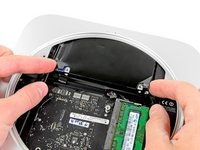
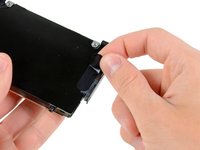
Rimuovere la striscia di nastro che fissa il cavo del disco rigido a quest'ultimo.
-
Scollegare il cavo del disco rigido estraendolo direttamente dall'unità stessa.
-
-
-
Rimuovi il cavo dell'hard drive.
-
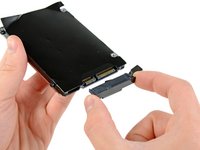
Rimuovi le due viti Torx T8 da 6,2 mm dall'altro lato dell'unità.
-
-
-
Rimuovere con attenzione la copertura del disco rigido.
-
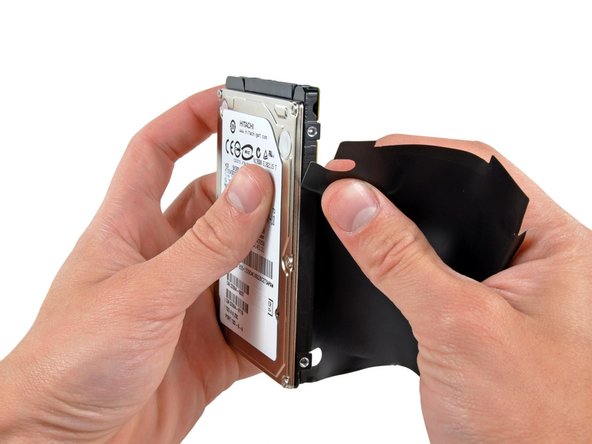
Resta il solo disco rigido.
-
Se stai installando un nuovo disco fisso, abbiamo una guida di installazione OS X per aiutarti a tornare rapidamente al lavoro.
-


Per riassemblare il dispositivo, seguire queste istruzioni in ordine inverso.
Per riassemblare il dispositivo, seguire queste istruzioni in ordine inverso.
Annulla: non ho completato questa guida.
Altre 546 persone hanno completato questa guida.
Un ringraziamento speciale a questi traduttori:
100%


Questi traduttori ci stanno aiutando ad aggiustare il mondo! Vuoi partecipare?
Inizia a tradurre ›

79 Commenti
no need to remove the logic board! the disk comes out after step 12.
Also you do not really need to disconnect the antenna. Just be carefull no to break the wire.
i replaced 5400 rpm hdd with Samsung SSD 840 Pro
I did it Rober's way - thanks - no disconnecting antenna in step 10
Stopping after step 12 and replacing hard drive there without removing logic board
I put the sheet that was around the old hard drive over the new one - not sure if its needed?
After it is all done i did Command + R to do internet recovery and get OS X mountain lion on the blank drive
Last thing to do is go here to enable trim: http://www.groths.org/?page_id=322
royl123 -
Very helpful guide, thanks! As many have said before, I would not detach the fan or antenna, just move it out of the way.
One very trivial tip: slide a piece of paper over the logic board as soon as you've removed the fan, as a protection against accidentally touching the components with your fingers or tools.
I did not reinstall the plastic cover on the HDD. This is only to protect the logic board of the HDD, which ofcourse is very well protected in SSD's.
That depends which position the hard drive is in. If it's in the upper slot (ie at the 'top' of the enclosure when it's in use) then you will need to remove the logic board.
Dismantling the Mini was simple, but the two hardest steps when installing a new hard drive were sliding the drive back in aligned correctly, and replacing the antenna grill.
Even with the logic board pushed out, I found it difficult to line up the screws on the hard drive and get it seated properly. As for the grill, it would not line up with the screw holes. I had to use the Mac Mini tool hooked into a hole in the grill as a lever to lift it up and in towards the lip of the rim it was sitting on. There was an audible snap as it settled into place.