
Sostituzione del pannello Touch dello schermo di un Kindle Paperwhite di 3a generazione

Introduzione
Vai al passo 1Amazon Kindle Paperwhite da 6" pollici di 3a generazione, schermo da 300 PPI. Questa guida richiede che il Kindle sia spento, e che vengano usati uno strumento di apertura di plastica, pinzette angolari di precisione, e un cacciavite PH000.


-
-
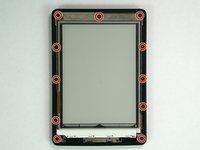
Fai leva delicatamente sullo schermo con lo strumento di apertura in plastica. Inizia agli angoli e fallo scorrere sotto i bordi finché non torni al punto iniziale.
-
-
-
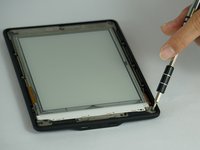
Usa estrema cautela quando sollevi il telaio. Fai attenzione a non far cadere il tuo strumento di leva sotto il display. Guarda sotto il coperchio mentre lavori, separando il display dall'adesivo del telaio.
-
Assicurati che il tuo separatore passi attraverso entrambi i lati del telaio sopra il display.
-
Nella seconda foto è il livello attraverso il quale desideri far passare in sicurezza il tuo strumento.
-
Nella terza foto è mostrato un esempio di ciò che può andare storto. Se ciò accade, il tuo strato del digitalizzatore leggerà in modo errato i tocchi e il display sarà danneggiato permanentemente.
-
-
-
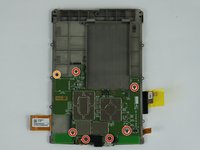
Svita le undici viti a croce Phillips #000 da 3,2 mm attorno alla cornice.
Mine had 11, as per the instructions, one of which was hidden under tape. I cut an opening in it.
Should have read Glover's comment.
Looked for the middle screw but the black tape covered all appearances of it. Lifting the mid-frame out of the case snapped the mount. However, there was plenty of support with the ten screws and no lasting damage to the reader.
-
-
-
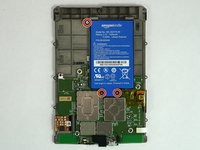
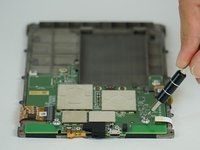
Solleva delicatamente il telaio intermedio dalla copertura con le mani.
-
-
-
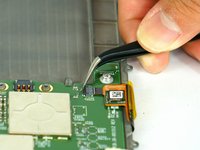
Solleva delicatamente la batteria dalla cornice.
We had a Kindle that unfortunately took a dunk in (clean) water. It was then inoperative. I followed this guide, and took the battery out, let everything dry for a few days, then replaced the battery. Now it works fine! Thanks!
-
-
-
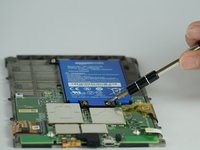
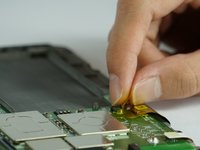
Capovolgi la chiusura nera con uno strumento in plastica di apertura, e poi gentilmente tira indietro il cavo a nastro arancione.
-
-
Aufpassen beim Kauf des neues Displays. Aktuell finde ich nur einen Anbieter bei ebay, der ein komplettes Set (Rahmen mit darauf verklebtem Display) anbietet. Die bei Aliexpress angebotenen Displays sind ohne Rahmen. Es dürfte aber kaum möglich sein, das defekte Display so sauber vom vorhandenen Rahmen abzulösen, dass der Rahmen nicht bricht oder sich zumindest verformt.
Auch das Angebot auf ebay, das eine vollständige Einheit (Display fertig verklebt auf Rahmen, so wie in Schritt 13 abgebildet) zeigt, entpuppte sich bei der Lieferung als einzelnes Display ohne Rahmen. Ich habe versucht, mein defektes Display vom vorhandenen Rahmen zu lösen - es ist schlichtweg unmöglich. Die Verklebung löst sich auch durch Erwärmen mit einem Fön nicht.
Fazit: Display defekt = Totalschaden


Per ricomporre il tuo dispositivo, segui queste istruzioni in ordine inverso.
Per ricomporre il tuo dispositivo, segui queste istruzioni in ordine inverso.
Annulla: non ho completato questa guida.
Altre 20 persone hanno completato questa guida.
Un ringraziamento speciale a questi traduttori:
100%

Questi traduttori ci stanno aiutando ad aggiustare il mondo! Vuoi partecipare?
Inizia a tradurre ›
Preparati per le riparazioni future
Acquista tutti


Team

USF Tampa, Team 14-3, Lacy Spring 2016 Membro di USF Tampa, Team 14-3, Lacy Spring 2016
USFT-LACY-S16S14G3
4 Membri
12 Guide realizzate
15Commenti sulla guida
hi there thank youfor your helping tutorial.
i just bought some used Kindle in order to buy at my shop. but i have a problem with some Kindle that i disassembled in order to have some spare parts and especially with the screen.
even after removing the screen it will stay frozen, even if i change the motherboard with a new one it will stay on the last screen shown.
Might you give me any explanation about the issue? and is that a way to reset the screen in order to use it as spare parts for other kindles?
Thank you so much for this tutorial! Thanks to it I was able to replace a (physically) broken display. I un-assembled the entire device, let it rest until the shipment from China arrived and re-assembled it. It works flawlessly again and looks like new. One word of caution, though: The new display came without frame and removing the old display from the frame (both are pretty tightly glued together) resulted in quite some patient work and many pieces of broken glass (even with having it all heated). Anyway it worked out like a charm at the end!
Hello, where I can but a replacement screen for Kindle Paperwhite 300 ppi?? Thanks!!
For anyone curious, the panel number for the PW3 is ED060KD1. You can use this to look it up on eBay etc.
Do you have to take the broken screen out of the frame and then put the new one in? Is it difficult?
Chris -
Hello! Thanks for the tutorial.my kindle screen is broken. Also the screen lights up every 3 seconds and then gets dark again. It could be some kind of bootloop because the device wont stop, even if I press the power button for a long time. Does anyone know if the device will work again after I change the display? I dont know if there is something more broken. The kindle was damage by pressure. Thanks for your help!
Hello! Thanks for the tutorial.my kindle screen is broken. Also the screen lights up every 3 seconds and then gets dark again. It could be some kind of bootloop because the device wont stop, even if I press the power button for a long time. Does anyone know if the device will work again after I change the display? I dont know if there is something more broken. The kindle was damaged by pressure. Thanks for your help.
Go Bulls!!!!!
where can I buy a replacement screen for this
ebay search ED060KD1
Thank you for this guide, it was very helpful. I replaced a broken screen. I disassembled the unit to be able to see the model # of the screen before ordering a new one on eBay. The replacement screens on eBay did not come glued in to a tray so I needed to peel off the old one. I also had to be careful when buying a replacement because the cheapest screens did not some with backlight or touch!
Is compatible with paperwhite 2?
would doing this fix dead touch in most of the screen?
Be very careful along the lower left side, where the cable to the touchscreen can be easily cut with a plastic spudger.
John Kenny - Replica
Be careful at the top of the 3G version. The wifi and cell antennas are located along here.
James Sullivan - Replica
I can’t get my spudger in to start lifting. Any advice?
Davey - Replica
it takes a bit of force to first insert the spudger into the crack
jookieapc -
Be careful inserting the spudger too quickly. The glue holding the screen pulled loose in two spots along the side before the bezel did and there are lines along the border of my screen now.
Nick - Replica
I made my own version of Nick’s error: I inserted a pick too far under the bezel, and very slightly separated the screen, leaving a small shadow in a corner. Easy does it!
Other than that, battery replacement was super-easy and successful.
Brad Compton - Replica
I couldn't get a purchase from the outside, so started from the inside of the bezel. It was secured with double sided tape. Might have been better to apply some heat before prying.
David Glover - Replica
Used the guide to replace the battery. Could not get enough separation using the blue spudger. Used the metal spidger to get things started then switched to the blue picks. Afterthought, Warming the bezel would have helped.
Jeffry Long - Replica