Salta al contenuto principale
HP Chromebook 11A G8 EE Bezel Replacement

HP Chromebook 11A G8 EE Bezel Replacement

Kim Travers

Kim Travers e 2 altri collaboratori

Ultimo aggiornamento il December 27, 2021

10 - 20 minuti
Moderato

Introduzione

Vai al passo 1

This guide is a prerequisite guide that will show you how to remove the bezel in the HP Chromebook 11A G8 EE laptop. On the laptop, the bezel is the black border that surrounds the screen. Bezels protect the screen and wiring from becoming damaged, and adds structural integrity to the device.

Cosa ti serve

Strumenti

Mostra di più…

  1. HP Chromebook 11A G8 EE Bezel Replacement, Keyboard Assembly: passo 1, immagine 1 di 2 HP Chromebook 11A G8 EE Bezel Replacement, Keyboard Assembly: passo 1, immagine 2 di 2
    • On the bottom of the laptop, remove four 7 mm screw using a Phillips #1 screwdriver.

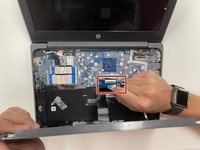
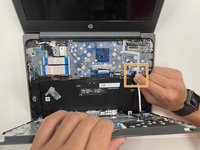
    • Using the Phillips #1 screwdriver, remove the two remaining 8 mm screws by the hinges.

  2. HP Chromebook 11A G8 EE Bezel Replacement: passo 2, immagine 1 di 3 HP Chromebook 11A G8 EE Bezel Replacement: passo 2, immagine 2 di 3 HP Chromebook 11A G8 EE Bezel Replacement: passo 2, immagine 3 di 3
    • Flip the laptop over and open up the display.

    • Using the iFixit opening tool, carefully separate the palm rest from the bottom cover by working your way around the perimeter and prying it up.

    • You will hear an audible and tactile click or pop letting you know that you have unclipped a portion of the palm rest from the base enclosure.

    • Lift the palm rest of the laptops towards you, away from the screen.

  3. HP Chromebook 11A G8 EE Bezel Replacement: passo 3, immagine 1 di 2 HP Chromebook 11A G8 EE Bezel Replacement: passo 3, immagine 2 di 2
    • Carefully, lift the keyboard ribbon lock and disconnect the keyboard ribbon from the motherboard.

    • Disconnect the touchpad ribbon from the motherboard, and remove top cover.

    • Remove the keyboard.

  4. HP Chromebook 11A G8 EE Bezel Replacement, Bezel: passo 4, immagine 1 di 1
    • Pry the hinge cap off with your hands by lifting it up.

  5. HP Chromebook 11A G8 EE Bezel Replacement: passo 5, immagine 1 di 1
    • Use the iFixit opening tool to pry the bezel up.

  6. HP Chromebook 11A G8 EE Bezel Replacement: passo 6, immagine 1 di 1
    • Once you have pried away the bezel, pull it up towards you.

    • Peel it off gently from the screen.

  7. HP Chromebook 11A G8 EE Bezel Replacement: passo 7, immagine 1 di 1
    • You are finished once the bezel is off of the device.

Conclusione

To reassemble your device, follow these instructions in reverse order.

Un'altra persona ha completato questa guida.

1Commento della guida

Just curious why the back needs to be unscrewed and the keyboard removed to take off the bezel.

The spine piece can be removed with the device closed.

Also, the bezel is attached with a lot of adhesive. Be extremely careful to not break the bezel when removing it.

Scott - Replica

Aggiungi Commento

Visualizza Statistiche:

Ultime 24 Ore: 1

Ultimi 7 Giorni: 6

Ultimi 30 Giorni: 27

Tutti i Tempi: 636