Salta al contenuto principale

HMD Pulse Battery Replacement

Cosa ti serve

  1. HMD Pulse Battery Replacement, Prepare your phone for disassembly: passo 1, immagine 1 di 1
    • Let your phone's battery drain below 25% before starting this repair. A charged lithium‑ion battery may catch fire if damaged.

    • Unplug all cables from your phone and completely power it down.

  2. HMD Pulse Battery Replacement, Remove the SIM card tray: passo 2, immagine 1 di 3 HMD Pulse Battery Replacement, Remove the SIM card tray: passo 2, immagine 2 di 3 HMD Pulse Battery Replacement, Remove the SIM card tray: passo 2, immagine 3 di 3
    • Firmly press a SIM eject tool, bit, or straightened paper clip into the SIM card tray hole on the left edge of your phone until the tray ejects.

    • Remove the SIM card tray.

    • During reassembly, use the tray's markings to orient and reinsert it properly.

  3. HMD Pulse Battery Replacement, Separate the back cover: passo 3, immagine 1 di 2 HMD Pulse Battery Replacement, Separate the back cover: passo 3, immagine 2 di 2
    • Insert the tip of an opening pick between the back cover and frame, at the SIM card tray cutout.

  4. HMD Pulse Battery Replacement: passo 4, immagine 1 di 3 HMD Pulse Battery Replacement: passo 4, immagine 2 di 3 HMD Pulse Battery Replacement: passo 4, immagine 3 di 3
    • Position the opening pick straight down and slide it along the left edge to begin unclipping the back cover.

  5. HMD Pulse Battery Replacement: passo 5, immagine 1 di 3 HMD Pulse Battery Replacement: passo 5, immagine 2 di 3 HMD Pulse Battery Replacement: passo 5, immagine 3 di 3
    • Continue sliding the pick around the perimeter of your phone until the back cover is fully unclipped.

    • The corners can be tricky to unclip and may take some force. If you're having trouble, try prying up with the pick.

    • Don't try to fully remove the cover yet, as a delicate cable still connects it to your phone.

  6. HMD Pulse Battery Replacement: passo 6, immagine 1 di 3 HMD Pulse Battery Replacement: passo 6, immagine 2 di 3 HMD Pulse Battery Replacement: passo 6, immagine 3 di 3
    • Carefully flip your phone over so the back cover is facing up.

    • Lift the back cover off the frame and flip it over the left edge of your phone, laying the cover flat on your work surface.

    • Be very careful not to strain the back cover's delicate cable.

    • During reassembly, place the back cover onto the frame and firmly squeeze around the perimeter to reengage all the clips.

  7. HMD Pulse Battery Replacement, Remove the motherboard cover: passo 7, immagine 1 di 2 HMD Pulse Battery Replacement, Remove the motherboard cover: passo 7, immagine 2 di 2
    Attrezzo utilizzato in questo passaggio:
    Tweezers
    $4.99
    Compra
    • Be very careful not to puncture the battery with your screwdriver.

    • Use a Phillips screwdriver to remove the nine 3.6 mm‑long screws securing the motherboard cover.

    • The screw near the center of the top edge is covered by a sticker. Pierce through it with your screwdriver, or use tweezers to remove it.

  8. HMD Pulse Battery Replacement: passo 8, immagine 1 di 3 HMD Pulse Battery Replacement: passo 8, immagine 2 di 3 HMD Pulse Battery Replacement: passo 8, immagine 3 di 3
    • Insert an opening pick between the right edge of the motherboard cover and frame.

    • Twist the pick to fully unclip the cover.

  9. HMD Pulse Battery Replacement: passo 9, immagine 1 di 2 HMD Pulse Battery Replacement: passo 9, immagine 2 di 2
    • Remove the motherboard shield and its connected graphite sheet.

    • During reassembly, set the motherboard shield into place and press down firmly around the perimeter to reengage the clips.

  10. HMD Pulse Battery Replacement, Disconnect the battery: passo 10, immagine 1 di 2 HMD Pulse Battery Replacement, Disconnect the battery: passo 10, immagine 2 di 2
    • Use the flat end of a spudger to pry up and disconnect the battery press connector from the bottom edge of the motherboard.

    • To reconnect these type of connectors, align the connector over its socket and press down with your fingertip—first at one side, then the other—until it clicks into place. Don't try to force the connector into place, or you may permanently damage it.

  11. HMD Pulse Battery Replacement, Remove the back cover: passo 11, immagine 1 di 2 HMD Pulse Battery Replacement, Remove the back cover: passo 11, immagine 2 di 2
    • Use the flat end of a spudger to pry up and disconnect the back cover press connector from the bottom edge of the motherboard.

  12. HMD Pulse Battery Replacement: passo 12, immagine 1 di 1
    • Remove the back cover.

  13. HMD Pulse Battery Replacement, Remove the battery: passo 13, immagine 1 di 3 HMD Pulse Battery Replacement, Remove the battery: passo 13, immagine 2 di 3 HMD Pulse Battery Replacement, Remove the battery: passo 13, immagine 3 di 3
    • Be very careful not to bend, crease, or puncture the battery during the next few steps. A damaged battery can leak dangerous chemicals and catch fire.

    • Use your fingers to carefully peel the three plastic tabs from the left side of the battery.

  14. HMD Pulse Battery Replacement: passo 14, immagine 1 di 3 HMD Pulse Battery Replacement: passo 14, immagine 2 di 3 HMD Pulse Battery Replacement: passo 14, immagine 3 di 3
    • With one hand, fold the clear outer tabs out of the way of the battery and firmly hold them down to secure the frame.

    • If you're having trouble with the tabs, you can fold them under the phone and tape them to the screen.

    • With your free hand, grip the green center pull tab and pull straight up to fully separate the battery adhesive.

    • Lay the battery over the right edge of your phone.

  15. HMD Pulse Battery Replacement: passo 15, immagine 1 di 2 HMD Pulse Battery Replacement: passo 15, immagine 2 di 2
    • Use your fingers to peel the battery's plastic film from the frame.

  16. HMD Pulse Battery Replacement: passo 16, immagine 1 di 1
    Attrezzo utilizzato in questo passaggio:
    Tweezers
    $4.99
    Compra
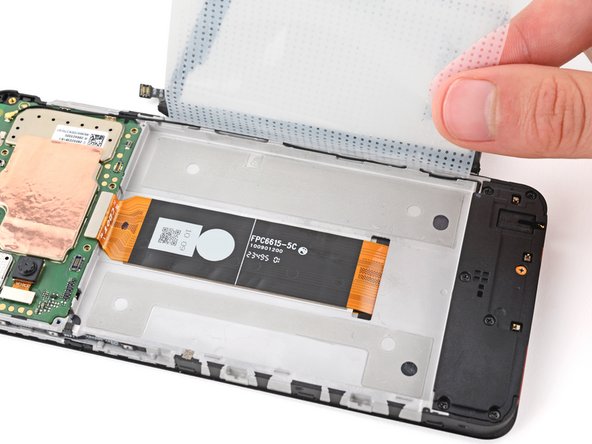
    • Remove the battery and its film.

    • During reassembly:

    • Never reuse a deformed or damaged battery, as it's a potential safety hazard. Replace it with a new battery.

    • If the adhesive in the battery recess is still sticky, you don't need to replace it.

    • If the adhesive isn't sticky, use a spudger and tweezers to peel up and remove the two pieces of battery adhesive. Then, apply the new adhesive to the frame and remove the plastic liners.

    • Firmly press the battery into its recess so the cable is on the top edge and the three tabs are on the left edge.

Conclusione

To reassemble your device, follow these instructions in reverse order.

For optimal performance, calibrate your newly installed battery after reassembling your phone.

Take your e-waste to an R2 or e-Stewards certified recycler.

Repair didn’t go as planned? Try some basic troubleshooting, or ask our Answers community for help.

Spencer Day

Membro da: 09/14/22

55.176 Reputazione

408 Guide realizzate

Team

iFixit Membro di iFixit

Staff

136 Membri

17.420 Guide realizzate

0 Commenti

Aggiungi Commento

Visualizza Statistiche:

Ultime 24 Ore: 5

Ultimi 7 Giorni: 40

Ultimi 30 Giorni: 211

Tutti i Tempi: 228