Salta al contenuto principale
Dell Inspiron 13-7352 Memory Module (RAM) Replacement

Dell Inspiron 13-7352 Memory Module (RAM) Replacement

Chase Sparkman

Chase Sparkman e 6 altri collaboratori

Ultimo aggiornamento il August 1, 2024

5 minuti
Molto facile
Necessarie Immagini Migliori

Introduzione

Vai al passo 1

The Memory Module (RAM) is one of the two memory storage places in your laptop. Some of your laptop's speed is dependent on the Memory Module so an upgrade may boost your laptop's overall performance if your current one if full.

Cosa ti serve

Strumenti

Mostra di più…

  1. Dell Inspiron 13-7352 Memory Module (RAM) Replacement, Battery: passo 1, immagine 1 di 3 Dell Inspiron 13-7352 Memory Module (RAM) Replacement, Battery: passo 1, immagine 2 di 3 Dell Inspiron 13-7352 Memory Module (RAM) Replacement, Battery: passo 1, immagine 3 di 3
    • Before you begin, be sure to turn off your laptop and unplug it from the outlet.

    • Use a Phillips screwdriver to remove the ten 7.5mm screws that securing the back panel.

    • Use the plastic opening tool to pry up and loosen the back panel.

    • Remove the back panel.

  2. Dell Inspiron 13-7352 Memory Module (RAM) Replacement: passo 2, immagine 1 di 2 Dell Inspiron 13-7352 Memory Module (RAM) Replacement: passo 2, immagine 2 di 2
    • Use a Phillips screwdriver to remove the two 3 mm screws securing the battery.

    • Unclip the hard drive wire from the battery.

  3. Dell Inspiron 13-7352 Memory Module (RAM) Replacement: passo 3, immagine 1 di 1
    • Gently remove the battery from the rest of the device.

    In the official service manual, they also recommend the following after removing battery.:

    "Press and hold the power button for 5 seconds, to ground the system board."

    Jordan Lui - Replica

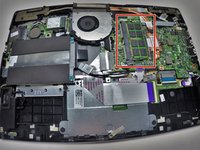
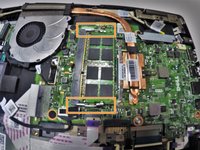
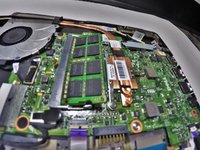
  4. Dell Inspiron 13-7352 Memory Module (RAM) Replacement, Memory Module (RAM): passo 4, immagine 1 di 3 Dell Inspiron 13-7352 Memory Module (RAM) Replacement, Memory Module (RAM): passo 4, immagine 2 di 3 Dell Inspiron 13-7352 Memory Module (RAM) Replacement, Memory Module (RAM): passo 4, immagine 3 di 3
    • Locate your memory module (RAM).

    • Release the clips from the Memory Module by gently pushing down. This should cause the Memory Module to pop up and separate from the device base.

  5. Dell Inspiron 13-7352 Memory Module (RAM) Replacement: passo 5, immagine 1 di 1
    • Pull the Memory Module from its slot by grasping each side with thumb and middle or index finger to pull from the rest of the device.

Conclusione

To reassemble your device, follow these instructions in reverse order.

Altre 4 persone hanno completato questa guida.

4Commenti sulla guida

Hello is the procedure same for 7353 ? can the ram be upgraded to 16GB. it currently has 8GB

Ali M - Replica

Hi! Same questions as Ali M: Is the procedure same for 7353 ? can the ram be upgraded to 16GB: It currently has 8GB and I'd like to upgrade it to 16 GB.

Roberto de Souza Santos - Replica

Did anyone ever get an answer if it can take 16 GB of RAM?

Robert Iversen - Replica

A 16GB RAM would work but it should be a single sodimm module like CT204864BF160B

Hochan Son - Replica

Aggiungi Commento

Visualizza Statistiche:

Ultime 24 Ore: 0

Ultimi 7 Giorni: 5

Ultimi 30 Giorni: 16

Tutti i Tempi: 3,315