Salta al contenuto principale
Asus VivoBook X202E-DB21T Power Port Replacement

Asus VivoBook X202E-DB21T Power Port Replacement

John Thomas

John Thomas e 2 altri collaboratori

Ultimo aggiornamento il April 11, 2019

5 minuti
Difficile

Introduzione

Vai al passo 1

The power port is where the power cable plugs into to send power to the battery and the motherboard. If this port is damaged, it may be impossible to charge the battery or power the computer. Replacing this component must be done with care, as any loose or crossed connections may result in device failure.

Cosa ti serve

Strumenti

  • Phillips #1 Screwdriver
    Phillips #1 Screwdriver
  • Spudger
    Spudger
  1. Asus VivoBook X202E-DB21T Power Port Replacement, Battery: passo 1, immagine 1 di 2 Asus VivoBook X202E-DB21T Power Port Replacement, Battery: passo 1, immagine 2 di 2
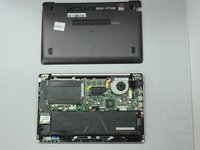
    • Flip the device such that the labels are on top.

    • Use a Phillips #1 screwdriver to remove the four 8mm screws near the back.

    • Use the same screwdriver to remove the four 5mm screws in the front.

    • Use the same screwdriver to remove the single 9mm screw in the center.

    • Make sure that the device is powered down and unplugged.

  2. Asus VivoBook X202E-DB21T Power Port Replacement: passo 2, immagine 1 di 2 Asus VivoBook X202E-DB21T Power Port Replacement: passo 2, immagine 2 di 2
    • Remove the back cover by gently prying with a spudger.

  3. Asus VivoBook X202E-DB21T Power Port Replacement: passo 3, immagine 1 di 2 Asus VivoBook X202E-DB21T Power Port Replacement: passo 3, immagine 2 di 2
    • Remove the eight 5mm screws using a Phillips #1 screwdriver.

    • Do not puncture the battery.

  4. Asus VivoBook X202E-DB21T Power Port Replacement: passo 4, immagine 1 di 1
    • Disconnect the battery ribbon cable from the motherboard.

  5. Asus VivoBook X202E-DB21T Power Port Replacement: passo 5, immagine 1 di 1
    • Remove the battery from the laptop.

  6. Asus VivoBook X202E-DB21T Power Port Replacement, Hard Drive: passo 6, immagine 1 di 2 Asus VivoBook X202E-DB21T Power Port Replacement, Hard Drive: passo 6, immagine 2 di 2
    • Unscrew the three 4mm screws holding the hard drive to the board.

  7. Asus VivoBook X202E-DB21T Power Port Replacement: passo 7, immagine 1 di 2 Asus VivoBook X202E-DB21T Power Port Replacement: passo 7, immagine 2 di 2
    • Pull on the tab on the left side of the hard drive and slowly disconnect it from the board.

  8. Asus VivoBook X202E-DB21T Power Port Replacement, Motherboard: passo 8, immagine 1 di 2 Asus VivoBook X202E-DB21T Power Port Replacement, Motherboard: passo 8, immagine 2 di 2
    • Unscrew the five 5mm screws holding the left board together.

  9. Asus VivoBook X202E-DB21T Power Port Replacement: passo 9, immagine 1 di 2 Asus VivoBook X202E-DB21T Power Port Replacement: passo 9, immagine 2 di 2
    • Unplug the two connectors on the left board.

  10. Asus VivoBook X202E-DB21T Power Port Replacement: passo 10, immagine 1 di 3 Asus VivoBook X202E-DB21T Power Port Replacement: passo 10, immagine 2 di 3 Asus VivoBook X202E-DB21T Power Port Replacement: passo 10, immagine 3 di 3
    • Remove the single 3mm screw from the sound chip.

    • Unplug the sound chip.

    • Remove the sound chip.

  11. Asus VivoBook X202E-DB21T Power Port Replacement: passo 11, immagine 1 di 1
    • Remove the six 4mm screws holding the fan and CPU cover.

  12. Asus VivoBook X202E-DB21T Power Port Replacement: passo 12, immagine 1 di 2 Asus VivoBook X202E-DB21T Power Port Replacement: passo 12, immagine 2 di 2
    • Unplug the fan.

    • Remove the fan and CPU cover.

  13. Asus VivoBook X202E-DB21T Power Port Replacement: passo 13, immagine 1 di 1
    • Unscrew the nine 4mm screws holding the right board together.

  14. Asus VivoBook X202E-DB21T Power Port Replacement: passo 14, immagine 1 di 1
    • Remove the two remaining connectors on the board.

  15. Asus VivoBook X202E-DB21T Power Port Replacement: passo 15, immagine 1 di 1
    • Remove the right board.

  16. Asus VivoBook X202E-DB21T Power Port Replacement, Power Port: passo 16, immagine 1 di 1
    • Locate the power port on the right board near the internet port.

  17. Asus VivoBook X202E-DB21T Power Port Replacement: passo 17, immagine 1 di 2 Asus VivoBook X202E-DB21T Power Port Replacement: passo 17, immagine 2 di 2
    • De-solder the pins of the port from the board

    • See this guide on how to use a soldering iron.

    • Remove the port from the board.

Conclusione

To reassemble your device, follow these instructions in reverse order.

Altre 2 persone hanno completato questa guida.

0 Commenti

Aggiungi Commento

Visualizza Statistiche:

Ultime 24 Ore: 1

Ultimi 7 Giorni: 4

Ultimi 30 Giorni: 10

Tutti i Tempi: 1,019