
Sostituzione del pannello LCD su un display Apple Thunderbolt
Introduzione
Vai al passo 1Il pannello CLD del display Apple Thunderbolt è la prima cosa che va rimossa, a prescindere da quale sia la componente da sostituire. Quindi è essenziale sapere come rimuoverlo dal dispositivo in sicurezza. Ricordati che anche dopo aver rimosso le viti non devi cercare di rimuovere del tutto il display, poiché è ancora collegato all'alimentatore e alla scheda logica! Una volta posizionato il nuovo schermo assicurati che tutto sia connesso come sul pannello originale, e il tuo dispositivo dovrebbe essere come nuovo!
Cosa ti serve


-
-
Appoggia il display con lo schermo rivolto verso l'alto.
-
Fai aderire 2 ventose, una per angolo del bordo superiore, e assicurati che abbiano una presa salda.
-
Il vetro è collegato al resto del display con dei piccoli magneti. Sollevalo lentamente e il vetro dovrebbe staccarsi da solo.
-
-
-
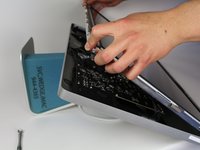
Svita le 12 viti lungo i bordi laterali e superiore del pannello LCD con un cacciavite TR 10.
The screws marked in orange don't need to be removed, all they do is hold the magnets on the LCD.
Yes “orange screws” does not need to be removed.
You do not need a TR10 screwdriver as written in the text a T10 will suffice (more common and also correctly mentioned in the list of tools).
A TR10 screwdriver is compatible with the T10, but not the other way around
Any info on if an older 2011 imac screen could just be plugged into this to replace the current lcd?
-
-
-
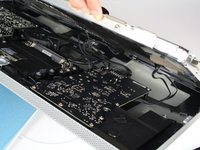
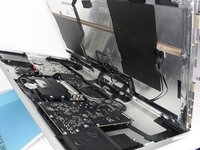
Inclina verso l'alto il pannello LCD sollevandolo lentamente dal suo bordo inferiore.
Add the note that it should be lifted from the bottom edge. It is also important not to twist the display by levering up from one corner.
Before lifting the monitor, you should be prepared to start collecting screws and have your TR 10 ready.
-
-
-
-
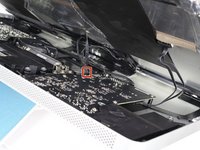
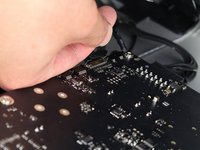
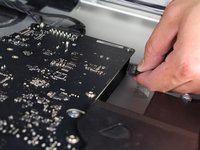
Per il primo cavo (quello più lontano dal cavo tenuto fermo da una vite) tira lentamente il connettore per scollegarlo.
Note: be sure to pull away but not hard. Wiggle and pull slowly. These are delicate especially due to age.
Overall this is a moderate repair. Follow step by step and you are good.
Also, use tape and/or labels to mark which cables go where per the MLB and other parts. Resulting in easier reassembly.
-
-
-
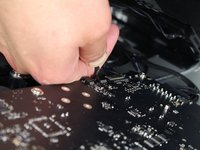
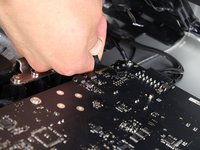
Per il prossimo cavo, che è accanto al precedente, troverai una striscia di nastro nero attaccata ad una staffa in metallo sul connettore.
-
Ruota la staffa per sbloccare il connettore, usando il nastro come manico.
-
Quindi tira lentamente il connettore per scollegarlo dalla sua presa sulla scheda.
What is this connector for?
I imagine this connector is going to be for display data (i.e. LCD data).
I pretty much mangled this cable trying to put it back into the slot. Is this something I can order a replacement for?
Thunderbolt Display 27" LVDS Cable
As other’s have said, this cable is super delicate.
When you replace it, make sure that the small metal handle it firmly reattached to the other side of the port. I thought I’d got it right first time, but had no video signal (thunderbolt detected display, and power was fed to the Macbook Pro).
I had to reinsert this one again, and one in, firmly press the connector home, then latch the handle over the other side. I also gave it a test pull to ensure it was secure. Then all was well!
Can anyone provide a photo of this connector so as to give a better understanding of its mechanics? see this cringe worthy effort at guidance; https://youtu.be/A96CUSm_Xhs?t=1050
-
-
-
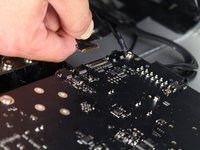
Per il cavo dall'altro lato della scheda, afferra il connettore da sotto e scollegalo attentamente dalla sua presa.
This cable was also taped for me, so remove the tape first
-
-
-
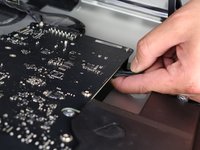
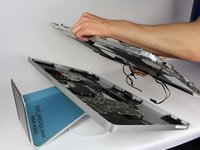
Il pannello LCD è ora completamente sconnesso dalla scocca e può essere riparato o sostituito.
Can this be replaced with an LCD from an imac?
From what I checked rather not, there are differemt revisions of this module.
bbkrzew -
-


Per rimontare il dispositivo, segui le istruzioni in ordine inverso.
Per rimontare il dispositivo, segui le istruzioni in ordine inverso.
Annulla: non ho completato questa guida.
Altre 28 persone hanno completato questa guida.
Un ringraziamento speciale a questi traduttori:
100%

Questi traduttori ci stanno aiutando ad aggiustare il mondo! Vuoi partecipare?
Inizia a tradurre ›
Preparati per le riparazioni future
Acquista tutti


Team

Cal Poly, Team 5-11, Maness Spring 2015 Membro di Cal Poly, Team 5-11, Maness Spring 2015
CPSU-MANESS-S15S5G11
4 Membri
20 Guide realizzate
13Commenti sulla guida
Love your site! Proved very helpful on multiple occasions and your products are fantastic!
Forgive my ignorance...
Is it possible to (1) Are any of the components of Thunderbolt Display upgrade-able? .... (2) There appears to be plenty of real-estate, can a Thunderbolt Display be turned into mac and/or pc? ... (3) Any way to upgrade to USB 3.0/3.1?...
I like tinkering with electronics and don't mind the complexities or if necessary getting parts, just wondering if any of these are possible and if so, can you give a clue as to where I can find more info... Thank You.
Would like to see a continuation of what it takes to replace the Thunderbolt cable that is attached to the back of the display
Does the LCD from an iMac 2009 27” fit into the Thunderbolt Display and make it work?
Actually it’s the same Display but the connectors are different, therefore it’s not that easy.
The Apple Studio Display 27 LCD panel has 2 main flaws that occasionally need fixing The first issue is the LCD panel and backlight are not vacuum sealed, micro dust particles gather between the 3 backlight transparent sheets, then when the air temperature changes is cause the dust to accumulated creating what looks like a water mark/streak. This may not be noticeable too most but if your using it for colour correction this is a major issue. Secondly the connections for powering the LEDS backlight at the bottom corners have a less than satisfactory solder connection causing flickering and turning off, sometimes only on one side, which can be fixed by just running solder along the 90 degree connection.
Fixing one of the two issues requires you to disassemble the panel, not for the faint hearted or not technically skilled.
It is hard to disassemble but impossible to reassemble, must have been assembled by a robot, the plastic frame and get it to click back in place, first time I attempted this i crushed the very thin LED panel.
The half-arse solution to reassembly is to modify the plastic clip as long as you return the silver curved reflector on the plastic frame so that the backlight works at the same brightness.
Tutoriel parfait mais où trouver une dalle LCD de remplacement pour thunderbolt apple 27”
Hello EVERYONE! I've just successfully completed the transplant of a 2011 27" iMac Screen, into my A1407 Thunderbolt Display. And there are 3 things to note.
1. Physical
Physically the displays are identical, even down to the mounting holes (covered with silver tape) However, you will need to transfer the metal brackets from the outside edges of your original thunderbolt LCD and replace the ones on the outside of your replacement LCD
a. you will need to transplant the metal brackets from the original display onto your replacement. All screws are visible however its also held on with some incredibly strong glue.
b. when removing the metal brackets from the 2011 27" display, there was one hidden screw under the cushioning and there seemed to be twice as much glue... its very strong so i recommend using pliers.
2. Technical
Swapping the T-Con board is incredibly easy and can be done by removing the top shielding
The screen temp sensor on the 2011's has an off branch for the motherboard, this can be removed.
More below..
Using the original temperature sensor is not required as all the displays come fitted with one anyway, however you should remove the pins that form a branch off connector as it will have one that stems from the tcon and to a motherboard(likely for connecting the display temp to the motherboard. and remove those pins directly out of the connector.
you must reuse all the original LCD data cable and t-con power cable? as you'll need it for your thunderbolt display.
3. Finally there is an actual modification you must make,
The original LCD Cable for the 2011 iMac comes up the left hand side.... on the TB Display it appears on the right hand side.... now unfortunately during my experimenting i destroyed one of the connectors but if you take more care than i did, it will be hugely beneficial to keep this connector and transferring it over from your TB display to your replacement imac LCD...
IMPORTANT NOTE: The cables that power the backlight are held in with plastic tabs that CANNOT BE Pulled back... they must be snipped off and/or Removed... there is plenty of tape to hold it in place so don't stress.
Thats it. T-CON, Brackets and LED cable
Instead of $14 foam block, I used a full roll of paper towel and two pillows. While it worked, if I ever did this again, I would buy the block of foam. Since you’re removing a power cable, you need to be able thread it through and I think the foam block would make that easier.
Josh Miller - Replica
You can also use a single handle, double cup floor lifting suction cup. Just place it in the centre of the screen near the camera and lift slowly.
Steve A - Replica
I just used a toilet plunger to remove the screen and it worked like a charm!
Philip Jacob - Replica
That’s what I call resourceful—made my day. I hope your repair was successful.
Tobias Isakeit -
Great idea, thanks a lot!
Yvan Sandoz -
The glass lifted off the magnets quite easily after just using my fingernails. No suction cups or toilet accessories needed.
Adrian Gropper - Replica
I had the same problem and after removal of the fan and a bit of work with the vacuum, the fan is quiet. Thanks to ifixit for the great instructions that made this easy.
John Perser - Replica
To keep the screen up, other soft objects might work, but it's important that the hole in the back isn't covered because you will need to thread the new Thunderbolt/MagSafe cable through it and it would be a hassle to do it after everything's been set up.
Thomas - Replica
Anybody got any links to glass screen replacement supplier for the A1407 Thunderbolt Display? Im finding it impossible to find a replacement without it being crazy money.
Michael McMillan - Replica
Instead of a wedge, I used 4 rolls of toiletpaper, one under each corner.
jnbruin - Replica
Glass screen cover came out just using my fingernails. Used a tupperware container as a prop to keep the screen at a good angle to access the cords underneath.
MeepleMe - Replica