Salta al contenuto principale

Apple Studio Display M7649 Logic Board Replacement

Cosa ti serve

  1. Apple Studio Display M7649 Logic Board Replacement, Stand: passo 1, immagine 1 di 2 Apple Studio Display M7649 Logic Board Replacement, Stand: passo 1, immagine 2 di 2
    • Lay the display facing down with the stand away from you.

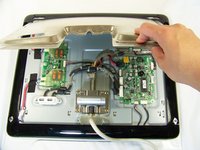
    • Remove the three size 2.0 hex screws on the swing arm and remove the swing arm as well as the plastic shield under it.

  2. Apple Studio Display M7649 Logic Board Replacement, Panels: passo 2, immagine 1 di 1
    • Remove the size 2.5 hex screws from each corner that connects the panels to the display and remove them.

  3. Apple Studio Display M7649 Logic Board Replacement: passo 3, immagine 1 di 1
    • Rotate the display so the legs of the display are now facing you

    • Grip the top of the clear panel and lift it upwards, and pull the ADC cable through the hole.

  4. Apple Studio Display M7649 Logic Board Replacement: passo 4, immagine 1 di 1
    • Remove the grey back panel by lifting the bottom and pulling the ADC cable through the hole.

  5. Apple Studio Display M7649 Logic Board Replacement, Metal EMI Shield: passo 5, immagine 1 di 1
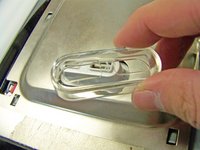
    • The next layer will be a shiny metal panel, which might have some stickers. Make sure to remove these stickers.

  6. Apple Studio Display M7649 Logic Board Replacement: passo 6, immagine 1 di 1
    • Now locate and remove the lone Phillips screw holding the EMI shield to the display

  7. Apple Studio Display M7649 Logic Board Replacement: passo 7, immagine 1 di 2 Apple Studio Display M7649 Logic Board Replacement: passo 7, immagine 2 di 2
    • Now that the screw has been removed, slide the panel towards your body and lift it out.

    • You may need to remove the clear USB port cover to remove the metal EMI shield.

  8. Apple Studio Display M7649 Logic Board Replacement, Logic Board: passo 8, immagine 1 di 1
    • Remove the four screws holding the logic board to the display

  9. Apple Studio Display M7649 Logic Board Replacement: passo 9, immagine 1 di 1
    • Remove these seven cables connected to the logic board.

    • There is an extra connection that no cable plugs into. This connection is for Apple to test their logic boards

  10. Apple Studio Display M7649 Logic Board Replacement: passo 10, immagine 1 di 1
    • Remove and replace the logic board.

Conclusione

To reassemble your device, follow these instructions in reverse order.

Altre 2 persone hanno completato questa guida.

Andrew Tsao

Membro da: 01/19/10

186 Reputazione

5 Guide realizzate

Team

Cal Poly, Team 3-20, Maness Winter 2010 Membro di Cal Poly, Team 3-20, Maness Winter 2010

CPSU-MANESS-W10S3G20

4 Membri

15 Guide realizzate

0 Commenti

Aggiungi Commento

Visualizza Statistiche:

Ultime 24 Ore: 0

Ultimi 7 Giorni: 3

Ultimi 30 Giorni: 12

Tutti i Tempi: 4,794