Introduzione
La sostituzione del case superiore offre anche il vantaggio di una nuova tastiera e un nuovo trackpad.
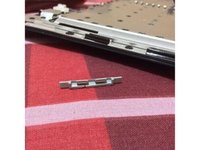
Nota: il cavo piatto è fragile ma sostituibile. È collegato mediante un connettore ZIF sotto il touchpad.
Cosa ti serve
-
-
Usa una monetina o uno spudger per ruotare la vite di blocco della batteria di 90 gradi in senso orario.
 Chiedi a FixBot
-
-
-
Svita le tre viti a croce Phillips 000 equidistanti lungo la parete posteriore del vano batteria.
-
-
-
Afferra l'estremità destra della copertura della memoria a forma di L, quindi tirala verso di te in modo che superi l'apertura del vano batteria.
-
Solleva la copertura della memoria verso l'alto e tirala fuori dal computer.
-
-
-
-
Rimuovere le 3 viti seguenti:
-
Una vite a croce Phillips #00 da 11 mm al centro del case inferiore. (Testa: 5 mm di diametro x 0,75 mm di spessore)
-
Due viti con testa a croce n. 00 da 14,5 mm (testa: 5 mm di diametro x 0,75 mm di spessore)
-
-
-
Rimuovi le 3 viti seguenti dalla parete posteriore dello scomparto della batteria:
-
Una vite con testa a croce Phillips #0 da 3 mm (testa: 2,75 mm di diametro).
-
Due viti con testa a croce Phillips #0 da 4 mm su entrambi i lati. (Testa: 2,75 mm di diametro)
-
-
-
Rimuovere le due viti con testa a croce da entrambi i lati della parete destra dello scomparto della batteria (non quelle più vicine al connettore della batteria).
-
Due viti con testa a croce n. 000 da 6,25 mm. (Testa: 4 mm di diametro x 0,5 mm di spessore)
-
-
-
Rimuovere le quattro viti a croce Phillips indicate dalla parte anteriore dello scomparto della batteria. Partendo da sinistra, rimuovere la seconda, la quarta, la settima e la nona vite.
-
Quattro viti con testa a croce Phillips n. 000 da 3,25 mm. (Testa: 4 mm di diametro x 4 mm di spessore)
-
-
-
Rimuovere le 4 viti seguenti dalla parte posteriore del computer:
-
Due viti con testa a croce n. 00 da 11 mm con gambo (2,2 mm di diametro x 2 mm di lunghezza) (Testa: 3,2 mm di diametro x 0,5 mm di spessore)
-
Due viti con testa a croce n. 00 da 7,25 mm con gambo (2mm di diametro x 3,75 mm di lunghezza) (Testa: 3,2 mm di diametro x 0,5 mm di spessore)
-
-
-
Rimuovi le due viti a croce Phillips dal lato del computer con il lettore ottico (destro):
-
Due viti Phillips #00 da 5,2 mm, con gambo (2,3 mm di diametro x 3,25 mm di lunghezza) (Testa: 3,2 mm di diametro x 0,5 mm di spessore)
-
-
Strumento utilizzato in questo passaggio:Plastic Cards$2.99
-
Usa uno strumento di apertura in plastica, una carta di credito scaduta o una carta di spessore simile per sollevare il case superiore, iniziando dall’angolo in alto a sinistra e procedendo verso il bordo frontale del computer.
-
-
Strumento utilizzato in questo passaggio:Spudger$3.99
-
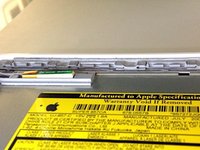
Tenendo sollevato il case superiore, solleva la linguetta nera all’estremità del cavo a nastro argentato dal connettore sulla scheda logica.
-


Per riassemblare il dispositivo, segui queste istruzioni in ordine inverso.
Annulla: non ho completato questa guida.
Altre 409 persone hanno completato questa guida.
Un ringraziamento speciale a questi traduttori:
100%


Questi traduttori ci stanno aiutando ad aggiustare il mondo! Vuoi partecipare?
Inizia a tradurre ›

14Commenti sulla guida
Note that the actual keyboard is sandwiched between the top case and an aluminum backing panel that is plastic welded together. Because of this, the keyboard can not be replaced without modification to these plastic weld points.
I actually purchased a replacement keyboard only to find out that I should have purchased the whole top case unit.
Many thanks for this guide. I was able to replace my old fried keyboard with no problem!
Wow. I have used this guide religiously 3 times now and I can not thank enough for it to the provider. You won't find anything more informative, explicit, graphic, descriptive but simple and basic oriented out there, and without leaving key details out. I think you did a FANTASTIC job with this guide, and thank you again. I'm very happy I found this link.
By the way, much better and appropiate than those dozens of youtube videos.
On step 10 the last screw, the one farthest away from the optical drive, would not come out. My screw driver is fine and the screw look ok but it will not come out. I'v been trying for 30 minutes now.
hello staff ifixit
I have a question happens when I change the upper case of this team and still does not work bring it to a central apple and tell me I have to change the logic board is this true and if so how is that is damaged