Questa versione può contenere modifiche errate. Passa all'ultima istantanea verificata.
Cosa ti serve
-
-
Rimuovi le due viti Pentalobe P2 da 3,4 mm sul lato inferiore dell'iPhone, su entrambi i lati del connettore Lightning.
-
-
-
Tira la manopola blu verso la cerniera per sbloccare i bracci dell'Anti-Clamp.
-
Fai scorrere le braccia o sul bordo sinistro o su quello destro del tuo iPhone.
-
Posiziona le ventose sullo schermo, subito sopra il tasto Home, una davanti e una sul retro.
-
Premi le ventose così che facciano presa sull'area desiderata.
-
-
-
Allontana la manopola blu dalla cerniera per bloccare le braccia
-
Ruota la manopola in senso orario di 360 gradi o finché vedi che la ventosa comincia ad allungarsi.
-
Aspetta un minuto per dare la possibilità all'adesivo di lasciarsi andare e alla parte inferiore dello schermo di aprirsi.
-
Salta i prossimi tre passi.
-
-
-
Se non hai un Anti-Clamp, segui i prossimi tre passaggi su come utilizzare una ventosa.
-
In alternativa, scalda moderatamente il bordo inferiore dell'iPhone usando un iOpener o un asciugacapelli per circa un minuto.
-
-
-
Afferra con delicatezza il gruppo display e sollevalo verso l'alto per aprire il telefono, usando le clip nella parte alta del pannello anteriore come una cerniera.
-
Apri il display a un angolo di circa 90° e appoggialo contro qualche cosa per tenerlo sollevato mentre tu lavori sul telefono.
-
Usa anche un elastico per tenere il display in una posizione sicura mentre lavori. In questo modo eviterai di forzare i cavi del display.
-
-
-
Rimuovi le due viti a croce Phillips che fissano la staffa del connettore della batteria:
-
Una vite da 2,9 mm
-
Una vite da 2,2 mm
-
-
-
Rimuovi le seguenti quattro viti a croce Phillips che fissano la staffa del cavo del display:
-
Tre viti da 1,2 mm
-
Una vite da 2,8 mm
-
-
-
-
Usa l'estremità piatta di uno spudger per scollegare la fotocamera iSight dal suo zoccolo sulla scheda logica.
-
-
-
Inserisci uno strumento di estrazione SIM o una graffetta nel piccolo foro nel vassoio della scheda SIM.
-
Premi per espellere la SIM.
-
-
-
Rimuovi le due viti a croce Phillips da 2,3 mm che fissano la staffa del connettore superiore del cavo.
-
-
Questo passaggio è privo di traduzione. Aiuta a tradurlo
-
Remove the two 1.5 mm Phillips screws holding the Taptic Engine in place.
-
Remove the Taptic Engine.
-
-
Questo passaggio è privo di traduzione. Aiuta a tradurlo
-
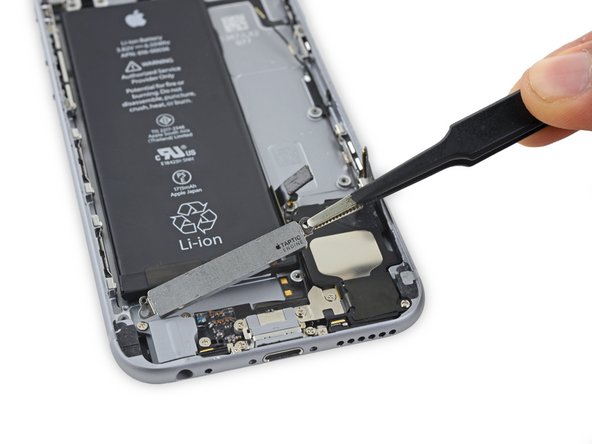
Use tweezers to peel up the tips of the battery adhesive strips at the lower edge of the battery.
-
-
Questo passaggio è privo di traduzione. Aiuta a tradurlo
-
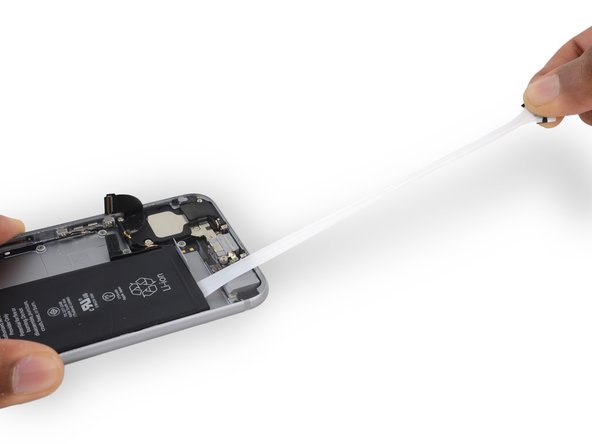
Pull one of the adhesive strips straight out, towards the bottom of the iPhone.
-
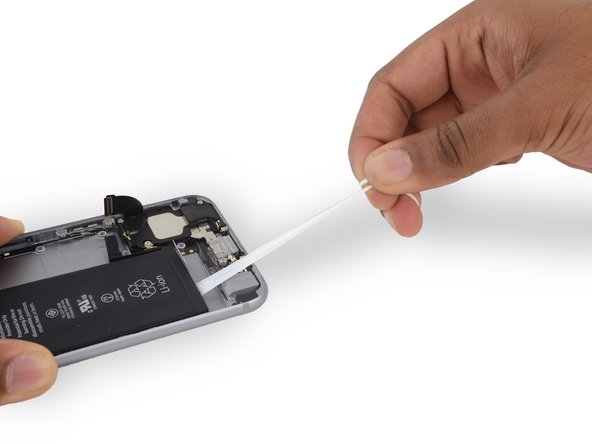
For best results, pull the strip at a 60º angle or less.
-
Continue pulling until the strip is fully removed.
-
If one of the adhesive strips breaks under the battery during this procedure, and cannot be retrieved, remove the remaining strip, and then skip to Step 48.
-
-
Questo passaggio è privo di traduzione. Aiuta a tradurlo
-
Repeat the previous step for the second adhesive strip.
-
-
Questo passaggio è privo di traduzione. Aiuta a tradurlo
-
If you successfully removed all three adhesive strips, move on to the next step. Otherwise, you will need to pry the battery from the rear case.
-
Prepare an iOpener and apply it to the back of the rear case, directly over the battery. Alternatively, you can apply heat using a heat gun or hair dryer.
-
After about a minute, flip the phone over and use a plastic card to break up any remaining adhesive behind the battery.
-
-
Questo passaggio è privo di traduzione. Aiuta a tradurlo
-
Remove the single 1.3 mm Phillips screw securing the flash bracket.
-
Remove the flash bracket.
-
-
Questo passaggio è privo di traduzione. Aiuta a tradurlo
-
Use the flat end of a spudger to lift the flash out of its housing in the rear case.
-
-
Questo passaggio è privo di traduzione. Aiuta a tradurlo
-
Remove the following five Phillips screws:
-
Two 2.5 mm screws set into the left edge of the rear case
-
One 2.1 mm Phillips #000 screw set into the left edge of the rear case
-
Two 2.1 mm screws set into the right edge of the rear case
-
-
Questo passaggio è privo di traduzione. Aiuta a tradurlo
-
Use the pointed tip of a spudger to gently separate the microphone from the rear case.
-
-
Questo passaggio è privo di traduzione. Aiuta a tradurlo
-
Slide an opening pick between the upper component cable and the rear case.
-
Gently separate the cable from the rear case.
-
-
Questo passaggio è privo di traduzione. Aiuta a tradurlo
-
Continue pushing the opening pick under the cable until it fully separates from the rear case.
-
-
Questo passaggio è privo di traduzione. Aiuta a tradurlo
-
If your replacement part did not come with the mute switch cover, you will need to remove the switch cover and transfer It.
-
Use the flat end of the spudger to press down and hold the old bracket firmly in place.
-
Use tweezers or your fingers to carefully rock the switch cover such that the switch cover pins swing out of their clips.
-
Lift the switch cover straight up.
-


Annulla: non ho completato questa guida.
Altre 44 persone hanno completato questa guida.

13 Commenti
Does anyone know where the secondary cell antenna is located on the 6S, it's easily visible on the 6S plus.
Is it under the top wifi antenna, built into the board?
Or at step 41 removing a 'plastic clip' which I thought could be the gps antenna
I had a question about the last step. Mine Upper component cable appears to be attached to the brackets that hold it in place. They appear to have very small spot welds which i cannot remove. It looks like the new cable should wrap around the brackets with an adhesive but i cant seem to get the brackets off of the old cable. Why doesn't the new cable come with those brackets attached? Or was i supposed to order those as separate pieces?
Good guide. Should have mentioned that buying the replacement cable WITH the brackets and switch attached is necessary . I bought a cable without and could not remove the mute button. Then went and bought a cable WITH the brackets and everything went together well. Phone works just fine.