Introduzione
Segui questa guida per rimuovere la scheda madre e scollegare tutte le sue periferiche: SSD, scheda AirPort, dissipatore, CPU e RAM.
Prima di iniziare a lavorare sul tuo iMac: Stacca il computer dalla corrente e tieni premuto il tasto di accensione per dieci secondi per scaricare i condensatori dell'alimentatore.
Stai molto attento a non toccare le gambe dei condensatori o qualsiasi saldatura esposta sul retro dell'alimentatore. Tocca la scheda solo sui suoi bordi.
Cosa ti serve
-
-
Con il perno libero di muoversi, l'iMac sarà sbilanciato e sarà difficile lavorarci sopra. Le riparazioni possono essere fatte con l'iMac a faccia in giù, ma sono più veloci e facili con un cuneo di supporto per iMac.
-
Se stai usando il Cuneo iFixit di cartone di supporto dell'iMac. segui queste informazioni per montarlo.
-
-
-
Posiziona l'iMac a faccia in su sopra un tavolo.
-
Partendo dall'angolo superiore destro, inserisci una scheda di plastica tra il display e il telaio.
-
-
-
Con le schede inserite come mostrato vicino agli angoli, torci delicatamente le schede stesse per allargare la fessura tra display e scocca.
-
Se c'è ancora qualche punto che sembra incollato e non vuole separarsi, smetti di torcere le schede e usane una per tagliare l'adesivo in quel punto.
-
Comincia a sollevare dalla scocca la parte superiore dello schermo.
-
-
-
Se c'è un cavo sotto un nastro adesivo, tira via sempre il nastro adesivo prima di tutto.
-
Se il cavo è incollato al telaio, usa un iOpener riscaldato o un asciugacapelli per ammorbidire la colla. Dopo potrai inserire un plettro sotto il cavo per liberarlo. Non tirare mai direttamente connettori delicati.
-
Fai scorrere un plettro sotto i cuscinetti ammortizzatori per separarli dal display e tirali via delicatamente. Potresti aver bisogno di nastro biadesivo per riattaccarli sul nuovo display.
-
-
-
-
Usa un cacciavite a croce Phillips per svitare le nove viti da 3,2 mm che tengono ferma la staffa di supporto.
-
Potresti dover rimuovere l'adesivo dello schermo dal bordo inferiore dell'iMac per accedere alle viti.
-
-
-
Tira verso l'alto il cavo SATA dati/alimentazione per disconnetterlo dal disco.
-
-
-
Usa l'estremità a punta di uno spudger per scollegare i connettori dei cavi dalla presa nella scheda logica.
-
-
-
Usa l'estremità piatta di uno spudger per disconnettere ciascuno dei quattro connettori delle antenne dalla scheda AirPort/Bluetooth.
-
Il più a sinistra
-
Il più in alto
-
Quello in alto a destra
-
Quello in basso a destra
-
-
-
Nel riassemblaggio dell'iMac, stai molto attenti all'allineamento delle porte I/O esterne. La scheda logica potrebbe essere disallineata anche se fissata con tutte le sue viti.
-
E' possibile usare una chiavetta USB o un cavo ethernet per essere sicuri che l'allineamento della scheda logica sia corretto mentre la fissi con le viti.
-
-
-
Tira verso l'alto il connettore del cavo SATA per scollegarlo.
-
Scollega il connettore del cavo SATA sganciando la sua aletta di bloccaggio e tirandolo verso l'alto sul connettore.
-
Rimuovi il cavo SATA dal gruppo della scheda logica e spostalo in un punto dove non interferisca per prevenire un eventuale danneggiamento.
-
-
-
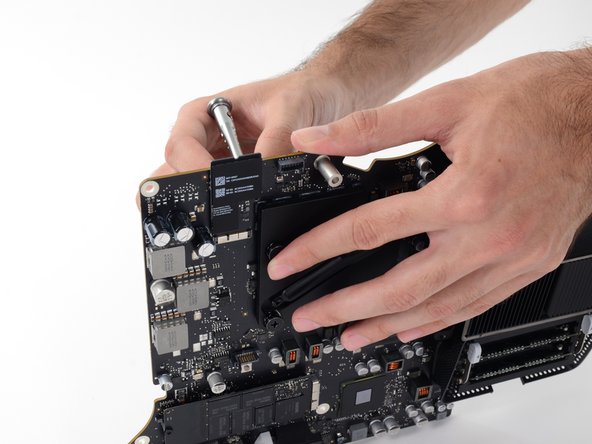
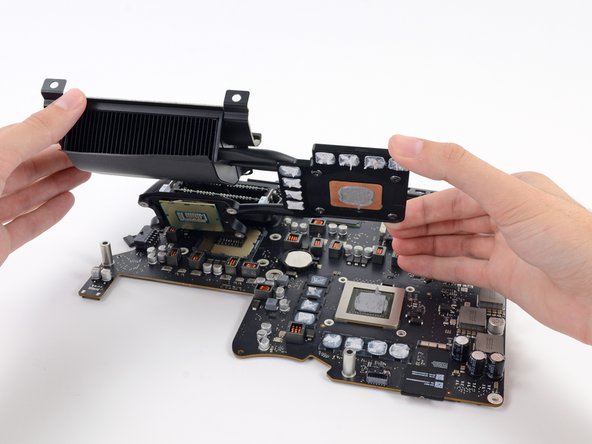
Svita le quattro viti Torx T8 da 7,5 mm da dietro la GPU sulla scheda madre.
-
-
-
Usa i pollici o gli indici per sbloccare il carrello spingendo le alette verso l'esterno, lontano dalla RAM.
-
Tira le alette verso l'esterno e verso l'alto, ruotando il carrello verso l'alto fino a una posizione quasi verticale.
-
-
-
Svita le due viti Torx T5 da 3,7 mm dal retro della scheda madre.
-
-
-
Scollega il cavo dell'alimentatore dal suo connettore tirandolo parallelamente alla scheda madre.
-


Per rimontare il tuo dispositivo, segui le istruzioni in ordine inverso e la nostra Guida per le strisce adesive per reincollare lo schermo.
Porta i tuoi rifiuti elettronici a un riciclatore certificato R2 o e-Stewards.
La riparazione non è andata come previsto? Prova delle soluzioni di base ai problemi, oppure rivolgiti alla nostra comunità Risposte per trovare aiuto.
Annulla: non ho completato questa guida.
Altre 30 persone hanno completato questa guida.
Un ringraziamento speciale a questi traduttori:
100%

Questi traduttori ci stanno aiutando ad aggiustare il mondo! Vuoi partecipare?
Inizia a tradurre ›

5 Commenti
The logic board in my iMac 27" 13, 2 (2546) late 2012 needs to be replaced. Will the logic board from the 27" 14,2 (2639) late 2013 match and fit inside the 27" 13,2 late 2012 housing?
I've looked all over and have yet to find a straight answer. Thanks in advance!!!
I somehow think this tweet should be linked here https://twitter.com/kirillz/status/12171...
What specific screws and at what locations to remove the logic board, PSU, RAM, etc. as a single piece? Trying to keep as much intact and undisturbed as possible. To remove these parts as a whole, which parts must be disconnected for removal and then reconnected? Or does every step describe a component removal so that an underlying component is accessible for removal? Thanks!