Salta al contenuto principale

Sostituzione SSD blade nell'iMac Intel 21.5" EMC 2805

Cosa ti serve

  1. Sostituzione SSD blade nell'iMac Intel 21.5" EMC 2805, Gruppo schermo: passo 1, immagine 1 di 1
    Attrezzo utilizzato in questo passaggio:
    iMac Intel 21.5" Cardboard Service Wedge
    $4.99
    Compra
    • Con il cardine libero di muoversi, l'iMac sarà sbilanciato e la lavorazione risulterà difficoltosa. Le riparazioni saranno più rapide e facili con un cuneo di supporto per iMac, ma potranno essere completate anche senza di esso.

    • Se intendi usare il Cuneo di cartone di supporto dell'iMac di iFixit, segui queste istruzioni di assemblaggio per montarlo.

    • Prima di iniziare a lavorare sull'iMac, scollega il computer dall'alimentazione e tieni premuto il pulsante di alimentazione per 10 secondi per scaricare i condensatori dell'alimentatore.

    • Fai molta attenzione a non toccare i contatti dei condensatori o qualsiasi punto di saldatura esposto sulla parte posteriore dell'alimentatore. Maneggia la scheda tenendola solo dai bordi.

    The wedge is an extremely tight fit for this model. I was worried that the amount of force needed to use it as shown might damage the stand, so I used it with the long side down instead. It worked fine that way and didn’t need anywhere near as much force to insert.

    roberttrevellyan - Replica

    Here’s a good YouTube vid on upgrading the RAM: Can a Normal Person Upgrade the RAM in the 2017 21.5" iMac?

    Dan - Replica

    Here are a couple tips from me:

    1) Expose the adhesive to extreme temperatures. I did this by transporting my iMac in my car, screen-down on a piece of cardboard on a cold February morning (in Chicago). When I went to pick up the iMac, the screen practically fell off the chassis. I would have been distraught by this if I hadn’t already planned this replacement. So it was a happy accident.

    2) Remember to expell the residual power from the power supply by pushing the power button while the iMac is unplugged. This does NOT guarantee it’s safe to touch, but when I accidentally brushed the solder and exposed capacitors, I didn’t get shocked.

    jerrid_foiles - Replica

    Instead of using the wedge, I placed the iMac faced up with the top side (web cam) facing me while I ran the pizza roller around. It worked out great!

    Sam Fung - Replica

    “All iMacs also come with a traditional hard drive” mine doesn’t!! it’s HDD bay is completely empty, no SATA cable or anything. I guess I’ll have to upgrade the PCIe SSD instead.

    Chris Hughes - Replica

    There is no replacement glass for this model, it is part of the LCD and impossible to remove or replace- the entire LCD has to be replaced unfortunately if the glass is cracked or damaged. You will have to Google search for a replacement. Also be careful with some of the lock tight tork screws as I broke one of my screw mounts taking one out.

    Phil Tesone - Replica

    I used this service wedge but also found it a very tight fit. The same stabilization can be achieved by using a big rolled up towel.

    Ernst - Replica

    While this is a good instruction guide, I recommend to also look at OWC’s instruction video about drive installation, before starting the exercise. Those install videos are very detailed and useful.

    Ernst - Replica

    Main advice: TAKE YOUR TIME with the pizza roller.

    Make several passes, until you really feel like there's no more sticker in the way. Stay away from the camera though (approx. 1inch / 2.5cm on both sides). This will reduce the work left with the plastic card. Adhesive is really on the edge of the screen so there is absolutely no need to go any further than the recommended 1cm / 3/8inch depth.

    Where are the sensitive parts?

    Facing your iMac, imagine you're looking at a watch. There are antennas on 1, 2 and 4 o'clock. Do not insert any metal piece there (nor anywhere else, btw). Other than that AND the screen cables underneath the camera, not much danger.

    Froggy Manny - Replica

  2. Sostituzione SSD blade nell'iMac Intel 21.5" EMC 2805: passo 2, immagine 1 di 2 Sostituzione SSD blade nell'iMac Intel 21.5" EMC 2805: passo 2, immagine 2 di 2
    • Iniziare sulla parte sinistra del display, accanto al pulsante di alimentazione, inserire l'attrezzo per l'apertura dell'iMac nello spazio fra il pannello di vetro e il case posteriore.

    • Il perno sull'attrezzo per l'apertura dell'iMac impedisce di inserire la ruota troppo a fondo. Nel caso di utilizzo di un altro attrezzo, non inserirlo nel display per più di 0,95 cm, In caso contrario, si rischia di tranciare i cavi dell'antenna e provocare danni gravi.

    Don’t get too worried about starting exactly where the picture says. The glue is stronger in some parts so just start wherever is easier and then work slowly and patiently around in the direction shown.

    Richard Cook - Replica

    As this guide doesn’t cover replacing the adhesive strips, I found referring to the following was useful (noting that it’s not for the same model of iMac, so the modification they mention wasn’t necessary): Sostituzione strisce adesive iMac Intel 21.5" EMC 2544

    Alan Digby - Replica

    It is very easy to crack the glass in front of the LCD during this step. I used the guitar pick, maybe it was too thick… crack is just on the frame but anyway it is disappointing :(

    Nikolay - Replica

    This part of the exercise should be done with extreme patience. I took my sweet time with the opening tool, rolling it through the entire panel and enclosure gap over and over again, until I was very sure no parts were sticking together anymore. And when I thought I was I done, I decided to do it over again.

    Ernst - Replica

    You can "warm up" the adhesive before try to cut it with the tool using a hair dryer. Heat the edges for about a minute, keep moving it so you don't cause stress in the glass. Also the above note.. use the tool and then the cards. Do not use a guitar pick or other objects as the thickness will cause you to break the front glass, which is a bonded part of the display (expensive).

    Carl Schultz - Replica

    Merci pour ce conseil

    bry nicolas -

  3. Sostituzione SSD blade nell'iMac Intel 21.5" EMC 2805: passo 3, immagine 1 di 3 Sostituzione SSD blade nell'iMac Intel 21.5" EMC 2805: passo 3, immagine 2 di 3 Sostituzione SSD blade nell'iMac Intel 21.5" EMC 2805: passo 3, immagine 3 di 3
    • Utilizzare l'attrezzo come una taglierina per la pizza: ruotarlo lungo lo spazio per tagliare la schiuma adesiva al centro.

    • Effettuare sempre una pressione con l'impugnatura dietro il disco tagliente. Tirando, il disco potrebbe uscire dall'impugnatura.

    • Far scorrere l'attrezzo lungo il lato sinistro del display.

    Erreur de traduction: "de bas en haut" et non de" haut en bas" sur le côté gauche de l'écran

    Moreau - Replica

    If re-opening a screen that was opened and re-attached using iFixit’s adhesive strips, I would strongly recommend heating it first with an iOpener, heat gun or hair dryer. 20 minutes after attaching with the iFixit adhesive I tried to open it again with the pizza slicer to fix something and cracked the screen on the left-hand side.

    plasticpool - Replica

  4. Sostituzione SSD blade nell'iMac Intel 21.5" EMC 2805: passo 4, immagine 1 di 3 Sostituzione SSD blade nell'iMac Intel 21.5" EMC 2805: passo 4, immagine 2 di 3 Sostituzione SSD blade nell'iMac Intel 21.5" EMC 2805: passo 4, immagine 3 di 3
    • Continuare a far scorrere l'attrezzo attorno all'angolo superiore sinistro.

    Ne pincez pas l’écran avec l’autre main. Vous exercez une pression inutile sur le verre et empêchez la roulette de couper le joint.

    phfoglia - Replica

  5. Sostituzione SSD blade nell'iMac Intel 21.5" EMC 2805: passo 5, immagine 1 di 2 Sostituzione SSD blade nell'iMac Intel 21.5" EMC 2805: passo 5, immagine 2 di 2
    • Tagliare l'adesivo lungo il lato sinistro del display.

  6. Sostituzione SSD blade nell'iMac Intel 21.5" EMC 2805: passo 6, immagine 1 di 2 Sostituzione SSD blade nell'iMac Intel 21.5" EMC 2805: passo 6, immagine 2 di 2
    • Continuare lungo la parte superiore del display.

    • È consigliabile far scorrere ripetutamente l'attrezzo avanti e indietro lungo la parte già tagliata, per fare in modo di separare il più possibile l'adesivo.

    In this step can I cut along the display without make any damage to the front camera?

    arisnordico - Replica

    Hi! Actually - there is no need to cut the tape around the camera area - there is no tape to cut at all! And so, the way go is easy - just pass 10 mm to the left and to the right from camera and start cutting!

    P.S. Just did the whole procedure to replace a RAM and to add SSD on PSIe an hour ago! Seems to be different reading the instructions... you know - 2/10 and so on. But it's really not that hard, trust me. I'll give it 5/10.

    P.P.S. By the way there is one trick to pass the difficult steps. Any action which requires pulling smth (motherboard, speaker, power supply unit) from the narrow crack (or should i say - slit?) at the bottom of your Imac is really not so easy.

    And the trick is to first remove a thin metal stripe with some kind of insulation on it which held by 5 small (very small!!) screws at the bottom of your Imac. After you done it - it's easy to pull everything! Pay attention to the fact that one of this 5 screws at the center are more shortly than others.

    dv1977 - Replica

    I did all steps like this manuell but now the Display wont work only some colered strips are to see! Whats happend??

    Can anybody help me ? Maybe the connector cable is broken?

    djfanta - Replica

    Check both connectors, probably one of them not seated well

    pzhivulin -

    You can add a SATA SSD if you already have a PCIe SSD Factory?

    kaserlik - Replica

    If you're changing cracked EMC 2638 display to new assembly, there's two more steps:

    Step 24: Use the tip of a spudger to flip up the metal retaining bracket on the display data cable.

    Carefully pull the display data cable from its socket on the display assembly.

    Step 25: Use the tip of a spudger to unplug bracket of the thermal sensor small cable near display data cable.

    Carefully remove scotch tape covering thermal sensor. Using iSesamo or flat tip of the spudger carefully peel the thermal sensor away.

    pzhivulin - Replica

    omg - forgot to switch the termal sensor from the old display...

    now fan runs like crazy...

    Andrei Balotescu -

    The key thing is to never put any force on the opening tool when working through the tape. Just roll it back and forth with ease.

    Ernst - Replica

  7. Sostituzione SSD blade nell'iMac Intel 21.5" EMC 2805: passo 7, immagine 1 di 3 Sostituzione SSD blade nell'iMac Intel 21.5" EMC 2805: passo 7, immagine 2 di 3 Sostituzione SSD blade nell'iMac Intel 21.5" EMC 2805: passo 7, immagine 3 di 3
    • Premere l'attrezzo attorno all'angolo superiore destro del display.

  8. Sostituzione SSD blade nell'iMac Intel 21.5" EMC 2805: passo 8, immagine 1 di 2 Sostituzione SSD blade nell'iMac Intel 21.5" EMC 2805: passo 8, immagine 2 di 2
    • Far scorrere l'attrezzo verso il basso, lungo il lato destro del display.

  9. Sostituzione SSD blade nell'iMac Intel 21.5" EMC 2805: passo 9, immagine 1 di 2 Sostituzione SSD blade nell'iMac Intel 21.5" EMC 2805: passo 9, immagine 2 di 2
    • Terminare l'applicazione dell'attrezzo per l'apertura nella parte inferiore del lato destro del display.

    • A questo punto, si consiglia di ripassare nuovamente l'attrezzo lungo tutto il display, per fare in modo di tagliare il più possibile l'adesivo.

    Yes, do it many times to loosen the adhesive.

    Noah Ralston - Replica

    Would be good data to show the 3 areas (wifi antennas where the "tape" is larger and covers them. The rest of the "tape" is 1.4" and easy. Also after removing the display, be sure to remove the old "tape" from both the display and the rubber parts of the case. Use the spudger to start an end and it should pull off easily. Careful on the baackside of the display as you can scratch off the black paint/covering.

    Carl Schultz - Replica

  10. Sostituzione SSD blade nell'iMac Intel 21.5" EMC 2805: passo 10, immagine 1 di 3 Sostituzione SSD blade nell'iMac Intel 21.5" EMC 2805: passo 10, immagine 2 di 3 Sostituzione SSD blade nell'iMac Intel 21.5" EMC 2805: passo 10, immagine 3 di 3
    Attrezzo utilizzato in questo passaggio:
    Plastic Cards
    $2.99
    Compra
    • Sebbene l'attrezzo per l'apertura tagli la maggior parte dell'adesivo, il display sarà ancora leggermente attaccato al case. Occorre una scheda di plastica per liberare la parte restante dell'adesivo.

    • Poggiare l'iMac su un tavolo, rivolto verso l'alto.

    • A partire dall'angolo superiore destro dell'iMac, inserire una scheda di plastica fra il display e il telaio.

    • Fare attenzione a non inserire la scheda di plastica per più di 0,95 cm, in caso contrario si rischia di danneggiare i componenti interni.

    this step is extremely important NOT to stick in the cards too far….. doing so, you risk a 600 euro replacement as I experienced………

    Edgar Broekema - Replica

    I drew a 3/8” line on my cards with a marker first.

    Max Romano - Replica

    I’m reading this on the EU store, please change all measurements to cm/mm.

    Morgana Devina - Replica

    @ifixit The next batch of cards you create should have a line printed on the card 3/8” in from the edges. Would make a nice reference.

    Richard Giratd - Replica

    Here’s where OWC provides glass removal suction cups, which is a better solution than plastic cards.

    The suction cups help to easily lift the glass panel, without risking the damaging of any internal wiring that the plastic cards could cause.

    Ernst - Replica

    Better to remove stand wedge at this point? Can’t see from pics

    derekrobinson - Replica

  11. Sostituzione SSD blade nell'iMac Intel 21.5" EMC 2805: passo 11, immagine 1 di 2 Sostituzione SSD blade nell'iMac Intel 21.5" EMC 2805: passo 11, immagine 2 di 2
    • Ruotare delicatamente la scheda di plastica lateralmente per creare uno spazio fra il display e il telaio.

    • Eseguire movimenti lenti, facendo attenzione a non fare troppa pressione sul vetro del display, poiché occorre solo uno spazio di circa 0,63 cm.

    This part must be done very carefully or you can damage the flat cable from display, despite it was under a iron cover.

    Cassio Machado - Replica

  12. Sostituzione SSD blade nell'iMac Intel 21.5" EMC 2805: passo 12, immagine 1 di 3 Sostituzione SSD blade nell'iMac Intel 21.5" EMC 2805: passo 12, immagine 2 di 3 Sostituzione SSD blade nell'iMac Intel 21.5" EMC 2805: passo 12, immagine 3 di 3
    • Far scorrere la scheda verso il centro del display per tagliare il resto dell'adesivo lungo l'angolo destro dell'iMac.

    • Occorre fermarsi prima della fotocamera iSight per non danneggiarla.

    You don't need to do it like this, simply open the iMac bendidng the LCD completely and use the pizza cutter to remove the adhesive.

    Felix - Replica

    Using glass removal suction cups will avoid running this risk of damaging the camera (or any wiring).

    Ernst - Replica

  13. Sostituzione SSD blade nell'iMac Intel 21.5" EMC 2805: passo 13, immagine 1 di 2 Sostituzione SSD blade nell'iMac Intel 21.5" EMC 2805: passo 13, immagine 2 di 2
    • Inserire la scheda di plastica nell'angolo superiore destro nuovamente e lasciarla in sede per evitare che l'adesivo si riattacchi.

  14. Sostituzione SSD blade nell'iMac Intel 21.5" EMC 2805: passo 14, immagine 1 di 3 Sostituzione SSD blade nell'iMac Intel 21.5" EMC 2805: passo 14, immagine 2 di 3 Sostituzione SSD blade nell'iMac Intel 21.5" EMC 2805: passo 14, immagine 3 di 3
    • Inserire una seconda scheda di plastica nello spazio fra il display e il telaio, vicino all'angolo superiore sinistro dell'iMac.

  15. Sostituzione SSD blade nell'iMac Intel 21.5" EMC 2805: passo 15, immagine 1 di 2 Sostituzione SSD blade nell'iMac Intel 21.5" EMC 2805: passo 15, immagine 2 di 2
    • Ruotare delicatamente la scheda verso l'alto per aumentare leggermente lo spazio fra il display e il telaio.

    • Come sulla parte opposta, ruotare lentamente la scheda, per consentire la separazione dell'adesivo, senza esercitare una pressione eccessiva sul vetro del display.

  16. Sostituzione SSD blade nell'iMac Intel 21.5" EMC 2805: passo 16, immagine 1 di 3 Sostituzione SSD blade nell'iMac Intel 21.5" EMC 2805: passo 16, immagine 2 di 3 Sostituzione SSD blade nell'iMac Intel 21.5" EMC 2805: passo 16, immagine 3 di 3
    • Far scorrere la scheda di plastica verso il centro, fermandosi nuovamente prima della fotocamera iSight.

  17. Sostituzione SSD blade nell'iMac Intel 21.5" EMC 2805: passo 17, immagine 1 di 2 Sostituzione SSD blade nell'iMac Intel 21.5" EMC 2805: passo 17, immagine 2 di 2
    • Reinserire la scheda di plastica nell'angolo superiore sinistro.

  18. Sostituzione SSD blade nell'iMac Intel 21.5" EMC 2805: passo 18, immagine 1 di 3 Sostituzione SSD blade nell'iMac Intel 21.5" EMC 2805: passo 18, immagine 2 di 3 Sostituzione SSD blade nell'iMac Intel 21.5" EMC 2805: passo 18, immagine 3 di 3
    • Mantenendo entrambe le schede di plastica inserite vicino agli angoli come indicato, ruotarle delicatamente sui lati per aumentare lo spazio fra il display e il case.

    • In presenza di sezioni ancora incollate che non si separano, fermare la rotazione e utilizzare una delle schede per tagliare l'adesivo restante.

    • Iniziare a sollevare la parte superiore del display dal telaio.

    • Sollevare il display di pochi centimetri, poiché i cavi di alimentazione e dei dati sono ancora collegati alla scheda logica.

  19. Sostituzione SSD blade nell'iMac Intel 21.5" EMC 2805, Cavi gruppo schermo: passo 19, immagine 1 di 3 Sostituzione SSD blade nell'iMac Intel 21.5" EMC 2805, Cavi gruppo schermo: passo 19, immagine 2 di 3 Sostituzione SSD blade nell'iMac Intel 21.5" EMC 2805, Cavi gruppo schermo: passo 19, immagine 3 di 3
    • Usa delle pinzette per ribaltare la staffa in metallo che blocca il cavo dati del display.

    • Sfila delicatamente il cavo dati del display dalla sua presa sulla scheda madre.

    • Assicurati di tirare il cavo dati nella stessa direzione dalla sua presa.

    Does anyone know where to find a replacement display cable for the 2014?

    PN: 923-00047

    PBMedic is out of stock

    Brian Hernandez - Replica

  20. Sostituzione SSD blade nell'iMac Intel 21.5" EMC 2805: passo 20, immagine 1 di 2 Sostituzione SSD blade nell'iMac Intel 21.5" EMC 2805: passo 20, immagine 2 di 2
    • Tenendo il display con una mano, usa l'altra per scollegare il cavo di alimentazione del display.

    • Solleva il display a sufficienza per avere un facile accesso al connettore, ma non troppo (circa 20 cm), per evitare di tirare o strappare i cavi.

  21. Sostituzione SSD blade nell'iMac Intel 21.5" EMC 2805, Schermo: passo 21, immagine 1 di 2 Sostituzione SSD blade nell'iMac Intel 21.5" EMC 2805, Schermo: passo 21, immagine 2 di 2
    • Solleva il display fino ad una posizione quasi verticale.

    • A questo punto rimane una striscia adesiva lungo il bordo inferiore del display, che terrà ancorato lo schermo come se fosse una cerniera. Puoi ammorbidire l'adesivo ruotando un po' di volte il display attorno alla base.

  22. Sostituzione SSD blade nell'iMac Intel 21.5" EMC 2805: passo 22, immagine 1 di 3 Sostituzione SSD blade nell'iMac Intel 21.5" EMC 2805: passo 22, immagine 2 di 3 Sostituzione SSD blade nell'iMac Intel 21.5" EMC 2805: passo 22, immagine 3 di 3
    • Stai molto attento a non toccare i contatti dei condensatori o qualsiasi altra saldatura esposta sul retro dell'alimentatore (evidenziato in rosso).

    • Prendi l'aletta all'estremità di una delle due strisce adesive inferiori dello schermo e tirala verso la parte superiore dell'iMac per rimuoverla.

    • Ripeti questo passaggio con l'altra striscia e rimuovila.

    • Se una delle due strisce si rompe prima che venga rimossa, usa una scheda di plastica per tagliare l'adesivo rimasto.

    Anyone else notice this iMac is different than the one in Step 20. The cables are in different places. I just saw one on YT like this, in a different country.

    Thomas Tommy - Replica

  23. Sostituzione SSD blade nell'iMac Intel 21.5" EMC 2805: passo 23, immagine 1 di 3 Sostituzione SSD blade nell'iMac Intel 21.5" EMC 2805: passo 23, immagine 2 di 3 Sostituzione SSD blade nell'iMac Intel 21.5" EMC 2805: passo 23, immagine 3 di 3
    • Solleva il display e rimuovilo dalla scocca dell'iMac.

    • Potrebbe essere necessario sollevarlo prima da un lato per staccare l'adesivo restante.

    • Presta molta attenzione nel maneeggiare il display: è grande, pesante e fatto di vetro.

    • Se stai sostituendo il display con uno nuovo, potresti dover trasferire alcune parti su quello nuovo.

    • Durante il riassemblaggio, segui la nostra guida sull'adesivo del display per applicarne di nuovo.

  24. Sostituzione SSD blade nell'iMac Intel 21.5" EMC 2805, Staffa di supporto inferiore: passo 24, immagine 1 di 2 Sostituzione SSD blade nell'iMac Intel 21.5" EMC 2805, Staffa di supporto inferiore: passo 24, immagine 2 di 2
    • Rimuovi le seguenti cinque viti a croce Phillips che tengono in posizione la staffa di supporto inferiore:

    • Quattro viti da 3,2 mm

    • Una vite da 1,7 mm

    • Su almeno alcune macchine EMC 2544, tutte e cinque le viti hanno le stesse dimensioni.

    • Potrebbe essere necessario rimuovere l'adesivo del display che riveste il bordo inferiore della custodia dell'iMac per accedere alle viti.

    I used the CR-V 4.0 standard screwdriver head to help peel away the adhesive lining. My fingers were too big to grab it, and my fingernails too short to get the removal started. This 4 screw head worked perfectly.

    airshack - Replica

  25. Sostituzione SSD blade nell'iMac Intel 21.5" EMC 2805: passo 25, immagine 1 di 1
    • Rimuovi la staffa di supporto inferiore dalla custodia dell'iMac.

    Of all the parts of this entire procedure, replacing this one piece is the hardest part! The screws are tiny and they just don’t seem to want to grab the support piece. Also it seems to perform no function which is also annoying.

    John M - Replica

    I left mine out. LOL

    jerrid_foiles -

    Line up the screw holes and press on the bracket from the back to help the screws grab. If your fingers are too big, press with the flat side of your spudger. As long as there’s no gap between the bracket and the iMac’s frame, the screws should grab easily.

    Jeff Suovanen -

    I put it in at a slight angle lining up the right hand side holes, screwed in the two screws and gently pressed my finger behind it on the rest

    jmorphett5 - Replica

    If you only want to replace the HD and RAM, take a big shortcut and leave the logic board in, as well as all the parts needed to remove it (speaker, power supply etc). Once the display is removed, just take out the fan and the top two logic board screw. There is than sufficient space to gently remove and insert the two ram modules. HD can easily be replaced with an SSD by just removing the HD mounting brackets...

    diddl14 - Replica

    Voces mudaram de modelo iMac, desta foto para proxima, esse modelo desta foto nao tem slot nvme. O da proxima foto sim. Voces me fizeram comprar un nvme por engano...

    tgb4rr0s tege - Replica

  26. Sostituzione SSD blade nell'iMac Intel 21.5" EMC 2805, Altoparlante destro: passo 26, immagine 1 di 3 Sostituzione SSD blade nell'iMac Intel 21.5" EMC 2805, Altoparlante destro: passo 26, immagine 2 di 3 Sostituzione SSD blade nell'iMac Intel 21.5" EMC 2805, Altoparlante destro: passo 26, immagine 3 di 3
    • Usa la punta di uno spudger per spingere su uno dei due lati del connettore del cavo dell'altoparlante per accompagnarlo fuori dalla sua presa sulla scheda logica.

  27. Sostituzione SSD blade nell'iMac Intel 21.5" EMC 2805: passo 27, immagine 1 di 1
    • Rimuovi le due viti T10 da 10,0 mm che fissano l'altoparlante destro al case posteriore.

  28. Sostituzione SSD blade nell'iMac Intel 21.5" EMC 2805: passo 28, immagine 1 di 2 Sostituzione SSD blade nell'iMac Intel 21.5" EMC 2805: passo 28, immagine 2 di 2
    • Inserisci la punta di uno spudger tra l'altoparlante destro e il cavo dell'antenna che passa sul lato destro dell'altoparlante.

    • Fa' scorrere lo spudger verso il basso lungo il lato destro dell'altoparlante per sollevare il cavo dell'antenna dal suo canale nell'altoparlante destro.

    • Se il canale non è facilmente accessibile, puoi tirare delicatamente l'altoparlante per allontanarlo dal case, per aver accesso al cavo dell'antenna.

  29. Sostituzione SSD blade nell'iMac Intel 21.5" EMC 2805: passo 29, immagine 1 di 2 Sostituzione SSD blade nell'iMac Intel 21.5" EMC 2805: passo 29, immagine 2 di 2
    • Solleva l'altoparlante destro e rimuovilo dall'iMac.

    • Inclinare la parte superiore dell'altoparlante allontanandolo dal case posteriore può aiutarti a rimuoverlo dall'iMac.

  30. Sostituzione SSD blade nell'iMac Intel 21.5" EMC 2805, Staffe hard drive: passo 30, immagine 1 di 1
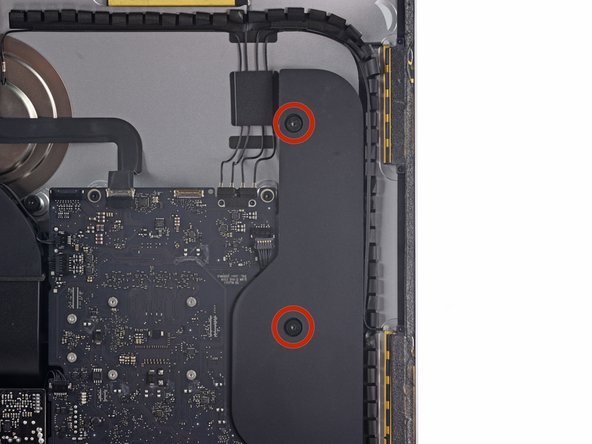
    • Rimuovi le seguenti viti che mantengono al loro posto le staffe di bloccaggio che fissano il disco rigido alla scocca posteriore:

    • Due viti Torx T10 da 21 mm sulla parte sinistra della staffa del disco rigido.

    • Una vite Torx T10 da 9 mm.

    • Una vite Torx T10 da 27 mm.

    Pay attention to this photo and where the fan is. It is 180° from where the previous step shows it is oriented to you.

    Max Romano - Replica

  31. Sostituzione SSD blade nell'iMac Intel 21.5" EMC 2805: passo 31, immagine 1 di 2 Sostituzione SSD blade nell'iMac Intel 21.5" EMC 2805: passo 31, immagine 2 di 2
    • Rimuovi dal tuo iMac le staffe di bloccaggio destra e sinistra dell'hard drive.

  32. Sostituzione SSD blade nell'iMac Intel 21.5" EMC 2805, Alimentatore: passo 32, immagine 1 di 3 Sostituzione SSD blade nell'iMac Intel 21.5" EMC 2805, Alimentatore: passo 32, immagine 2 di 3 Sostituzione SSD blade nell'iMac Intel 21.5" EMC 2805, Alimentatore: passo 32, immagine 3 di 3
    • I prossimi passaggi ti faranno lavorare con le mani vicino all'alimentatore esposto. Non toccare la faccia della scheda o le saldature. Toccarle significa correre il rischio di ricevere una scossa ad alta tensione dai diversi potenti condensatori fissati alla scheda.

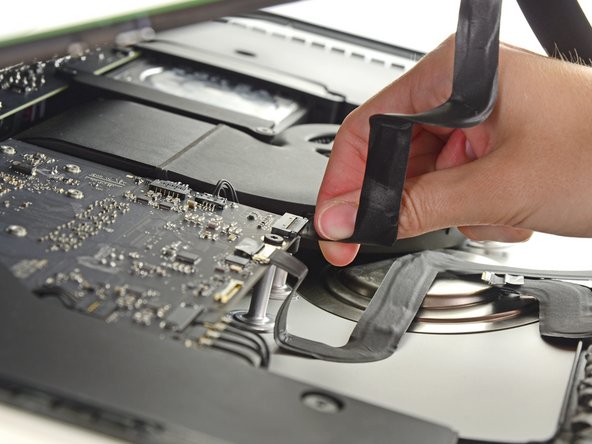
    • Usa la punta di uno spudger per spingere su un lato alla volta del connettore del cavo del tasto di accensione e scollegalo lentamente dalla sua presa.

    I would advise that before removing the PSU unit and all other components from the bottom of the case that you remove the 5 screws at the bottom of the display which hold an insulation strip in place.

    The guide shows this piece removed, but does not tell you how to remove it.

    There will be 5, small J1000 screws. The middle one, which goes over Apple Logo is the shorter one of the 5, all others are the same length. Once this piece is gone removing the components is much easier, and chance of damage lessened.

    [deleted] - Replica

    Added to the guide. Thanks for the tip!

    Jeff Suovanen -

    No need to remove power board and logic board and all other components, just remove the fan and it is quite "easily" accessable to change the RAM. Just need to use the tools to remove the old RAM and carefully install the new RAM.

    I just did it without removing the logic or power board

    Oleksandr Trokhymchuk - Replica

    could you elaborate a little more, I would love to skip the rest of these steps. How did you accomplish this?

    ej P -

    Oleksandr Trokhymchuk,

    Thank you! You just saved me so much time! I wouldn’t call this “easy” but it saved me a lot of time and effort.

    Joshua Ericson -

    ej P: remove the fan assembly first. Then remove the connector that runs from the iSight camera to the logic board on the left.

    the RAM is located right near that cable. It’s tricky to remove but you can pop open the connectors with a black nylon stick and the RAM chip will pop up at 45 degrees. Make a mental note on which way you will need to install the new ram as it’s tough to see. For the Crucial memory I got it was label side facing away you (facing towards rear metal enclosure).

    the second chip has a plastic adhesive piece on it that you should probably attach to the new ram.

    remove both chips then install the new ram in sequence from the board out.

    Wizdom On Wheels - Replica

    In the photo for Step 28, the power button cable connector is placed around the power board screw hole on the top left of the power board.

    However, on the iMac I upgraded, the power button cable connector was “fed” through the power power screw hole on the top left of the power board. The cable was too short to run around and below the hole.

    Hence, I had to ensure the cable was “fed” through the hole during re-assembly and the screw carefully screwed back through the hole.

    I guess every iMac is assembly just a bit differently, just to make repairs that much more fun.

    Tim Telcik - Replica

    This is not correct and may have been assembled incorrectly during a previous repair.

    Charlie Nancarrow -

    Just replaced the hard drive and RAM with SSD and 16GB respectively and did NOT remove the power supply or logic board. Tricky is a word to describe putting the RAM in without removing the logic board. You work in the dark with little room to get your fingers in between the logic board and the back of the case. I put the first RAM chip in without a problem (the one next to the logic board), but the second to four tries and dropped it behind the logic board three times before finally getting it to position correctly. Just impossible to see and must work but feel. Still it was faster than removing all the components… though did remove the fan (needed cleaning anyway). All in all I can’t say enough about the help the guide was through the upgrade ! Thanks !

    Ray Burgard - Replica

    I found this connector to be very tight and was afraid of breaking it off. I just kept slowly working on it—it did eventually come out.

    I did try to sneak the RAM in without removing the logic board but my fingers were too big. I found it too difficult and just continued on with this guide.

    Mikkif - Replica

    I was not able to install the memory without removing all the components. My fingers are too big and I could barely get in that tight spot to swap out the memory. The hardest part about the power supply is that one connector under the chin next to the Apple logo. Once it is out, you are home free because it is so easy to plug it back in when you are putting it all back together again. Ridiculous that Apple did not put a simple access door behind those memory slots because they are on the backside of the Mac! They did an access door on the PowerBooks and it did not ruin the appearance. They could have designed a cool looking pop out door that only had a thin seam around it so it would still look good. Then you could remove the access door to upgrade the memory easily.

    Peter Hillman - Replica

    Does anyone know if this is the same situation as in the 2017 model? I just changed RAM in the 2017 version and also skipped taking out the logic board. I just bent a pair of tweezers and put some tape around the tips to make them less scratchy and used them to place the RAM modules into the slots. Worked supereasy and much much quicker than performing the complete tear down of the whole machine.

    Nils Witte - Replica

    This step is impossible!

    Cecily Walker - Replica

    @wizdomonwheels, I don’t see how I can get the RAM shield off of the logic board to access the RAM without removing the logic board. What am I missing?? I’m guessing that those of you that are suggesting this technique are working on older iMac models that don’t have the RAM shield.

    jiclark - Replica

    Yes, you are correct. It is likely the various steps are a bit different on each model. If I recall I was likely working on a 2015 or older system. If there’s a shield in the way, I can’t think of a way you could get around it without pulling the logic board.

    Wizdom On Wheels -

  33. Sostituzione SSD blade nell'iMac Intel 21.5" EMC 2805: passo 33, immagine 1 di 2 Sostituzione SSD blade nell'iMac Intel 21.5" EMC 2805: passo 33, immagine 2 di 2
    • Usa la punta di uno spudger per spingere su un lato alla volta del connettore del cavo di controllo dell'alimentatore e scollegalo lentamente dalla sua presa.

  34. Sostituzione SSD blade nell'iMac Intel 21.5" EMC 2805: passo 34, immagine 1 di 1
    • Svita le due viti Torx T10 da 7,2 mm che fissano l'alimentatore al case posteriore.

    • In alcuni modelli più recenti di iMac queste sono due viti T8 da 7,2 mm.

    • Durante il riassemblaggio assicurati di non bloccare il cavo del tasto di accensione dietro all'alimentatore.

    In my case, the left side corner of the PS was caught against the Lower Support Bracket, and I had to remove the LSB in order to get the PS freed and out.

    I think the author Walter Galan should put this in the main section of his instructions. I have TWO identical iMac 14,1 / i5 2.7GHz / 21 Inch Late 2013 / Order ME086LL/A. They both required removing the LSB. Thank you very much Walter Galan & others for your contributions.

    Ted Horodynsky - Replica

    Those screws were definitely not T10 but T9 on my unit

    Vincent Monteil - Replica

    Those screws were T8 on my unit.

    jag32mobile - Replica

    c'est du torx 08

    pascal cacou - Replica

  35. Sostituzione SSD blade nell'iMac Intel 21.5" EMC 2805: passo 35, immagine 1 di 2 Sostituzione SSD blade nell'iMac Intel 21.5" EMC 2805: passo 35, immagine 2 di 2
    • Mentre sei alle prese con l'alimentatore stai molto attento a non toccare i contatti dei condensatori o le saldature sul retro dell'alimentatore. Spostalo toccando esclusivamente i bordi della scheda.

    • Inclina l'alimentatore in avanti.

    When replacing the PSU (on the re-build) take care not to trap the power button cable behind it - I did...

    Dave Hallett - Replica

  36. Sostituzione SSD blade nell'iMac Intel 21.5" EMC 2805: passo 36, immagine 1 di 3 Sostituzione SSD blade nell'iMac Intel 21.5" EMC 2805: passo 36, immagine 2 di 3 Sostituzione SSD blade nell'iMac Intel 21.5" EMC 2805: passo 36, immagine 3 di 3
    • Tira leggermente l'alimentatore verso l'alto e fuori dalla scocca.

    • Ruota l'alimentatore in senso antiorario, sollevando il lato destro di circa 2 cm rispetto a quello sinistro.

    In my case, the left side corner of the PS was caught against the Lower Support Bracket, and I had to remove the LSB in order to get the PS freed and out.

    I think the author Walter Galan should put this in the main section of his instructions. I have TWO identical iMac 14,1 / i5 2.7GHz / 21 Inch Late 2013 / Order ME086LL/A. They both required removing the LSB. Thank you very much Walter Galan & others for your contributions.

    Ted Horodynsky - Replica

  37. Sostituzione SSD blade nell'iMac Intel 21.5" EMC 2805: passo 37, immagine 1 di 2 Sostituzione SSD blade nell'iMac Intel 21.5" EMC 2805: passo 37, immagine 2 di 2
    • Fai scorrere l'alimentatore verso destra per evitare i supporti per le viti sulla scocca.

  38. Sostituzione SSD blade nell'iMac Intel 21.5" EMC 2805: passo 38, immagine 1 di 3 Sostituzione SSD blade nell'iMac Intel 21.5" EMC 2805: passo 38, immagine 2 di 3 Sostituzione SSD blade nell'iMac Intel 21.5" EMC 2805: passo 38, immagine 3 di 3
    • Muovi l'alimentatore avanti e indietro per rimuoverlo da suo alloggio nella scocca.

    • Non cercare di rimuovere del tutto già ora l'alimentatore: è ancora collegato alla scheda madre.

  39. Sostituzione SSD blade nell'iMac Intel 21.5" EMC 2805: passo 39, immagine 1 di 2 Sostituzione SSD blade nell'iMac Intel 21.5" EMC 2805: passo 39, immagine 2 di 2
    • Stai molto attento a non toccare i contatti dei condensatori o le saldature sul retro dell'alimentatore. Spostalo toccando esclusivamente i bordi della scheda.

    • Gira l'alimentatore per avere accesso al cavo di alimentazione DC sul retro della scheda madre.

    • Schiaccia l'aletta sul retro del connettore del cavo di alimentazione e sfilalo dalla sua presa sulla scheda madre.

    when pulled the cable, even slightly, the actual female piece that connects to the logic board came off. am i screwed?

    Racheal Major - Replica

    Repairing sockets that come off the logic board is possible, but very specialised work. Unless you have a magnifying lamp and the necessary desoldering and soldering skills, it will be difficult but not impossible.

    Charlie Nancarrow - Replica

    The tab is at the far end of the connector, so you’ll need to reach farther than you might think.

    lkollar - Replica

    When I pulled the disconnect, I pushed down on the disconnect, instead of pushing down on the tab on the disconnect and bent those pins… tried to straighten the bent pins and two of the pins broke off the logic board. Will I need a new logic board or can I purchase the pins…?

    Ray AA - Replica

    I could not disconnect this cable without fear of breaking something (as previous posters did). I found that I could skip this and the next step by wrapping the power supply in a couple layers of a small towel (to prevent shorting with any other metal surfaces), and laying the power supply on the aluminum face of the iMac near the Apple logo. This got it out of the way enough to do what I needed on the logic board (changing PRAM battery) after completing removal of the other items in this guide.

    Phil McInnis - Replica

  40. Sostituzione SSD blade nell'iMac Intel 21.5" EMC 2805: passo 40, immagine 1 di 3 Sostituzione SSD blade nell'iMac Intel 21.5" EMC 2805: passo 40, immagine 2 di 3 Sostituzione SSD blade nell'iMac Intel 21.5" EMC 2805: passo 40, immagine 3 di 3
    • Può esserti d'aiuto appoggiare l'iMac sul suo retro per i prossimi passaggi.

    • Usa l'estremità piatta di uno spudger per premere verso l'interno l'aletta sul lato del connettore del cavo di alimentazione AC.

    • Mentre premi l'aletta per il rilascio, afferra il cavi di alimentazione AC e sfilalo dalla sua presa.

    I didn't disconnect the input cable to the power supply. Because I had the machine lying on its back throughout, I placed it on to the metal bit at the bottom of the machine instead (with a cloth to stop the metal getting scratched). The AC inlet cable was pretty tricky to get un-locked, and the PSU sat on the case fine. It didn't hinder anything else throughout the guide.

    Dave Hallett - Replica

    I thought from Dave’s comment that I could leave the power supply completely in place, but I was mistaken. In order to remove the hard drive assembly after you remove the center screw in it, you’ll need to at least unscrew it and the HD assembly will slip out. Like Dave said, you don’t need to unplug the AC or PSU, which I left hanging.

    Getting power supply to the logic board unplugged is also tricky without unscrewing the two bottom screws. They didn’t make this part easy.

    delacrj2 - Replica

    Kleiner Rechtschreibfehler - statt „denac“ muss es wohl „den iMac“ heißen

    Gonzalo - Replica

    Au ja. Du kannst so was selbst ausbessern. Einfach auf “Übersetzen" gehen und loslegen.

    VauWeh - Replica

    I would like to thanks Dave Hallett for his tip of not removing the AC inlet connector of the power supply. I simply wrapped the board in bubble wrap and taped to the iMac case, out of the way, thus giving access to the remaining disconnection procedures and preventing the board from scratching to the iMac case. It also made reassembly much simpler.

    Rob Hogan - Replica

    Yeah, that AC inlet plug was a nasty one to unplug, mainly because I was trying not to bump the solder joints on the PSU. After a few wiggles and pulls while manipulating the spudger tool to release the clip, it finally unplugged. Made it easier by removing the PSU completely so you don’t have to worry about it. Don’t worry, plugging it back in is a breeze!

    Peter Hillman - Replica

    With the right tool this plug comes out very easily. Forget about your tiny computer tools, go to the garage and grab a regular old needle nose pliers. Grab the clip and the plug at the same time. The plug will come right out.

    Carin Ann Loewen - Replica

    Carin Ann— The most helpful comment on this procedure. After reading what you wrote I maneuvered the board, grabbed the clip with my left hand (a little awkward because of the cooling enclosure), squeezed the front of the plug, and got it out.

    Glen Kohler - Replica

    +1 for needle nose pliers!

    Sam - Replica

  41. Sostituzione SSD blade nell'iMac Intel 21.5" EMC 2805: passo 41, immagine 1 di 1
    • Rimuovi l'alimentatore dall'iMac.

    erreur: retirer "la carte d'alimentation" et non" le disque dur" !!!!!

    Moreau - Replica

  42. Sostituzione SSD blade nell'iMac Intel 21.5" EMC 2805, Ventola: passo 42, immagine 1 di 2 Sostituzione SSD blade nell'iMac Intel 21.5" EMC 2805, Ventola: passo 42, immagine 2 di 2
    • Usa la punta di uno spudger per spingere il connettore del cavo della ventola fuori dalla sua presa sulla scheda logica.

    • Ti raccomandiamo di spingere con attenzione su entrambi i lati del connettore per accompagnarlo fuori dalla sua presa.

  43. Sostituzione SSD blade nell'iMac Intel 21.5" EMC 2805: passo 43, immagine 1 di 1
    • Rimuovi le seguenti viti che fissano la ventola al case posteriore:

    • Due viti T10 da 12,5 mm

    • Una vite T10 da 9,9 mm

  44. Sostituzione SSD blade nell'iMac Intel 21.5" EMC 2805: passo 44, immagine 1 di 2 Sostituzione SSD blade nell'iMac Intel 21.5" EMC 2805: passo 44, immagine 2 di 2
    • Solleva e rimuovi la ventola dall'iMac.

  45. Sostituzione SSD blade nell'iMac Intel 21.5" EMC 2805, Gruppo disco rigido: passo 45, immagine 1 di 3 Sostituzione SSD blade nell'iMac Intel 21.5" EMC 2805, Gruppo disco rigido: passo 45, immagine 2 di 3 Sostituzione SSD blade nell'iMac Intel 21.5" EMC 2805, Gruppo disco rigido: passo 45, immagine 3 di 3
    • Solleva l'hard drive dal lato più vicino alla scheda madre e tiralo leggermente fuori dal suo alloggio.

    • Il disco rigido è ancora collegato all'iMac con un cavo dati/alimentazione SATA: non cercare di rimuoverlo ora.

    The newer drives have rubber ends and an adhesive side, be careful removing them if replacing the drive and be sure they are securely pushed back into the holder

    Carl Schultz - Replica

  46. Sostituzione SSD blade nell'iMac Intel 21.5" EMC 2805: passo 46, immagine 1 di 2 Sostituzione SSD blade nell'iMac Intel 21.5" EMC 2805: passo 46, immagine 2 di 2
    • Usa uno spudger per scollegare il cavo dati/alimentazione SATA facendo leva delicatamente su entrambi i lati del connettore per farlo scorrere lontano dall'unità.

    When reconnecting the SATA cable, there is nothing to make the connector hold still, and it is hard to reach, so it took several tries. I ended up taking off the rubber baby buggy bumpers to get more room, and then jamming them back on after getting the SATA connector snugged up.

    bstaud - Replica

    If by rubber baby buggy bumper, you mean left speaker, then yes, I agree. Reinstall the hard drive before the left speaker.

    jerrid_foiles -

    Kudo to @jerrid_foiles! I was going crazy trying to attach the SATA cable until I took the two screws out of the left speaker and slid the top end of it aside by about 3/4 inch. Make the whole process SO MUCH easier!!

    jiclark - Replica

    We solved this by removing the hard drive tray screw, then inserting the cable into the SATA hard drive. Then hold the hard drive a bit out of the way to insert the 7.3mm hard drive tray screw.

    Marjie - Replica

    Agree with this method, found it an impossible task to reconnect the SATA connector until removed the tray screw, then it was relatively easy to reconnect and then replace the tray screw.

    daveedwards -

    Also agree with this method!

    jmorphett5 -

  47. Sostituzione SSD blade nell'iMac Intel 21.5" EMC 2805: passo 47, immagine 1 di 1
    • Rimuovi il gruppo dell'hard drive dall'iMac.

    When reassembling, I found it easier to loosen the HD tray screw from Step 48 and pull the tray outwards from the left side in order to plug the SATA cable in more easily.

    Cool_Breeze - Replica

    Thanks! I, too, had a hard time reconnecting the SATA cable.

    boboswell -

    I found this helpful too!

    Anwar -

    And DON’T do what I did, which is to remove the left speaker - which can easily lead to breaking the cable between the power on button and the power supply. The cable is routed through a hidden slot at the very bottom of the left speaker

    bsmith1 - Replica

    I did loosen the speaker so I could get a tool behind the SATA cable to push it on to the SSD drive. Otherwise hard to align cable.

    Noah Ralston - Replica

    I found the easiest way to connect the SATA cable was to not screw the plastic hard drive tray down until you plug the drive in. That way you can easily push the connector in and due to the cable you’ve got some wiggle room. You can position the tray then just lift one end of the drive up and secure the screw. Then just push the drive down.

    Chris Caldwell - Replica

    This was the step that I had the most trouble with. I’m used to replacing a hard drive in a MacBook Pro, where the “plug” that you plug the drive into is a rigid thing that you can firmly press the hard drive into.

    With the iMac, the plug is situated on the end of a non-rigid cord, so the plug moves back when you try to snap a drive into it. Also, those two rubber gasket things that you adhere to the side of the drive really make it difficult to maneuver the now-overly-chubby drive towards the plug.

    After must frustration/concern, what I ended up doing was temporarily removing the rubber gasket things, using the “spudger” as kind of a lever behind the “plug on a cord” so that it didn’t move as much, and then pushed the gasket-less SSD into the plug.

    Once I got it connected, I put the rubber gaskets back on the sides of the SSD and kind of coaxed it down into place, using the pointy end of the spudger to get the chubby corner pieces to “sit” correctly in the rigid plastic tray that the SSD kind of rests in.

    Jack OnFlickr - Replica

    From another comment elsewhere on this repair, I *highly* recommend removing the two screws holding the left speaker in place, then sliding it just a tad out of the way to be able to easily attach the SATA cable. You don’t have to move it much to make the whole process so much easier!

    jiclark - Replica

  48. Sostituzione SSD blade nell'iMac Intel 21.5" EMC 2805, Vassoio hard drive: passo 48, immagine 1 di 1
    • Rimuovi la vite T10 da 7,2 mm che fissa il vassoio dell'hard drive al telaio posteriore.

    HD Screw is a T9 on mine

    TheStudioDrummer - Replica

  49. Sostituzione SSD blade nell'iMac Intel 21.5" EMC 2805: passo 49, immagine 1 di 1
    • Rimuovi il vassoio dell'hard drive dal telaio posteriore.

    You will have to reroute the sata cable beneath too. The drive tray will not simply lift out.

    biscuit - Replica

  50. Sostituzione SSD blade nell'iMac Intel 21.5" EMC 2805, Assemblaggio scheda logica: passo 50, immagine 1 di 2 Sostituzione SSD blade nell'iMac Intel 21.5" EMC 2805, Assemblaggio scheda logica: passo 50, immagine 2 di 2
    • Usa la punta di uno spudger per accompagnare il connettore del cavo dell'altoparlante sinistro fuori dalla sua presa.

    • Premi prima su un lato del connettore e poi sull'altro, finché non si libera.

  51. Sostituzione SSD blade nell'iMac Intel 21.5" EMC 2805: passo 51, immagine 1 di 1
    • Sposta il cavo dell'altoparlante sinistro tirandolo direttamente fuori dal gancio sul retro del case posteriore.

  52. Sostituzione SSD blade nell'iMac Intel 21.5" EMC 2805: passo 52, immagine 1 di 2 Sostituzione SSD blade nell'iMac Intel 21.5" EMC 2805: passo 52, immagine 2 di 2
    • Come nel passo precedente, sposta il cavo di alimentazione/dati SATA e rimuovilo dal gancio.

  53. Sostituzione SSD blade nell'iMac Intel 21.5" EMC 2805: passo 53, immagine 1 di 3 Sostituzione SSD blade nell'iMac Intel 21.5" EMC 2805: passo 53, immagine 2 di 3 Sostituzione SSD blade nell'iMac Intel 21.5" EMC 2805: passo 53, immagine 3 di 3
    • Usa delle pinzette per aprire la staffa di bloccaggio in metallo sul connettore del cavo della fotocamera iSight.

    • Rimuovi il cavo della fotocamera iSight dalla sua presa sulla scheda logica.

    • Questo è un connettore delicato che può danneggiarsi facilmente.

  54. Sostituzione SSD blade nell'iMac Intel 21.5" EMC 2805: passo 54, immagine 1 di 3 Sostituzione SSD blade nell'iMac Intel 21.5" EMC 2805: passo 54, immagine 2 di 3 Sostituzione SSD blade nell'iMac Intel 21.5" EMC 2805: passo 54, immagine 3 di 3
    • Se necessario, usa la punta di uno spudger per rimuovere le linguette che coprono i connettori dell'antenna.

  55. Sostituzione SSD blade nell'iMac Intel 21.5" EMC 2805: passo 55, immagine 1 di 3 Sostituzione SSD blade nell'iMac Intel 21.5" EMC 2805: passo 55, immagine 2 di 3 Sostituzione SSD blade nell'iMac Intel 21.5" EMC 2805: passo 55, immagine 3 di 3
    • Usa la punta di uno spudger per scollegare tutti e quattro i connettori dell'antenna dalla scheda AirPort/Bluetooth.

    • Prendi nota delle posizioni originali di ciascun connettore quando ricolleghi i cavi.

  56. Sostituzione SSD blade nell'iMac Intel 21.5" EMC 2805: passo 56, immagine 1 di 3 Sostituzione SSD blade nell'iMac Intel 21.5" EMC 2805: passo 56, immagine 2 di 3 Sostituzione SSD blade nell'iMac Intel 21.5" EMC 2805: passo 56, immagine 3 di 3
    • Usa la parte piatta di uno spudger per sollevare il connettore del cavo del jack cuffie dalla sua presa sulla scheda logica.

    • Spingi il cavo leggermente a destra.

  57. Sostituzione SSD blade nell'iMac Intel 21.5" EMC 2805: passo 57, immagine 1 di 1
    • Rimuovi le seguenti viti che fissano il condotto di raffreddamento al case posteriore:

    • Due viti T8 da 6,3 mm

    • Due viti T8 da 4,7 mm

  58. Sostituzione SSD blade nell'iMac Intel 21.5" EMC 2805: passo 58, immagine 1 di 1
    • Rimuovi le quattro viti T10 da 7,2 mm che fissano la scheda logica al case posteriore.

  59. Sostituzione SSD blade nell'iMac Intel 21.5" EMC 2805: passo 59, immagine 1 di 1
    • Usa delle pinzette per rimuovere il nastro adesivo che copre il condotto di raffreddamento.

  60. Sostituzione SSD blade nell'iMac Intel 21.5" EMC 2805: passo 60, immagine 1 di 2 Sostituzione SSD blade nell'iMac Intel 21.5" EMC 2805: passo 60, immagine 2 di 2
    • Inclina la parte superiore della scheda logica, allontanandola dal case posteriore.

  61. Sostituzione SSD blade nell'iMac Intel 21.5" EMC 2805: passo 61, immagine 1 di 2 Sostituzione SSD blade nell'iMac Intel 21.5" EMC 2805: passo 61, immagine 2 di 2
    • Solleva la scheda logica e rimuovila dall'iMac.

    • Fa' attenzione che non si impigli nei perni delle viti sul case posteriore.

    • Gli input I/O sulla parte inferiore della scheda logica saranno la sfida più difficile. Tira delicatamente per evitare danni.

  62. Sostituzione SSD blade nell'iMac Intel 21.5" EMC 2805: passo 62, immagine 1 di 2 Sostituzione SSD blade nell'iMac Intel 21.5" EMC 2805: passo 62, immagine 2 di 2
    • Quando reinstalli la scheda logica, controlla l'allineamento delle porte I/O esterne. La scheda logica può rimanere storta anche quando è fissata con tutte le viti.

    • Usa una chiavetta USB e/o un cavo ethernet per tenere la scheda logica allineata mentre la avviti.

  63. Sostituzione SSD blade nell'iMac Intel 21.5" EMC 2805, SSD Blade: passo 63, immagine 1 di 1
    • Rimuovi la singola vite Torx T8 che fissa l'SSD alla scheda logica.

  64. Sostituzione SSD blade nell'iMac Intel 21.5" EMC 2805: passo 64, immagine 1 di 3 Sostituzione SSD blade nell'iMac Intel 21.5" EMC 2805: passo 64, immagine 2 di 3 Sostituzione SSD blade nell'iMac Intel 21.5" EMC 2805: passo 64, immagine 3 di 3
    • Solleva lievemente la parte più a destra dell'SSD e fai scorrere l'unità tirandola con una certa decisione fuori dal suo zoccolo sulla scheda logica.

    At this “Remove logic board” guide Sostituzione scheda logica iMac Intel 21.5" EMC 2805 step 65, I’m not seeing any PCIe socket. Does this mean if you bought an iMac with HDD you cannot add PCIe-based storage module to it later? I see in this guide, there can be a HDD with the PCIe-based model.

    Lance - Replica

    If the iMac shipped with only a regular hard drive there will be no socket for a blade SSD.

    roberttrevellyan -

Conclusione

Per riassemblare il tuo dispositivo, segui queste istruzioni in ordine inverso e usa la nostra guida alla sostituzione delle strisce adesive per riattaccare il vetro dello schermo.

Altre 14 persone hanno completato questa guida.

Un ringraziamento speciale a questi traduttori:

en it

100%

albertob ci sta aiutando ad aggiustare il mondo! Vuoi partecipare?
Inizia a tradurre ›

3 Commenti

If I do not have an SSD connector, it is possible to weld it and it works

Juan Manuel - Replica

If the circuit points are there, why not? My guess (but qualified guess) is that the existence of the connector itself is the difference.

But you should know what you are doing ;)

Daniel JB - Replica

como puedo saber si mi equipo tiene ssd de fabrica , para configurar fusion driver?

es un iMac de finales de 2013

jesus - Replica

Aggiungi Commento

Visualizza Statistiche:

Ultime 24 Ore: 3

Ultimi 7 Giorni: 27

Ultimi 30 Giorni: 112

Tutti i Tempi: 30,587