Salta al contenuto principale
Yamaha APX-6N Guitar Strings Replacement

Yamaha APX-6N Guitar Strings Replacement

Benjamin

Benjamin e 3 altri collaboratori

Ultimo aggiornamento il December 15, 2023

30 minuti - 1 ora
Facile
Foto Azione
Necessarie Più Immagini

Introduzione

Vai al passo 1

This guide will teach you how to remove old or damaged strings from a Yamaha APX-6N guitar. It will also teach you how to put the new strings on properly and tie knots at the bridge and head so the strings stay in place.

Cosa ti serve

iFixit guadagna commissioni quando acquisti tramite questi link.
  1. Yamaha APX-6N Guitar Strings Replacement, Guitar strings: passo 1, immagine 1 di 1
    • Loosen the guitar strings by turning the tuning pegs counter clockwise.

  2. Yamaha APX-6N Guitar Strings Replacement: passo 2, immagine 1 di 1
    • To avoid injury, assure strings are loosened before cutting.

    • Once the strings are loose, cut them using the wire cutters.

    • After strings have been cut, remove them by pulling them out of the tuners and the bottom of the bridge.

  3. Yamaha APX-6N Guitar Strings Replacement: passo 3, immagine 1 di 2 Yamaha APX-6N Guitar Strings Replacement: passo 3, immagine 2 di 2
    • Insert the end of the string through the middle of the bridge until four inches comes through.

    • Wrap the short end of the string around the long end, making a loop.

    • Put the short end of the string through the loop around three to four times.

    • Pull both ends of the string until the knot is tight.

  4. Yamaha APX-6N Guitar Strings Replacement: passo 4, immagine 1 di 2 Yamaha APX-6N Guitar Strings Replacement: passo 4, immagine 2 di 2
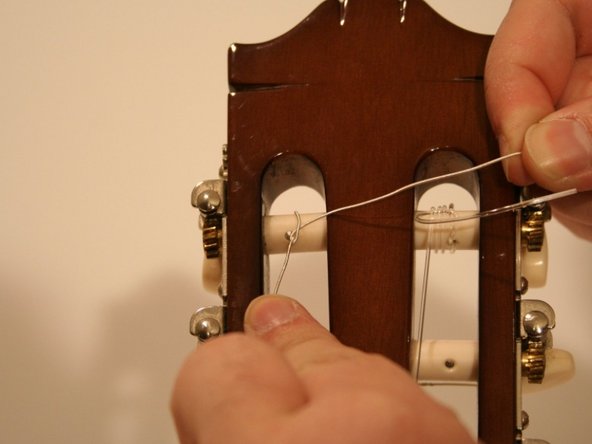
    • Insert the end of the string into the hole on the correct tuning peg.

    • Pull the end over the tuning peg and loop under the string. Then push the end of the string under the loop.

    • Put the end of the string through the loop and pull both ends until the knot is tight.

  5. Yamaha APX-6N Guitar Strings Replacement: passo 5, immagine 1 di 2 Yamaha APX-6N Guitar Strings Replacement: passo 5, immagine 2 di 2
    • Repeat Step 4 for all other strings. Strings should be placed in the tuning pegs in clockwise order. Refer to string packaging for more details.

  6. Yamaha APX-6N Guitar Strings Replacement: passo 6, immagine 1 di 1
    • Turn the tuning pegs clockwise to tighten each string until the string makes a sound when plucked.

    • Do not overtighten the strings! Strings may snap and lead to injury.

  7. Yamaha APX-6N Guitar Strings Replacement: passo 7, immagine 1 di 1
    • After all strings have been replaced, tune the guitar to your desired tuning.

    • Check the headstock and the bridge for any loose string ends.

    • If necessary, use the wire cutters to snip off excess string.

    • The ends of the strings are very sharp.

Conclusione

You now have new strings for your guitar!

Benjamin

Membro da: 05/10/21

145 Reputazione

1 Guida realizzata

0 Commenti

Aggiungi Commento

Visualizza Statistiche:

Ultime 24 Ore: 0

Ultimi 7 Giorni: 0

Ultimi 30 Giorni: 8

Tutti i Tempi: 335