Introduzione
Use this guide to remove and replace the power supply in an Xbox Series X.
If your Xbox doesn't power on or the light on the console doesn't light up, your power supply may be faulty.
Before you begin, completely power down and unplug all cables from your console. Remember to follow general electrostatic discharge (ESD) safety procedures while repairing the console.
Cosa ti serve
-
-
Use a pair of tweezers to remove the sticker hiding the first screw on the back panel, near the base.
-
-
-
Use a pair of blunt tweezers to peel back the large sticker on the back panel to reveal the second screw.
-
-
Attrezzo utilizzato in questo passaggio:Magnetic Project Mat$19.95
-
Use a T8 Torx driver to remove the two 7.4 mm‑long screws securing the back panel.
-
-
-
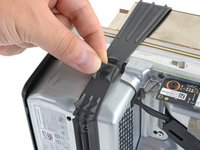
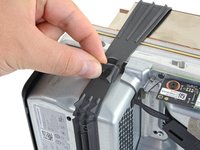
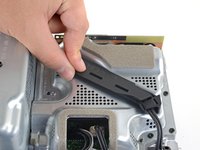
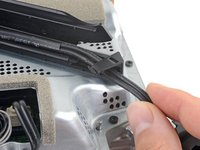
Insert the flat end of a spudger into the gap between the back panel and the shell, near the left side of the base.
-
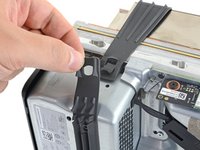
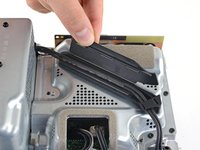
Pry up the back panel to release it from the locking clips.
-
-
-
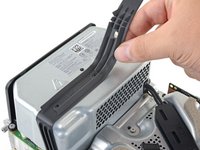
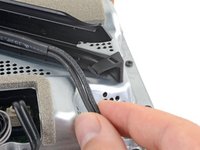
Grip the back panel at the opening you just created and pull it up and away from the shell to unclip the long edges.
-
-
-
Use a T8 Torx driver to remove the three screws securing the fan to the center chassis:
-
One 10.5 mm pancake screw
-
Two 8.8 mm screws
are there any 10.5mm wide head screw for the xbox fan for sale because i need a replacement because i accidentally broke mine
If the 10.5 mm screw isn’t budging, use some pliers to loosen it
-
-
Attrezzo utilizzato in questo passaggio:Tweezers$4.99
-
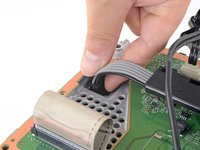
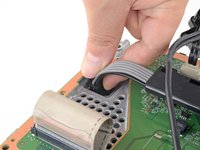
Use your fingers or a pair of blunt tweezers to grip the edges of the fan cable connector, and pull up to disconnect it from the center chassis.
But don’t pull the connectors with tweezers because you will inevitably still damage the cable as you have no grip on the connector and the tweezers will slip.
-
-
-
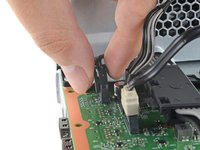
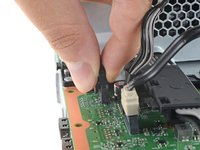
Use the flat end of a spudger to lift up on the locking tab holding the base to the shell.
-
-
-
Grip the base and rotate it counterclockwise to unlock it from the shell.
-
Remove the base.
had trouble getting the base off, what worked for me is setting the console on the table sitting on the base and turning the whole console while pushing down.
-
-
-
Use a T8 Torx driver to remove the two 8.8 mm screws securing the optical drive's vibration isolator to the shell: one on the base and one on the top of the isolator.
-
-
-
Lift up the optical drive's vibration isolator to remove it.
-
-
-
Attrezzo utilizzato in questo passaggio:Tweezers$4.99
-
Use a pair of blunt tweezers to grip the edges of the optical drive power connector and pull up to disconnect it from the optical drive.
-
Use your fingers to pull up and disconnect the data cable from the optical drive.
Once again, DO NOT use tweezers to pull these connectors out. That’s a great way to slip and damage something.
I managed to get the power connector unplugged, but the data cable just refuses to move. I've used quite a bit of force, and using any more feels like I would damage it. I have no clue on how to get it out safely :(
Try to "walk" the connector out: pry up one side, then the other. Best of luck!
-
-
-
Grip the top edge of the optical drive and pull it out of its slot in the shell to remove it.
-
-
-
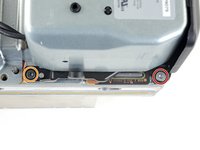
Use the flat end of a spudger to flip open the metal locking tab on the USB port ribbon cable.
-
-
-
Use a pair of tweezers to pull up on the black plastic pull tab to disconnect the USB port cable.
The silver ribbon cable is glued down to the center chassis, so only pulling on the black plastic pull tab will result in it pulling free from the cable as that tab is only glued to the cable.
Better to heat the silver ribbon cable's adhesive with a hair dryer, separate the cable from the center chassis, and then pull the cable from the connector using the black plastic pull tab.
-
-
-
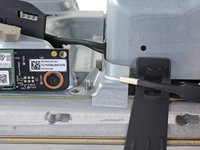
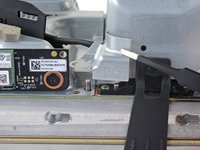
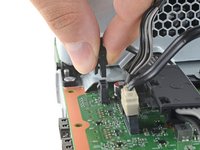
Use the pointed end of a spudger to depress the metal tab on the side of the power button cable's board connector.
-
With the metal tab depressed, use a pair of tweezers to pull up on the pull tab to disconnect the power button cable from the center chassis.
I broke this connector during disassembly. Is there a part number I can use to get a replacement on Mouser or Digikey?
I broke this connector during disassembly too. Where can I get this connector?
the manufacturer of connectors in series x is I-PEX. exact part number (as far as I'm not mistaken) 20535-010E-02 EVAFLEX 5-VS. 0.5mm pin spacing (10pin connector). a possible rescue may be to desolder the connector from the switch board and solder it permanently there.
How do I purchase this from their website?
I have these connectors. Baycroc@fedtel.net
Would we be able to order them from you directly
Yes would we be able to order these connectors directly from you?
There is no black pull tab on mine😬. How am I supposed to pull it safely?
-
-
-
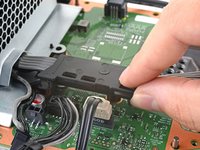
Use a T8 Torx driver to remove the three 7.4 mm screws securing the center chassis assembly to the shell.
-
-
-
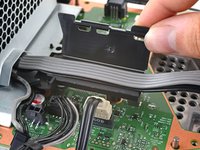
Gently peel the taped USB port ribbon cable off of the heatsink.
-
-
-
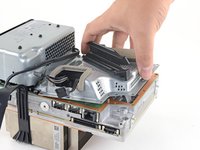
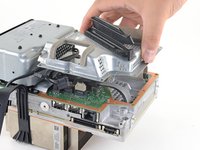
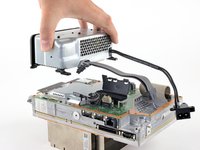
Grip the center chassis and pull it towards the green fan grille at the top of the shell, uncoupling the guide pegs from the shell.
-
Lift out the center chassis assembly to remove it from the shell.
-
-
-
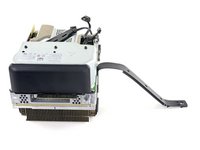
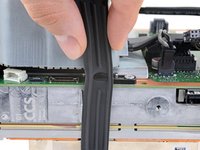
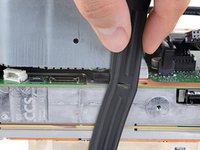
Unlatch the chassis strap from the right side of the power supply.
-
-
-
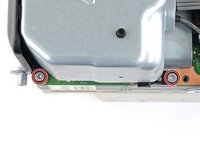
Use a T8 Torx driver to remove the three screws securing the power cable port to the chassis:
-
Two 13.1 mm screws
-
One 35 mm screw
-
-
-
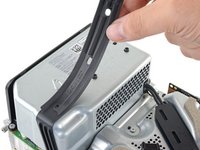
Unlatch and open the lid on the power cable's plastic guide.
-
-
-
Use a T8 Torx driver to remove the 8.8 mm screw securing the power supply corner cover.
-
-
-
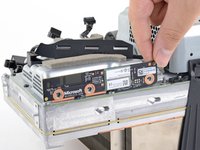
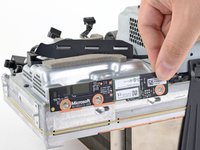
Use a T8 Torx driver to remove the three 9.6 mm screws securing the accessory antenna board to the center chassis.
-
-
-
Use a T8 Torx driver to remove the nine screws securing the board shield:
-
Six 8.8 mm black screws
-
Two 35 mm silver screws
-
One 13.1 mm silver screw
-
-
-
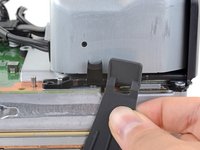
Disconnect the chassis strap from the locking tabs on either side of the power supply.
-
-
-
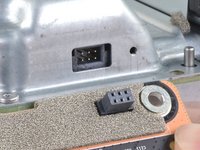
Grip and compress the locking tab on the 10-pin power connector.
-
While compressing the locking tab, lift the connector straight up to disconnect it from the board.
-
-
-
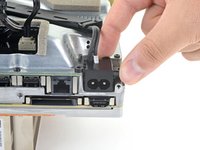
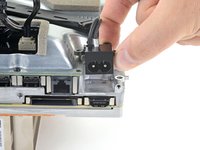
Grip and compress the locking tab on the 2-pin power connector.
-
While compressing the locking tab, lift the connector straight up to disconnect it from the board.
-
-
-
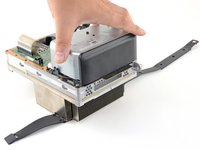
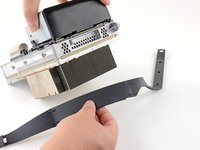
Use a T8 Torx driver to remove the four screws securing the power supply around its perimeter:
-
Three 35 mm silver screws
-
One 8.8 mm black screw
-
-
-
Remove the power supply.
Bei meinem Ersatznetz teil musste ich auch die Kunststoff Halterung tauschen, da sonst die Löcher für die Schrauben nicht passten
super gute Anleitung
-


To reassemble your device, follow these instructions in reverse order.
Take your e-waste to an R2 or e-Stewards certified recycler.
Repair didn’t go as planned? Try some basic troubleshooting, or ask our Xbox Series X Answers community for help.
To reassemble your device, follow these instructions in reverse order.
Take your e-waste to an R2 or e-Stewards certified recycler.
Repair didn’t go as planned? Try some basic troubleshooting, or ask our Xbox Series X Answers community for help.
Annulla: non ho completato questa guida.
Altre 26 persone hanno completato questa guida.


24 Commenti
So, I am a skilled DIYer. I had 1 series x that had no power all the sudden, under warranty, sent back and received a refurb. Then I got a halo infinite edition, it all the sudden wouldn't send video. It would power up but I couldn't boot in safe mode or low res mode. Sent it back, send me a refurb. Now my brothers Xbox did the same thing. It turns on but never boots then shuts off after few minutes. No controller connects either, and can't have the xbox sync with the flash. His is not under warranty so I bought a PSU and replaced, still same thing. Any ideas? Microsoft just sends you a refurb and doesn't tell you what was wrong or else I'd know since it happened to my infinite console.
Have you tried replacing the SSD drive?
Kason M -
FYI this guide is amazing! Down to providing the length of screws and circling in photos. A++
Well ladies and gentlemen I did it. Took about an hour and a half, only because I put one of the cables on backwards, otherwise it would have only taken an hour. SHES ALIVE!!!! Thank you so much to the person that created these instructions they were SPOT ON!
CAN I GET A A'MEN!!!
Great guide! It took me about an hour with my 7 year old son helping me. I have PC and laptop background so that helped me a lot about knowing how to remove the ribbon cables and other connections. MS wants $300 to just give you another Xbox. Even with buying the tools I still saved $200. Great job ifixit!
The hardest thing was that %#*@ base plate,, everything worked great thank you
This guide and the replacement power supply worked perfectly! We got the Xbox Series X when it was first released. In February 2023 it would no longer power on. I took it to two local repair shops and they both said it was too new, they couldn't work on it. Thankfully I found this guide and my 13 year old son and I were able to take it apart and put it back together again ourselves. It did help to have a Torx wrench that you can get some leverage with (L-shaped), especially for the screw with the oversized head. We kept track of the screws by writing the step number on a Post-it Note and sticking each screw on the note with a double-sided adhesive sticker. I wish we would have done this sooner!
My house took a lightning strike 3 months ago and the only two things it fried was my cable modem and Series X. My luck, the Series X's warranty expired about 5 days before that happened. I ordered a PSU from iFixit and just finished installing it. Works like a charm and I'm finally back up and running. I used to build computers when I was younger so the install was pretty straightforward. This was much better than spending $600 on a new system :). Thanks iFixit!
Mine just had an issue where it turns on, button lights up white along with a beep, fan spins up for about 5 seconds then stops,
Light stays on but no video feed then shuts off.
Dunno is this is a PSU issue?
I ordered one to be safe, if it still doesn't fix it I will just send it back but if this isn't the issue then what is?
The SSD?
Hi , I hope you are fine
I have the same problem with my Xbox Series X, for me, when it turns on, after a few minutes of working, a green screen crash suddenly occurs, and as you said, it turns off and then turns on normally. It is not possible and as you said, it is difficult to turn on. Is your problem solved? what have you done?
I recently moved into a new apartment with my wife and my Xbox did not survive the move. While I don't believe the move or packing damaged the power supply, it still did not power up once it was set up in our new apartment. With the LED not even turning on by pressing it, I suspected the power supply. I ordered a new power supply from the iFixit website and followed the repair guide. As soon as I reassembled my Xbox, I powered it on and, to my excitement, it powered on and works!
This was an incredibly helpful and cost effective solution. Thank you for creating this helpful guide!
very good guide. because of a screw problem, it took me 3 hours. but I'm happy. in fact, for €80 I was able to repair my Xbox where Microsoft was asking me €340, almost the price of a new one.
Thanks to the author of this guide
Guida fantastica, seguita passo per passo il problema è stato risolto! Grazie!
About an hour for me because a ribbon cable tab came off, had to glue it back on. Guide is flawless and it fixed the console. Thanks!
I’m considering doing this but I’m worried about breaking it in the process. Any idea how risky it is?
It is not risky if you already had experience opening up laptops etc, but if you don't, the biggest risk is breaking some of the cables. (There is really no risk when it comes to screws other than losing them -- make sure to organize your screws well.) And the solution to that is simple -- religiously follow all the instructions here, don't use force to pull something out when it does not come off -- make sure you are always doing the right thing. If anything seems confusing to you, find a Youtube video and follow what they are doing. You'll be ok.
lzps -
I couldn't get the board shield to go back on after I swapped out the power supply. The ten pin power cord seems to be longer than the original.
These directions were absolutely perfect. Thank you so much. You saved me $220 that Microsoft would have charged me to do the same thing detailed here. My Xbox went from brick to fully functional. Took about an hour of work but the step by step guide with photos was SPOT ON. Cannot be happier.
Thanks Farty McGee!
Super tutoriel !
Ma Xbox ne démarrait pas et en changeant l'alimentation elle remarche !!! Merci beaucoup !!