
Toshiba Satellite C655-S5142 Hard Disk Drive Replacement
Introduzione
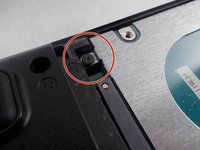
Vai al passo 1If your Toshiba C655-S51142 has slowed to a snail's pace or has completely crashed, it may be time to replace your hard drive. Follow this guide to replace the hard drive.
The hard drive is the part of the computer that stores files, applications, pictures and even the entire operating system. Signs of a failing hard drive include receiving frequent error messages, a major computer slow down or the dreaded blue screen of death. But, before you grab your screw driver, review the troubleshooting page for tips that may get you back up and running without fully replacing the hard drive.
Before you begin, make sure you backup your hard drive. Also, be sure to power off your computer and disconnect from electrical sources.
Cosa ti serve


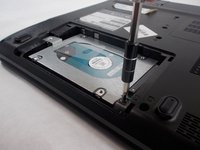

To reassemble your device, follow these instructions in reverse order.
To reassemble your device, follow these instructions in reverse order.
Team

UMass Dartmouth, Team S1-G5, Valliere Spring 2019 Membro di UMass Dartmouth, Team S1-G5, Valliere Spring 2019
UMASSD-VALLIERE-S19S1G5
3 Membri
8 Guide realizzate