Salta al contenuto principale

Toshiba Satellite C55D-C5106 Cooling Fan and Heat Sink Replacement

Cosa ti serve

  1. Toshiba Satellite C55D-C5106 Cooling Fan and Heat Sink Replacement, Cooling Fan and Heat Sink: passo 1, immagine 1 di 3 Toshiba Satellite C55D-C5106 Cooling Fan and Heat Sink Replacement, Cooling Fan and Heat Sink: passo 1, immagine 2 di 3 Toshiba Satellite C55D-C5106 Cooling Fan and Heat Sink Replacement, Cooling Fan and Heat Sink: passo 1, immagine 3 di 3
    • Turn the laptop off and remove any external power sources.

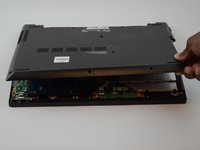
    • Flip the laptop upside down.

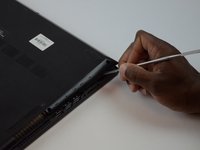
    • Remove all of the 12 screws that secure the back cover to the laptop with a Phillips #1 screwdriver.

  2. Toshiba Satellite C55D-C5106 Cooling Fan and Heat Sink Replacement: passo 2, immagine 1 di 1
    • Pull the battery toward yourself until it is completely removed from the laptop. The battery should detach easily.

  3. Toshiba Satellite C55D-C5106 Cooling Fan and Heat Sink Replacement: passo 3, immagine 1 di 2 Toshiba Satellite C55D-C5106 Cooling Fan and Heat Sink Replacement: passo 3, immagine 2 di 2
    • Run the metal spudger around the seam between the back cover and the rest of the laptop.

    • Use the metal spudger to remove the bottom cover of the laptop.

  4. Toshiba Satellite C55D-C5106 Cooling Fan and Heat Sink Replacement: passo 4, immagine 1 di 1
    • Use the Phillips #1 screwdriver to remove the screw securing the fan.

  5. Toshiba Satellite C55D-C5106 Cooling Fan and Heat Sink Replacement: passo 5, immagine 1 di 1
    • Loosen the four screws securing the heat sink using the same screwdriver.

    • These screws cannot be removed.

  6. Toshiba Satellite C55D-C5106 Cooling Fan and Heat Sink Replacement: passo 6, immagine 1 di 1
    • Disconnect the fan from the motherboard by removing the white holder with the red, yellow, and black wires.

  7. Toshiba Satellite C55D-C5106 Cooling Fan and Heat Sink Replacement: passo 7, immagine 1 di 2 Toshiba Satellite C55D-C5106 Cooling Fan and Heat Sink Replacement: passo 7, immagine 2 di 2
    • Pull the fan and heat sink away from the motherboard.

Conclusione

To reassemble your device, follow these instructions in reverse order.

Laura Tamayo

Membro da: 02/14/19

678 Reputazione

5 Guide realizzate

Team

USF Tampa, Team S1-G4, Leahy Spring 2019 Membro di USF Tampa, Team S1-G4, Leahy Spring 2019

USFT-LEAHY-S19S1G4

4 Membri

10 Guide realizzate

0 Commenti

Aggiungi Commento

Visualizza Statistiche:

Ultime 24 Ore: 0

Ultimi 7 Giorni: 4

Ultimi 30 Giorni: 8

Tutti i Tempi: 336