Salta al contenuto principale
Toshiba Satellite C55D-A5108 Keyboard Replacement

Toshiba Satellite C55D-A5108 Keyboard Replacement

Michael Medeiros

Michael Medeiros e 2 altri collaboratori

Ultimo aggiornamento il December 14, 2022

5 - 10 minuti
Moderato

Introduzione

Vai al passo 1

If your Toshiba Satellite C55D-A5108 keyboard is defective in some manner, use this guide to replace it. Before proceeding, check to make sure the keyboard issue is being caused by software instead of the keyboard itself. If you do not feel confident with replacing the keyboard yourself please find someone that can help you with the process.

Cosa ti serve

Strumenti

  • Spudger
    Spudger
  1. Toshiba Satellite C55D-A5108 Keyboard Replacement, Battery: passo 1, immagine 1 di 1
    • Flip over the device so that the model stickers are facing up.

  2. Toshiba Satellite C55D-A5108 Keyboard Replacement: passo 2, immagine 1 di 1
    • Move the right notch to the unlock position by sliding it to the right.

  3. Toshiba Satellite C55D-A5108 Keyboard Replacement: passo 3, immagine 1 di 1
    • Hold the left notch in an unlocked position with one hand and use the other hand to slide the battery out.

  4. Toshiba Satellite C55D-A5108 Keyboard Replacement, Keyboard: passo 4, immagine 1 di 2 Toshiba Satellite C55D-A5108 Keyboard Replacement, Keyboard: passo 4, immagine 2 di 2
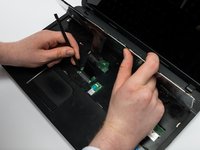
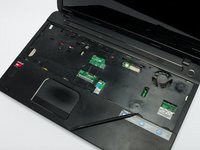
    • Open the device so that the keyboard is visible.

    • Slip the wide tip of the spudger underneath the Enter key on the keyboard.

  5. Toshiba Satellite C55D-A5108 Keyboard Replacement: passo 5, immagine 1 di 1
    • Slowly slide the spudger along the perimeter of the keyboard in a clockwise manner until you’ve reached the top left corner.

    • Lift the keyboard at an angle.

    • Be aware to not lift the keyboard too forcefully as to not damage anything.

  6. Toshiba Satellite C55D-A5108 Keyboard Replacement: passo 6, immagine 1 di 2 Toshiba Satellite C55D-A5108 Keyboard Replacement: passo 6, immagine 2 di 2
    • Use the pointed tip of the spudger to open the notches on the ribbon cable directly attached to the device.

    • Pull the connector out of its slot and lift the keyboard out of the device.

Conclusione

To reassemble your device, follow these instructions in reverse order.

Michael Medeiros

Membro da: 10/25/19

150 Reputazione

1 Guida realizzata

Team

0 Commenti

Aggiungi Commento

Visualizza Statistiche:

Ultime 24 Ore: 0

Ultimi 7 Giorni: 0

Ultimi 30 Giorni: 3

Tutti i Tempi: 286