Salta al contenuto principale

The Claw Case Replacement

Cosa ti serve

  1. The Claw Case Replacement, Top Cover: passo 1, immagine 1 di 1
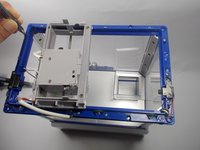
    • Place The Claw machine in the up-right position with the control knobs facing you.

  2. The Claw Case Replacement: passo 2, immagine 1 di 1
    • Turn The Claw machine upside-down placing the top cover on the surface of your work area.

  3. The Claw Case Replacement: passo 3, immagine 1 di 1
    • Remove all ten 6mm phillips #1 screws underneath the top cover using your #1 phillips head screwdriver.

    • It is helpful to choose a clear, well lit work space. There are multiple tiny screws that are easy to lose.

  4. The Claw Case Replacement: passo 4, immagine 1 di 1
    • Turn The Claw machine back to the upright position with controls facing you.

  5. The Claw Case Replacement: passo 5, immagine 1 di 1
    • Remove the top cover of The Claw machine.

  6. The Claw Case Replacement: passo 6, immagine 1 di 2 The Claw Case Replacement: passo 6, immagine 2 di 2
    • Remove the ten 6 mm phillips #1 screws from the top flange.

  7. The Claw Case Replacement: passo 7, immagine 1 di 1
    • Lift the flange upward and off to the side of the machine.

    • There is enough wire connecting the flange to the machine that you will not need to cut the wire. The flange can be moved off to the side of the machine while you are working.

    • Cutting or ripping out the wire will cause damage to the machine so try not to put much tension on the wire.

  8. The Claw Case Replacement, Case: passo 8, immagine 1 di 1
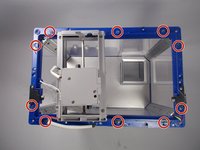
    • The glass you intend to replace will have four 6mm #1 phillips head screws on either side located in the silver corner pieces.

  9. The Claw Case Replacement: passo 9, immagine 1 di 1
    • Loosen all eight screws using your phillips head #1 screwdriver so that the glass can be removed.

  10. The Claw Case Replacement: passo 10, immagine 1 di 1
    • Gently remove the broken clear plastic case.

    • Remember how the case sat into the frame so that you can seat the new case in the same way.

Conclusione

To reassemble your device, follow these instructions in reverse order.

Altre 2 persone hanno completato questa guida.

Alain Pierre

Membro da: 03/22/16

1.188 Reputazione

9 Guide realizzate

Team

Un commento

where can i get the clear plastic panels

cristian2002 - Replica

Aggiungi Commento

Visualizza Statistiche:

Ultime 24 Ore: 1

Ultimi 7 Giorni: 7

Ultimi 30 Giorni: 19

Tutti i Tempi: 1,425