Introduzione
Segui questa guida per sostituire lo schermo in un MacBook Air di inizio 2020.
Cosa ti serve
-
-
Se il tuo MacBook funziona con Big Sur v11.1 o successive, disattivare l'Auto Boot potrebbe non funzionare. Puoi procedere normalmente, ma assicurati di scollegare la batteria appena sei dentro.
-
Usa un cacciavite pentalobe P5 per rimuovere le viti seguenti:
-
Due viti da 7,9 mm
-
Due viti da 7,1 mm
-
Sei viti da 2,6 mm
-
-
-
Infila le dita tra lo schermo e il case inferiore per sollevare dall'Air la cover stessa.
-
Rimuovi il case inferiore.
-
Posizionalo e premi con decisione per far scattare le due clip nascoste sotto. Dovresti percepirle e sentirle scattare al loro posto.
When reassembling, the “snaps” are in the middle of the laptop (from top to bottom), and just to the left and right of center. I assumed it was near the hinge so it took a bit for me to hear the snaps.
Laurie, the two clips are outlined in the third photo of step two. Hope this helps—happy fixing!
-
-
-
Stacca il nastro adesivo che copre il connettore della batteria quanto basta per scoprire lo stesso connettore.
This image is incorrect correct for the A2179 EMC 3302 model, also doesn’t match the next image in this guide
There is other guide for the model you reffer to, I was using that one until i realize it was different, this is the one you are looking for: MacBook Air 13" Retina Late 2020
I initially thought the image was incorrect, but I was just looking for the connector in the wrong place. This picture IS correct for the A2179 EMC 3302. Note that the connector is on the left side of the heat sink (the black thing with parallel ridges in the picture and on the computer), and the connector wires gather together towards the left the side of the computer, not the back. Note that "left side" assumes the Air is upside-down, with the hinge on the side farthest away from you (I'm not doing the "right speaker is on the left side because it's upside-down" thing that iFixit does in step 5).
-
-
-
Usa uno spudger per far scorrere il connettore della batteria parallelamente alla scheda logica, tirandolo fuori dal suo zoccolo sulla scheda.
-
-
-
Usa un cacciavite Torx T3 per svitare la vite da 1,4 mm che tiene ferma la copertura del cavo dell'antenna.
-
Rimuovi la copertura del cavo dell'antenna.
-
-
-
-
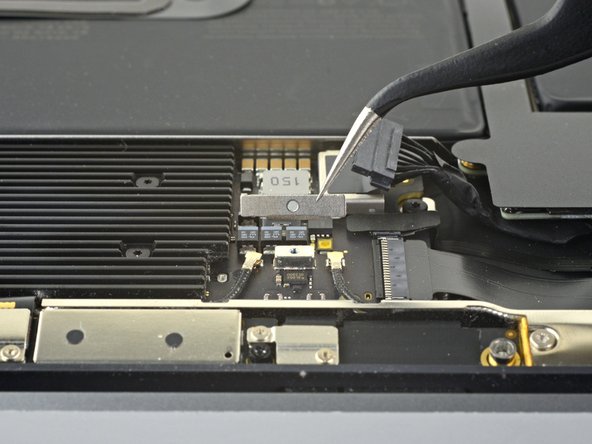
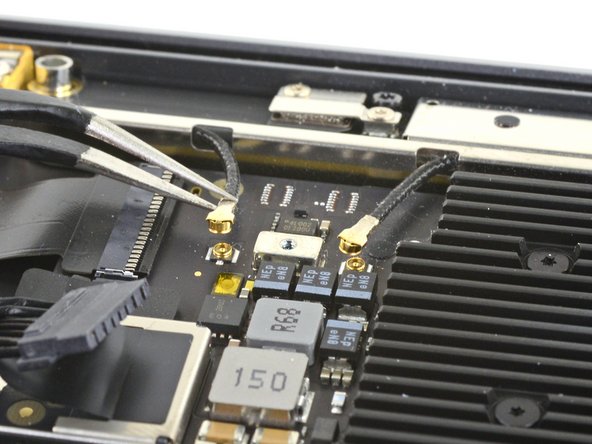
Usa un paio di pinzette per prendere il connettore dell'antenna vicino alla sua base.
-
Tira verso l'alto per scollegare il cavo.
-
Ripeti per il secondo cavo dell'antenna.
This connector is extremely fragile! I always apply a very fine flat screwdriver head to the connector on the system board so it does not pull out!
-
-
-
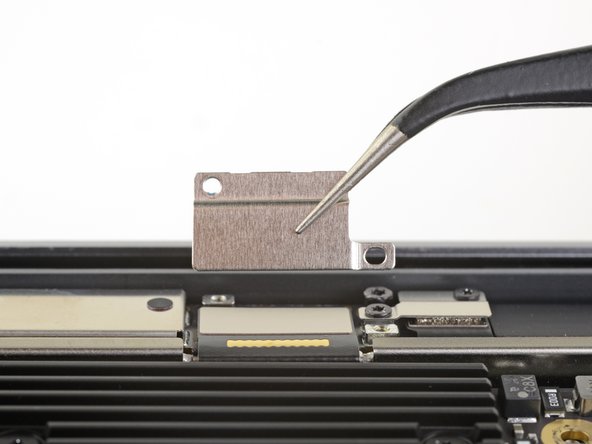
Usa un cacciavite Torx T3 per svitare le due viti da 1,5 mm che tengono ferma la copertura del connettore del cavo dello schermo.
-
Rimuovi la copertura del connettore del cavo dello schermo.
There are two smaller connector covers that cover a narrow ribbon connector. (One of them is visible in the Step 7 photo to the right of the display cable connector cover.) These covers don't have to be removed for disassembly. But my replacement display didn't include them, so I salvaged the covers from the broken display when I reassembled.
-
-
-
Usa la parte piatta di uno spudger per sollevare il connettore del cavo dello schermo dalla scheda dell'antenna per scollegarlo.
I have noticed that replacement assemblies from Ifixit and perhaps other suppliers do not have the smaller covers for the side cables to the left and right of the main display cable installed! Remember to transfer them from your old display to the new or you will have a POF waiting to happen!
Thank you for you advisory on the connector covers. Please tell me what POF stands for?
I'm guessing POF=point of failure.
-
-
-
Infila la punta di uno spudger nella fessura tra la barra dell'antenna e la cerniera dello schermo.
-
Fai perno con lo spudger contro la cerniera peer fare leva e sollevare l'estremità della barra dell'antenna.
-
Ripeti per l'altra estremità della barra dell'antenna.
-
-
-
Usa le dita per tirare la barra dell'antenna verso l'alto e fuori dalla copertura.
-
Fai passare la scheda dell'antenna nell'apertura nel centro della barra dell'antenna.
-
Rimuovi la barra dell'antenna.
this is a bit tricky - the last one i worked on was held tight by a thin black tape, similar to the stretchy tape underneath batteries. this tape is near the motherboard underneath the path of the ribbon cables to the lcd. underneath this tape is a groove cut that the antenna slips into. actually 3 grooves, the 2 underneath the black tape and a longer channel in between. this channel grabs onto a thin part of the antenna that slips into these channels and some bumps help to “wedge” it into place by a pressure type fitting. kind of reminds me of edge of the shield on some ipads and older iphones. the bumps fit into areas and “grab” onto the area next to them. trying to create a word picture. maybe ifixit can add a real picture. definitely slows you down when you encounter resistance - don’t want to force anything. saw some dude on youtube yanking and pulling and i started yelling at him.
Thanks for your advisory, Greg. I can confirm the sticky tape about 1/2" long. It's to the left of the LVDS cable and attached to board. Looks like antennae wall sticks on vertically. Gentle prodding with spudgers from all angles finally frees it. Be patient with it.
-
-
-
Usa un cacciavite Torx T8 per svitare le tre viti da 4,9 mm da ogni cerniera (sei viti in totale).
The hinge screws were a T9 on mine
It's actually easier to remove 2 of the 3 screws on each hinge and then open the laptop before then removing the final screw. This prevents the display from shifting while opening and accidentally damaging other components on the logic board. As we all know, a few mm in the wrong direction on a MacBook can cause a world of trouble.
-
-
-
Avendo ancora il MacBook appoggiato sullo schermo, solleva attentamente la copertura superiore per aprire il MacBook il più possibile.
-
-
-
Solleva il MacBook e inizialo a chiudere attentamente lo schermo finché non è a un angolo di circa 90° con la copertura superiore.
-
Tenendo lo schermo a un angolo di 90° con la copertura, allontanalo da quest'ultima mentre la tieni ferma, in modo che le cerniere si possano sfilare da sotto la copertura.
-
Rimuovi lo schermo.
Great instructions. One note is that on re-assembly, slide base onto hinges and reattach hinge screws before closing down base onto screen.
-


Confronta la tua parte di ricambio con quella originale: potrebbe essere necessario il trasferimento di alcuni componenti o la rimozione di protezioni adesive dalla nuova parte prima di installarla.
Per rimontare il tuo dispositivo, segui le istruzioni in ordine inverso.
Porta i tuoi rifiuti elettronici a un riciclatore certificato R2 o e-Stewards.
La riparazione non è andata come previsto? Prova a rivolgerti alla nostra comunità Risposte per trovare aiuto per la risoluzione dei problemi.
Annulla: non ho completato questa guida.
Altre 38 persone hanno completato questa guida.
Un ringraziamento speciale a questi traduttori:
100%


Questi traduttori ci stanno aiutando ad aggiustare il mondo! Vuoi partecipare?
Inizia a tradurre ›


11 Commenti
Thank you so much for this awesome walkthrough! I can’t believe how much I saved doing this myself. Works beautifully! If I could only suggest a more comprehensive “reassembly” page. There are a couple of missteps I made (eg. trying to install the antenna bar and accidentally leaving the display cable connector under it) that would have helped. In any event, thank you so much!
Thanks for the tip! I’ve added a reminder to that step.
when starting the process of installation, make sure that at least the inside hinge screw is installed and mostly tightened. once the antenna is installed, there is almost no room for that screw to be inserted without a tight scrape against the end of the antenna. a very tight fit. i sometimes only install one hinge screw, usually the center ones, and then align the lid before adding the others and tightening everything up. in this case, would save you some concern to address this beforehand.
Definitely not. Also, there is no such thing, perhaps you meant 2020? Also no.
Have never needed to repair a Mac, but when a pen was slammed in the lid of my wife’s MBA, the screen was completely gone. So I decided to have a go myself, having followed iFixit for a number of years. So a massive thank you for a simple, clear guide, with tool specs that I can’t fault. (I bought your magnetic pad, excellent!)
The new screen is in place, the system functions perfectly. You saved me money and I had real fun and confidence doing the geeking!
Thank you for this guide. I was able to complete things as described. One thing to note: I didn't see any sign of adhesive holding down the antenna bar, but there are metal ridges/dimples on a portion of the folded edge that have to be pressed into the top case in order to prevent the antenna bar from simply springing back up. I found it fiddly to find a suitable tool and generate enough force to push this folded edge fully home, but eventually managed it with careful use of a flathead screwdriver.
Screen turns on but only Apple logo loads, nothing else happens. Thoughts?
Also how to I get the 2 small metal plates on each side of antenna? Thanks
The What you need section mentions T4 and TR8 screwdrivers, but I don't see any mention of these in the instruction steps. Are they really needed?
Conversely, Step 12 requires a T8 screwdriver (not TR8), but this is not mentioned in the What you need section.
Can these be clarified?
Just executed this procedure on a friends machine (using a new screen bought from AliExpress) and it was ridiculously easy to complete.
However, upon restarting, the machine took a little while to show signs of life. A few mins in fact, therefore I'd recommend exercising extra patience before pulling it apart again to check for assembly errors.
Much gratitude to @carsten for putting this together! Thank you!
P5 is also a PL4 (so confusing) - i like the wiha 26764 thanks to @mayer for this post. P5 pentalobe and 1.2 pentalobe screwdriver
greg - Replica