Introduzione
Usa questa guida per sostituire il cuore del tuo DSi, la scheda madre.
Cosa ti serve
-
-
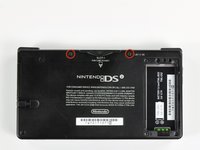
Svita le due viti a croce Philips che fissano il copribatteria al case inferiore.
-
Prendi il copribatteria e sollevalo dal case inferiore.
-
-
-
Usando uno spudger (o un'unghia), solleva la batteria dalla parte superiore.
-
Prendi la batteria e rimuovila dal DSi.
-
-
-
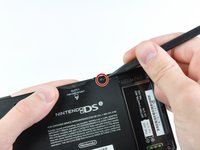
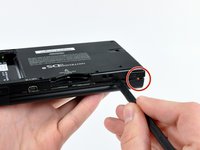
Ci sono due viti nascoste sotto i due gommini cerchiati in rosso.
-
Usa la punta dello spudger per estrarre i due gommini dal case inferiore.
One of the feet did break on me, tweezers came in handy for picking it out
I unfolded and sharpened a paperclip. You can use that to stab and hook the rubber without tearing it, as the rubber is thick enough to reseal when reinserted.
-
-
-
Rimuovi le viti cerchiate che fissano il case inferiore al resto del DSi:
-
Sei viti a croce Phillips #00 da 5,2 mm
-
Una vite a croce Phillips #00 da 2,7 mm
Impossible d'enlever les vises… trop serré! comment faire?
i can't get the screw by the gamecard slot out, PH#00 is too small and PH#0 is too big
same problem here. maybe try a JIS?
-
-
-
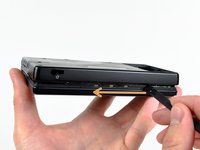
Inserisci lo spudger tra il case inferiore e il pannello inferiore vicino all'angolo in alto a destra del DSi.
-
Passa delicatamente lo spudger lungo il margine del case esterno, creando uno spazio tra il case e il dispositivo.
-
Continua a passare lo spudger intorno al dispositivo fino a separare il case inferiore quasi del tutto.
-
-
-
-
Solleva delicatamente il case dal bordo inferiore.
-
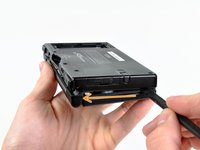
Usa uno spudger per sollevare il cavo del volume e della scheda SD dalla sua presa sulla scheda madre.
-
Una volta che il cavo è stato rimosso del tutto puoi rimuovere il case estero.
Any help removing the ribbon cable, I have absolutely no clue how to remove this.
-
-
-
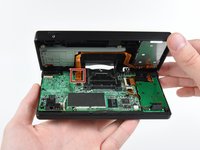
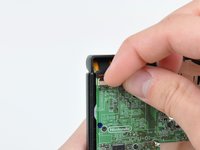
Stacca la scheda del Wi-Fi dalla scheda madre prendendola dal bordo più vicino al jack cuffie.
-
-
-
Usa la punta di uno spudger per staccare il connettore della scheda di alimentazione dal suo posto sulla scheda madre.
do not pry up! pull to one side so you don't disconnect the clip from the motherboard!
Actually Lisa, you are incorrect. If you pull to one side you WILL end up pulling the connector off the motherboard. It is designed so that you ARE MEANT TO pry it upwards out of the connector. All you need to do is use the point or corner of the flat edge of a spudger (or a small flat-headed screwdriver), push it ever so slightly under the middle of the small white plug where there is a small recess in the connector for just this purpose. Prying the plug up in this fashion you should clear the connector with the spudger by prying it up through the recess rather than catching the connector and pulling it off the board.
If the socket comes off the motherboard along with the connector, what’s the best way to fix it?
it has to be soldered back on, so if you can't do it yourself, find someone who can (maybe a local repair shop).
I already pull it off from board new i have to learn how to weld it back
-
-
-
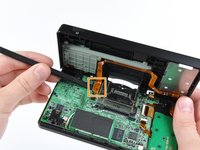
Usa l'unghia o il bordo di uno strumento di apertura in plastica per sollevare la linguetta di fissaggio sulle seguenti tre prese ZIF:
-
Cavo touchscreen inferiore
-
Cavo LCD inferiore
-
Cavo scheda di alimentazione
-
Dopo aver sollevato le linguette di bloccaggio su tutti e tre i socket, usa le dita o un paio di pinzette per estrarre delicatamente i cavi dai rispettivi socket.
I accidentally broke the retaining flap off of the lower touchscreen’s socket. Is it possible to reattach it?
Mine broke off too. At first I thought it would just pop back in, but when I looked at it under magnification, I can see that a tiny piece of plastic actually snapped off the flap. I think we're farked. Looks like the only way to fix would be to solder on a new cable connector.
-
-
-
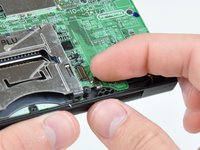
Usa l'unghia o il bordo di uno strumento di apertura in plastica per sollevare con attenzione lo sportello di fissaggio del cavo a nastro del touchscreen.
-
Usa la punta di uno spudger per estrarre il cavo a nastro del touchscreen direttamente dalla sua presa.
When I was putting mine back together, the flap popped off and when I tried to put it on with a tweezers, it snapped. Any suggestions other than scrap it or use it without the touchscreen? Pictures at https://sites.google.com/site/memesbyluc...
This little flap is a pain in the butt to get back in! If there is any way to bypass the removal of this, my advise is to do it!
Adding on: The cable actually ended up breaking as the tweezers I used to put it back in scraped part of the gold ribbon off. Be extremely careful!!!
-
-
-
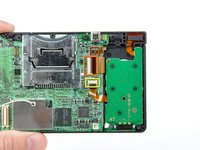
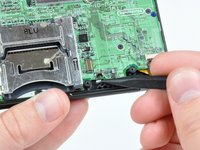
Usa l'unghia o il bordo di uno strumento di apertura in plastica per sollevare con attenzione lo sportello di fissaggio del cavo a nastro della doppia fotocamera.
-
Usa la punta di uno spudger per estrarre il cavo a nastro della doppia fotocamera direttamente dalla sua presa.
-
-
-
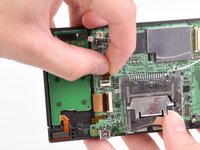
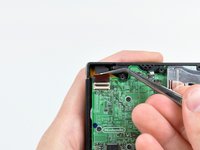
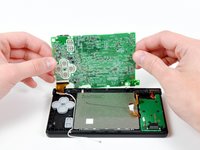
Solleva leggermente la scheda madre verso l'alto per rivelare il cavo a nastro LCD superiore sopra i pulsanti ABXY.
-
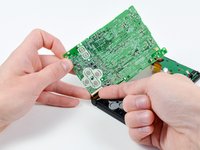
Usa l'unghia o il bordo di uno strumento di apertura in plastica per sollevare con cautela l'aletta di fissaggio del cavo a nastro LCD superiore.
-
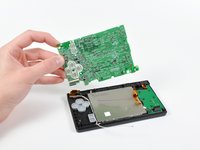
Rimuovi la scheda madre del DSi.
I actually chose to leave this ribbon cable connected, and had no issues completing the rest of the steps around this. Just be careful not to pull the cable!
-


Per riassemblare il tuo dispositivo, segui questa guida al contrario.
Per riassemblare il tuo dispositivo, segui questa guida al contrario.
Annulla: non ho completato questa guida.
Altre 21 persone hanno completato questa guida.
Un ringraziamento speciale a questi traduttori:
100%

Questi traduttori ci stanno aiutando ad aggiustare il mondo! Vuoi partecipare?
Inizia a tradurre ›

4 Commenti
do you know r78's value?
used this guide to swap the stock power connector to a usb micro one, was a bit tricky because the sockets I use have some holes on their sides where solder kept flowing in, but in the end it works and it’s totally worth it. did the same to my old ds lite too, works flawlessly.
Is the motherboard paired? I'm replacing a shotty chairing repair. (One of the pads on the charger port is ripped off and not soldered well) wouldn't it be easier just to swap the whole board and nothing else?
I followed the instructions but my Nintendo DSi won't boot up