Introduzione
Questa guida di riparazione è stata redatta dallo staff di iFixit ma non è stata approvata da Google. Leggi di più sulle nostre guide qui.
Segui questa guida per rimuovere e sostituire la porta USB-C danneggiata del Pixel 3a. La porta USB-C è completamente modulare e facile da sostituire.
Il pannello dello schermo del Pixel 3a non rinforzato è molto fragile. Se stai riusando lo schermo, assicurati di porre speciale attenzione agli avvertimenti durante la procedura di apertura.
La parte più difficile è riattaccare il connettore del sensore di prossimità, il quale richiede un po' di pazienza e delicatezza.
Cosa ti serve
-
-
Fai caso alle due fessure di giunzione attorno al perimetro del telefono:
-
Giunzione dello schermo: questa fessura separa il display del resto del telefono. E' qui che dovrai agire.
-
Giunzione della scocca: qui la scocca di plastica si unisce alla cover posteriore. È tenuta in posizione da viti. Non agire su questa giunzione.
-
Prima di iniziare a infilare gli attrezzi nella fessura, prendi nota delle seguenti aree sullo schermo:
-
Cavo flessibile dello schermo: in questo punto, non entrare a una profondità maggiore di quanto indicato per non danneggiare il cavo stesso.
-
Perimetro dell'adesivo: infilare il plettro senza angolarlo oltre questo stretto perimetro significa danneggiare il display.
-
-
-
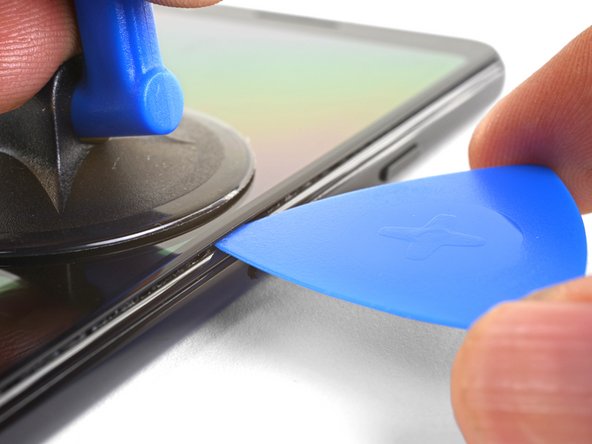
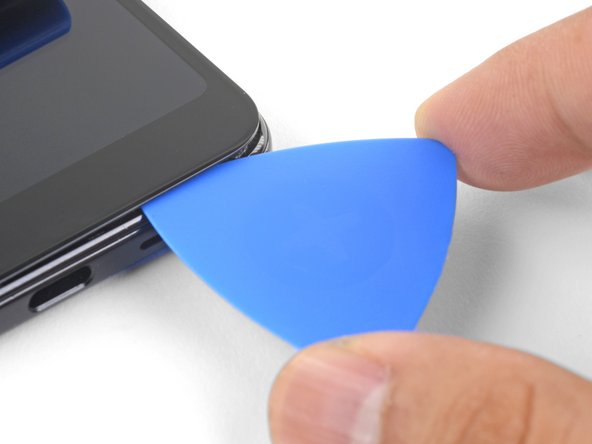
Scalda un iOpener e applicalo sul bordo destro del display per un minuto.
My screen was cracked diagonally. Heating with iOpener helped at the top and bottom edges to weaken the adhesive.
-
-
-
Con il plettro infilato a una profondità di 1 mm, ruota l'attrezzo verso l'alto facendogli raggiungere un angolo elevato.
-
Mantenendo questo angolo, spingi delicatamente il plettro nella fessura per circa 6 mm. Il plettro dovrebbe infilarsi al di sotto del pannello OLED.
-
-
-
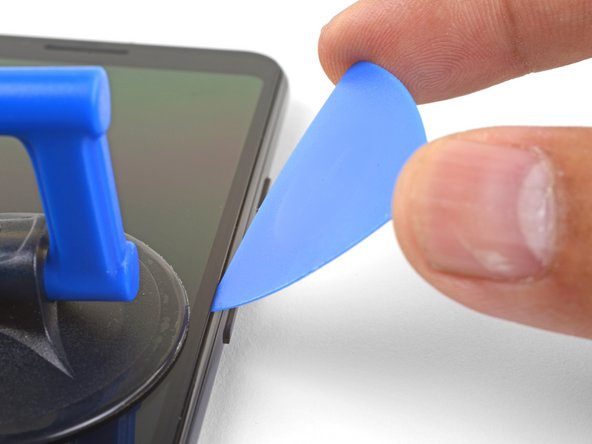
Fai scorrere il plettro lungo il bordo destro, tagliando l'adesivo.
-
Lascia il plettro in posizione per impedire che la colla possa attaccarsi di nuovo.
Don’t make my mistake and read ahead. 6mm may be too close for comfort! 8mm is definitely too far and caused me to damage. Also be sure to read the right manual! I have an XL and it notes 5mm.
Fortunately my old screen was beyond repair, But be super careful around the bottom I managed to sever the ribbon cable to the digitizer.
I broke my screen here. The adhesive in my case was quite strong on the top and bottom.
This is by far the hardest part of the entire replacement. I ruined my screen doing this, you might as well buy a new screen at the same time as you buy your battery. I just barely rubbed the edges of my screen and it turned the edge of my screen purple. This eventually migrated to the entire screen causing the whole thing to be purple/black.
I've repaired many iPhones, and never had any issues. The screens always remained intact. But with the Pixel, I completely destroyed the screen. The only thing it showed after booting up was a purple line... The adhesive is very strong and it's nearly impossible to separate the screen without damaging it. You should order a new screen before you attempt to change the battery, just in case.
-
-
-
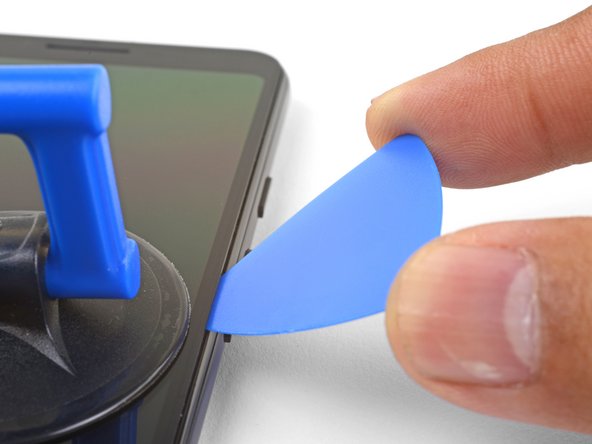
Fai scorrere il plettro attorno all'angolo inferiore destro per tagliare tutto l'adesivo.
-
Continua a tagliare lungo il bordo inferiore del telefono e attorno all'angolo sinistro.
My screen was already cracked diagonally, so going around the corners was especially hard. Starting from each side was not so risky as I first thought because side adhesive is really thin. However top and bottom needed some more lifting force from the pick. More heating helped at the top and bottom edges.
-
-
-
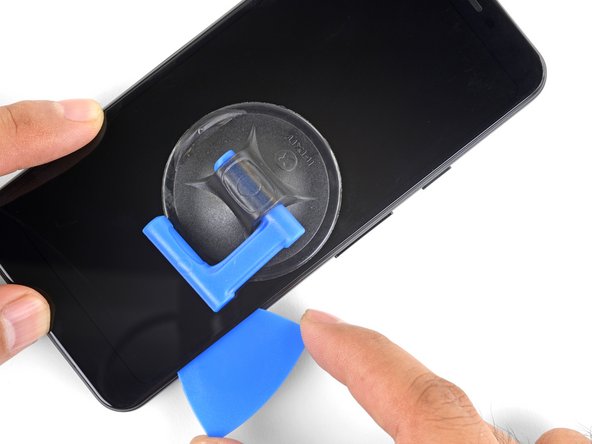
Taglia attraverso tutto il lato sinistro del telefono, ricordandoti di angolare correttamente il plettro perché passi sotto il pannello OLED e di non inserire la punta più di 6 mm.
-
Per angolare il plettro in modo che passi sotto il pannello OLED, inserisci la punta per meno di 1 mm, angola verso l'alto lo strumento e poi spingilo dentro per 6 mm.
-
-
-
-
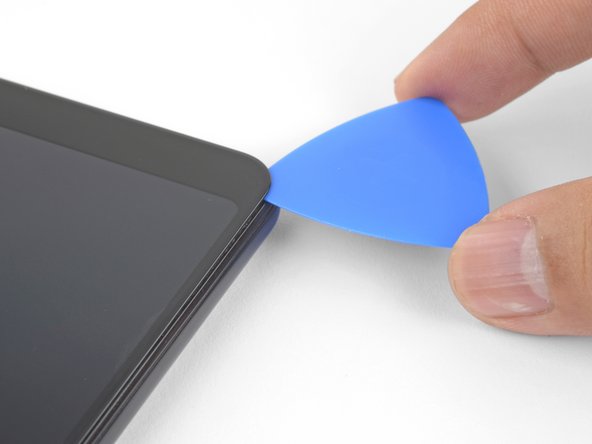
Taglia lungo il bordo superiore mentre mantieni inserito il plettro a una profondità inferiore a 8 mm.
There is a LOT more adhesive at the top than anywhere else on the phone! It’s like there’s 2 lines of adhesive, one along the edge of the case and one along the edge of the screen, and it’s filled in between them wherever the speaker camera aren’t. I needed to heat and pry several times to get the top loose. Fortunately, there’s little risk of hitting a cable near the top (look ahead to the step where you lift the screen off to see where all the cables go!)
I found that applying the iOpener across the top edge of the glass for about 30 seconds at this step helped soften the adhesive significantly. My front camera was replaced only a few months ago by uBreakiFix and the display adhesive subsequently let go on the entire right edge, bottom, and part of the left side shortly after the new front camera failed. Only the top was still securely stuck.
-
-
-
Una volta staccato tutto l'adesivo, ribalta lo schermo, sempre collegato dal cavo, portandolo sopra il telefono con il vetro rivolto verso il basso. Il cavo flessibile del display deve rimanere con una curvatura piuttosto ampia.
Hi, could you help me with one clarification?
What does the small “metal patch” in the middle of the display ribbon do?
Does it prevent the phone from starting while disconnected?
Thank you for your time!
Hi Oliver,
I think the patch you’re referring to helps with either EM shielding or heat dissipation. It should not prevent the phone from starting.
-
-
-
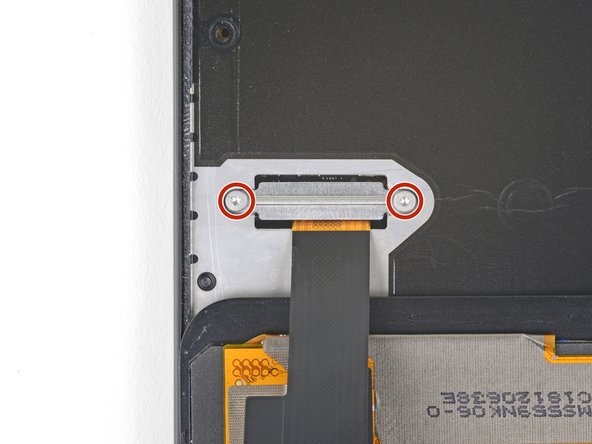
Stacca con delicatezza il nastro nero che copre la staffa del connettore dello schermo.
-
Rimuovi le due viti Torx T3 da 4,4 mm che fissano la staffa del connettore dello schermo.
-
Rimuovi la staffa del connettore dello schermo.
This may be a silly question but how are you able to tell whether the tape is in good condition? Is it based off of how sticky it is after you remove it?
That is a fair question! If the tape is in one piece and is relatively sticky, it can probably be used again.
Oops! I forgot to put any tape back. Does this tape have a critical purpose, in other words should I go to the trouble to pry the screen back off and tape it?
The tape does not serve a critical purpose. If you have already re-sealed your phone, I wouldn’t worry about it.
Les vis sont des T4 et non des T3
Bonjour Gaëtan ! Merci pour la remarque. En fait, il y a toujours une certaine tolérance entre le tournevis et la tête de vis. Donc il se peut que la taille supérieure ou inférieure soit plus “confortable” au cas par cas. Bonne réparation !
Bonjour,
Pouvez-vous me conseiller un bon kit de réparation pour mon Google Pixel 3A?
J'ai peur de me faire arnaquer en achetant un mauvais écran de basse qualité .
Do you sell the 2 4.4mm t3 screws and the screen connector bracket. Or know where I can get it thanks
-
-
-
Usa la punta di uno spudger per sollevare e disconnettere il cavo flessibile dello schermo.
I had accidentally pressed the power button and the phone was on when connecting the new screen and that broke the board! So make sure the phone is off.
hey man think I've just done the same thing :(
how did you fix it? did it need a new motherboard?
is it okay if I forgot to add the black tape on the connector area???
When reassembling, before reattaching the connector for the screen flex cable is the time to align the screen cover adhesive sheet onto the perimeter of the plastic mid-frame. Even if one is using the Tesa tape, I suspect aligning it along the edge of the mid-frame would be simpler without the screen and its flex cable obstructing your efforts.
-
-
-
Rimuovi lo schermo.
-
Confronta attentamente il tuo schermo sostitutivo con quello originale. Può essere necessario trasferire alcuni componenti (come la griglia dello speaker) nel nuovo schermo.
-
Segui questa guida se stai usando degli adesivi pretagliati.
-
Se invece stai usando del nastro biadesivo come il nastro Tesa, segui questa guida.
There is a blue plastic tape covering the digitizer and when I try to take it off it rips out something more than just the tape I think it’s pulling the magnet too
i had a little plastic piece around the camera (seems to just be a spacer) that i moved to the new screen. had to pry it up with a pick cuz it was stuck down good.
actually to clarify- i didn’t move the little camera spacer to the new screen- i placed it around the camera on the phone, where there was a little indent for it, and stuck it down with a bit of tesa strip, then applied more tesa strips around the edge of the phone before finally reconnecting and replacing the screen. the little plastic bit i encountered needs to be precisely placed around the camera so would not be a good idea to just stick it to the screen when reinstalling!
elyze -
Thanks team! I was able to replace my broken screen with no issues!
Instead of cutout adhesives or tesa tape, I used B-7000. Painless.
Appreciate the screen and instructions!
Bonjour,
Pouvez-vous me conseiller un bon kit de réparation pour mon Google Pixel 3A?
J'ai peur de me faire arnaquer en achetant un mauvais écran de basse qualité .
Hello . Can you advice me a site where i Can buy a quality screen replacement pack for my Google Pixel 3A?
There's a lot of rip off on internet and id like to get a good pack and a quality screen .
Hello! We currently sell a replacement screen. However, I’m not sure if it is available yet internationally.
I have a quick question, so I haven’t done anything yet because I only just ordered my repair kit, but is it possible to replace the battery without having to replace the display ?
Hi Braeden!
Yes, it is definitely possible to replace the battery without replacing the display. With that said, the initial entry steps can be pretty tricky. Before you begin, look very closely over the display to see if you can see any micro-fractures. If you see any, you will most likely crack the screen when you try to remove it. Take your time and apply a heated iOpener often. Good luck!
I forgot to order the tape when getting my replacement USB port, so I ended up putting the screen back on without any tape and using regular clear tape on the outside of the phone to keep the screen from falling off. It’s less waterproof, but it’ll do the job until the right part arrives.
Speaker mesh appeared to already be in place on my replacement screen, so I did not transfer this over from my old screen. That was a huge mistake, sounds were garbled above about 30% volume. Make sure you do this part!
I tried the replacement after watching this and many other videos. I purchased a working Pixel 3a and removed it to put onto my old Pixel 3a. The screen is not turning on on either devices now, old or new. The device is turning on because I can feel vibrations. What do you think the problem is?
-
-
-
Rimuovi le quattordici viti Torx T3 che fissano il telaio intermedio in plastica, delle seguenti tipologie:
-
Dodici viti cromate da 4,3 mm
-
Due viti nere da 4,3 mm
I found that a T3 bit didn’t get purchase on the screws in my Pixel 3a, but the T4 bit worked great. Not sure what’s up with that.
This is definitely possible, depending on which kit’s T3 bit you use, along with potential screw quality variances.
My Pixel 3a has been apart three times for a non-functioning front camera. The first time, it was by a Google authorized repair shop, and the camera stopped functioning again after a few months. When I took it apart the second time, I noted that many of the screws weren't seated before I removed them. The camera module had become disconnected and simply reseating the connector fixed it. I was careful to fully drive all screws and apply an appropriate amount of torque to them, thinking the repair shop failed to do so. After 9 or 10 months, my front camera stopped working again. Again, I'm noticing a lot of the screws have worked themselves loose. I'm going to try to find an appropriate thread compound that I can precisely apply to these tiny screws.
Hey Reid,
I would suggest blue Loctite or threadlocker. Dab a small drop on each screw before you install them.
-
-
-
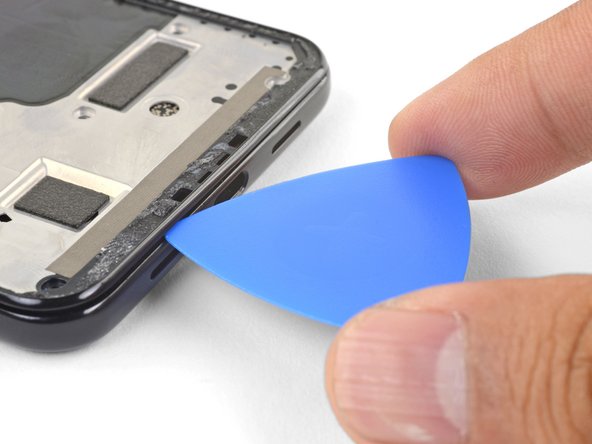
Inserisci un plettro di apertura nella giunzione della scocca nella parte inferiore del telefono. Questa giunzione si trova tra il midframe in plastica e la cover posteriore.
-
Fai scorrere il plettro lungo la giunzione per liberare le clip che trattengono il midframe in plastica.
To remove the midframe, I was having a lot of trouble until removing the sim card tray. I think this might have to be removed before the midframe
-
-
-
Fai scorrere il plettro di apertura lungo i bordi sinistro e destro del telefono per sganciare le clip del midframe.
-
Solleva il bordo inferiore del telaio centrale in plastica ma non provare a rimuovere già ora il midframe. Il telaio in plastica è ancora collegato al telefono dal fragile cavo del sensore di prossimità nel bordo superiore.
-
-
-
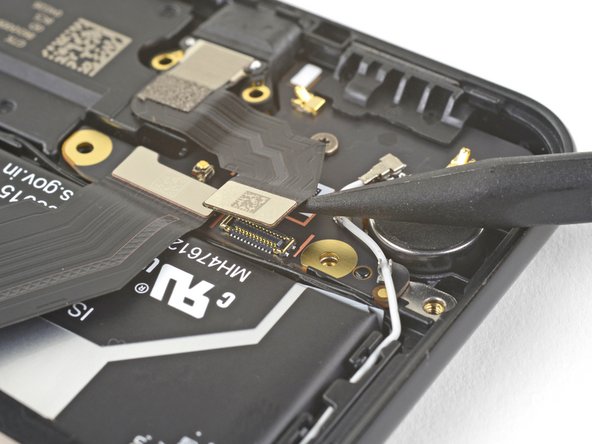
Usa la punta di uno spudger per far leva delicatamente sul connettore del sensore di prossimità scollegandolo dalla scheda madre.
-
Rimuovi il telaio intermedio in plastica.
This connector is f*ckn impossible to reconnect 😭
This is the hardest part of the job. I gave up on connecting the proximity sensor while in the midframe, and found it much easier to remove the proximity sensor from the midframe, attach the connector, then thread the sensor into its home in the midframe.
-
-
-
Allinea il bordo superiore del midframe di plastica con il telefono.
-
Usa la punta di uno spudger per allineare con cura e premere il connettore del sensore di prossimità nel suo zoccolo sulla scheda madre.
-
Questa operazione richiede un po' di pazienza e mano ferma. Una volta messo in posizione il connettore, puoi usare anche un dito per premerlo nello zoccolo.
-
Usa la punta di uno spudger per sollevare delicatamente il sensore di prossimità dal suo alloggiamento sul telaio intermedio. Il sensore è blandamente incollato al midframe.
-
Rimuovi il sensore dal midframe. Infila il connettore del sensore nel suo zoccolo sulla scheda madre.
-
Fai passare il cavo del sensore attraverso il midframe e rimetti il sensore nel suo alloggiamento. Premi con il dito per far aderire di nuovo il sensore al telaio centrale.
I tried to do this for about 15 minutes before I went to the alternative. There is a tiny post to hold the sensor in position on the midframe. I pried the sensor from the midframe from the corner opposite that post and then finished this step in 2 minutes.
Plan B ok for me as well. There is a hole below the sensor in order to push it with a sim card opener.
-
-
-
Usa la punta di uno spudger per staccare e scollegare il connettore della batteria dal suo zoccolo sulla scheda madre.
-
Piega lievemente il cavo flessibile della batteria in modo che non possa fare contatto accidentalmente con lo zoccolo.
-
-
-
Rimuovi le due viti Torx T3 da 3.3 mm che tengono ferma la porta USB-C.
-


Per rimontare il dispositivo, segui le istruzioni nell'ordine inverso.
La riparazione non è andata come previsto? Dai un'occhiata alla nostra comunità Risposte Google Pixel 3a per trovare aiuto nella risoluzione dei problemi.
Per rimontare il dispositivo, segui le istruzioni nell'ordine inverso.
La riparazione non è andata come previsto? Dai un'occhiata alla nostra comunità Risposte Google Pixel 3a per trovare aiuto nella risoluzione dei problemi.
Annulla: non ho completato questa guida.
Altre 19 persone hanno completato questa guida.
Un ringraziamento speciale a questi traduttori:
100%


Questi traduttori ci stanno aiutando ad aggiustare il mondo! Vuoi partecipare?
Inizia a tradurre ›


10 Commenti
There was moister in the tip of my USB C cable when I plugged it into my phone to charge. A warning popped up on my screen to unplug. I did right away and the cord smoked…. My charging port is charged… the rest of the phone seems to work fine. The case did not feel hot afterward. Do you think my battery might be damaged too?
Hi Desmond,
It sounds like moisture may have shorted some contacts at the USB port. That normally shouldn’t damage the battery. It’s possible the charging circuitry may be damaged.
Where is the part for this? I can't find the USB C port for the 3a!
Just did this. A few notes:
* There’s a lot, like a lot, of adhesive up by the front camera. Lacking an iOpener, I used a washcloth soaked in hot water and sealed in a plastic bag to soften the adhesive.
* My ifixit kit is old and didn’t have a pick, but I used the knife to shave down the corner of an old gift card so it was thinner, and that worked fine. I found it easiest to get the screen off by placing several old gift cards under the edges to keep them from sticking down as I pried at other areas.
* I got my replacement port from an eBay listing entitled “Charging Port Flex Cable for Google Pixel 3a G020A G020E G020B 5.6” and it works fine.
* I forgot to buy extra tape for sticking the screen back on, so to keep it from falling off while the tape is in the mail, I’ve applied clear cellophane tape around the outside edges of the screen and back where there are no ports or buttons. It works ok.
* I found that the T4 bit worked better than the T3 for all of the screws involved in this process.
Fantastic guide. Really helpful. Yes, tons of adhesive up front and on the bottom. Dealing with adhesive (clearing it out while opening the case, completely removing it while the case is open, and re-applying tesa tape before finishing) is by far the most time consuming part of this process. Overall, it took me 1.5 hrs from start to finish.
Two comments:
- I want to remark the initial warning "The Pixel 3a’s unreinforced display panel is fragile". I cracked a corner of my screen, so be sure to apply some heat to remove the glue. I applied heat, but it seems it wasn't enough. Sides were very easy to remove, top and bottom a bit trickier, especially around the corners.
- Step 18, reconnecting the proximity sensor, was probably the part that required more time. After solid 20 minutes trying to reconnect it with a pointy spudger, I tried using Halberd spudger (the one with a hook end), and I managed to connect it at first try. The main issue here was to press the connector due to the bigger piece besides it. I mean the one that looks like a square with a corner removed just for the connector. The trick with the spudger is to rest it on top of that piece (cut-off corner), and rotate it so it pushes down the connector with the hook itself. Here's a link to a picture I took.
Really nice guide! thank you! I damaged the black tape on the midframe (step 14) while replacing my diplay and usb port. I was wondering if i need to worry about it? Or can i replace it with any electrical tape. Behind the black tape, i can see silver sheet. Thank you!
Hi Lokesh!
The black tape is a graphite thermal sheet. It helps the phone spread and dissipate heat. As long as the sheet is relatively intact, it will still perform its job. Electrical tape won't work in this case, since it has different properties.
As a complete newbie to removing glass screens via heat/suction, the only thing unclear to me from this guide was whether I would need to buy extra adhesive if I wasn't replacing the screen. The answer is: yes. Tesa tape is on the way now. :) (Seems obvious in hindsight, but, like I said: total newbie.) This also doubles as a review for the iOpener which is now my new favorite tool.
Overall the guide worked absolutely fantastic. I agree that the hardest part is getting the screen off, once you crack the adhesive the interior of the phone is no trouble at all to work on. This guide makes the delicate process of removing the screen less intimidating--the instructions were very clear and easy to follow--and my extremely simple port replacement went very well. Thanks for this!
(I also used a T4 screwdriver, FWIW--I didn't look at that particular part of the instructions but now that I do/look at other comments, I will also just note that I had the best luck with it as well.)
Great guide, I took me more time being careful with the display.
About "the tricky part" with proximity, first I did the patient way, but second I took the alternative method which is much simpler.
I'd leave some note in the conclusion after "follow these instructions in reverse order." to watch to attach the adhesives before proceeding to step 12 (The first time I followed the instructions carefully, but the second time I got myself into trouble :) )
Power is off, but does the battery need to be disconnect to safely do this replacement?
mplishka - Replica
Da ich keinen iopener ( dachte das wäre alles dabei wie auf der bstellvorschau!!!) habe ich eine Wärmflasche auf das Handy gelegt ..behutsam und nicht zu heiß. Besonders an Kopf und fußende war das Display ziemlich fest...befolgt man die Anweisungen genau ist es eigentlich kein Problem das Display vom Rahmen zu lösen, jedoch bin ich der Meinung, dass hier schon ein gewisses Maß an motorischer Vertrautheit mit der Materie bestehen sollte, da wie gesagt oben und unten doch ein tieferes eingreifen in den Rahmen unter das Display nötig ist...
Ralph S. aus Neumünster
Ralph S - Replica
You definitely want to use the iOpener on all sides as you make your way around the screen. The adhesive on my device was quite strong!
My screen was cracked in the corner and it was a real pain in the neck to get the little bits and pieces out of the corner. I don't know if this step is easier with an intact screen, but it was definitely the most difficult step on the repair for me.
Simon Stone - Replica