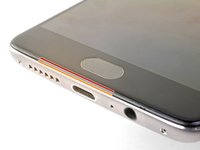
Introduzione
Segui questa guida per rimuovere la batteria del OnePlus 3. La parte più difficile di questa guida è liberare le clip che trattengono la scocca.
Se la tua batteria è gonfia, prendi adeguate precauzioni.
"'Per la tua sicurezza, fai scaricare la batteria sotto il 25% di carica prima di smontare il tuo telefono"' Questo riduce il rischio di pericolosi eventi termici, nel caso in cui la batteria dovesse accidentalmente essere danneggiata durante la riparazione.
Cosa ti serve
-
-
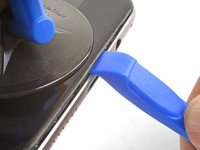
Infila uno strumento per l'eiezione della SIM o una graffetta raddrizzata nel foro posizionato tra il carrello della scheda SIM e il tasto di accensione.
-
Premi con decisione per espellere il carrello della scheda SIM.
-
-
-
Svita le due viti Torx T2 da 2,6 mm dal bordo inferiore del telefono.
-
-
-
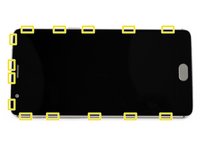
Fessura del pannello dello schermo: Questa fessura fa parte del gruppo dello schermo. Non fare leva in questa fessura, o separerai e danneggerai il pannello dello schermo.
-
Fessura della cornice: Questa è dove la cornice in plastica incontra la copertura posteriore. è incassata nella copertura posteriore. Fai leva solo in questa fessura.
-
Ci sono quattordici ganci che fissano la cornice contro la copertura posteriore. Ricordati la loro posizione mentre rimuovi la copertura posteriore nei prossimi passaggi.
This picture is a bit misleading, the frame seam is actually sunk into the metal frame, and is not visible at first.
With an older phone, it’s more likely to separate the display panel itself than to separate the displaypanel from the frame. If the top of the screen comes off first, before the part with the touch sensor, then you’re separating the wrong thing (ie displaypanel).
Mind that the displaypanel itself seems as if it has two seams (the panel itself and the board).
Thanks for the helpful tip! I re-worded the step slightly to hopefully clarify where the frame seam is.
-
-
-
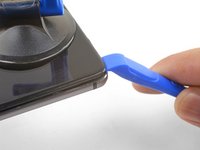
Fai aderire una ventosa vicino al bordo inferiore dello schermo.
-
Tira la ventosa con forza costante.
-
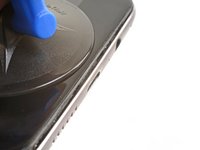
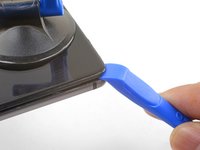
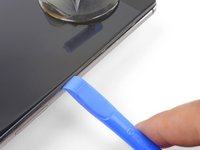
Premi il bordo di uno strumento di apertura nella fessura della cornice vicino alla ventosa finché non si infila tra la cornice in plastica e il bordo della copertura posteriore.
To get maximum leverage and make this step possible with my weaker suction cup, I held down the phone with a plastic pick/tool pressed down onto the metal back. As the suction cup pulled up the plastic frame, the plastic pick holding down the metal back naturally was pushed further and further into the gap between the frame and back.
-
-
-
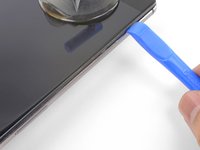
Continua a far scorrere lo strumento di apertura sotto il bordo lungo, rilasciando i ganci sulla strada.
I couldn’t get the last clip easily, so I also went around the other side, and then the last two clips left and right went out togther much more easily.
Yep, thanks for your note. It was far more easy to go round the other side.
-
-
-
-
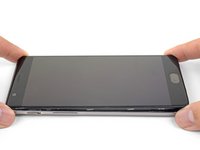
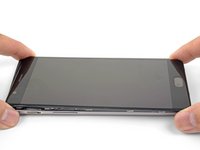
Dopo aver liberato i bordi inferiore e sinistro del telefono, fai ondeggiare delicatamente la cornice per rilasciare i ganci dei bordi superiore e destro.
-
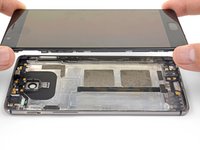
Solleva lo schermo e rimuovilo.
-
Allinea il bordo superiore della cornice alla copertura posteriore ed assicurati che i ganci superiori si infilino in posizione.
-
Schiaccia i bordi lunghi del telefono per far scattare i ganci restanti.
I’m having trouble putting on the back cover, anyone else had this issue?
Hello.
From this Step on I directly jumped to Step 13. Removing the 7 Screws. NOT removing the Mainboard. It is easy possible to remove the camera just like this if you loosen the Camera-cable and pull carefull on it. Because the 7 Screws are removed there is enough space to remove the old camera and bring the new camera in. I tried It various times to verify this.
-
-
-
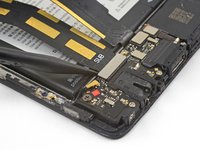
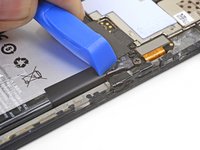
Usa la punta di uno spudger per sollevare e scollegare il connettore della batteria dalla sua presa, posizionata sopra l'angolo in alto a destra della batteria.
-
Piega il connettore lontano dalla presa per evitare dei contatti accidentali.
Why not removing the camera without removing the mainboard?
Warum wird die rückseitige Kamera nicht ausgebaut, ohne das Mainboard auszubauen?
Hello Ingo,
The rear camera is trapped under the motherboard. You must at least loosen the motherboard to remove the camera.
Die Kamera befindet sich unter dem Motherboard. Sie müssen mindestens das Motherboard lösen, um die Kamera zu entfernen.
During reassembly this part was tricky for me: the new battery couldn’t clip into place the way the old one did, resulting in a loose connection and “battery does not match “ message when trying to power the phone up. The new battery probably had a slightly different connector that than the old one. I even ordered another battery but the same thing happened. I finally managed to connect it by applying much more pressure on the press connector than needed for the other ones. it did not make any clip sound though.
-
-
-
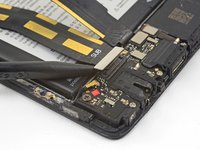
Svita la vite a croce Phillips da 3 mm che tiene ferma la copertura del cavo.
-
Rimuovi la copertura del cavo.
-
-
-
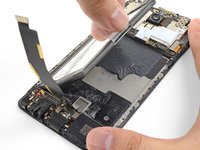
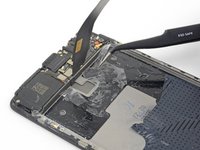
Usa la punta di uno spudger per sollevare e scollegare il cavo di interconnessione dalla scheda figlia, che si trova sotto alla batteria.
-
-
-
Rimuovi il cavo di interconnessione.
-
Piega con cura il cavo ancora attaccato alla daughterboard per tenerlo lontano dalla batteria.
Upon reassembly place the cable back correctly. Apparently, it is often overlooked, see: Replaced Battery, Now My Phone is Overheating and Won't Boot
Thanks for the tip! I’ll adjust the step add this info.
-
-
-
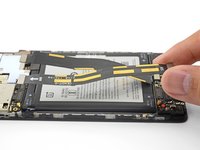
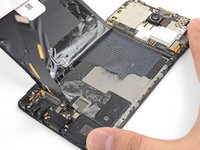
Premi la scocca sul tavolo per tenere fermo il telefono.
-
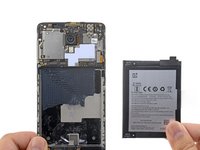
Con un'azione forte e costante, tira la linguetta di estrazione finché la batteria non si stacca dal suo alloggiamento.
-
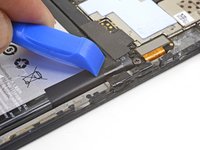
Ruotandola, stacca totalmente la batteria dal suo alloggiamento, liberandola del tutto dall'adesivo.
I found (once I had bent the old battery removing it) that there is a film around the battery which would come away much more easily. I suggest this step is updated:
Peel back the four black sticky tabs which say “Position 1” (one at each corner of the battery) and the peel back the black sticky film connected to the tabs. Now pull the clear pull tab upwards and the battery should come away.
This! I did it by unpealing the “Position 1” tabs, and then pulled the battery much more easily. Thanks for the hint! Interestingly, it still came out with the black film intact and on the battery. I then put this black film and the pull tab on the new battery, which didn’t have either. I applied some double-sided tape between the black film and the phone to glue the whole thing in place.
I agreee , just peel the “position1” tabs. Plus my spare battery didn’t come with these tabs so I had to reuse the old ones anyway.
romDL -
-


Per rimontare il tuo dispositivo, segui queste istruzioni in ordine inverso.
"'Per una massima prestazione, calibra la tua nuova batteria installata:"' Caricala fino al 100% e lasciala sotto carica per almeno altre 2 ore. Poi usa il tuo dispositivo fino a scaricare completamente la batteria. Infine carica la batteria fino al 100%.
Porta i tuoi rifiuti elettronici a un riciclatore certificato R2 o e-Stewards.
La riparazione non è andata come previsto? Prova la nostra comunità Risposte OnePlus 3 per trovare aiuto nella risoluzione dei problemi.
Annulla: non ho completato questa guida.
Altre 56 persone hanno completato questa guida.
Un ringraziamento speciale a questi traduttori:
100%


Questi traduttori ci stanno aiutando ad aggiustare il mondo! Vuoi partecipare?
Inizia a tradurre ›


13 Commenti
Is this tutorial and the repair kit also applicable for the OnePlus 3T model? Thanks in advance for helping!
The tutorial for the 3T model would be similar, but not completely identical to this guide. Since the battery capacity is different between the 3 and 3T, the repair kit would not be applicable. However, the tools are most likely the same.
Thanks for your response Arthur! Is it planned to offer a battery kit also for the OnePlus 3T? I’d definitely appreciate it since I can’t find any trustworthy OnePlus 3T batteries so far. Best regards!
Unfortunately, I don’t think we are releasing a 3T battery kit anytime soon.
My One Plus 3 is A3003, is the BLP613 battery compatible with this device ? on some website they write that A3003 is One Plus 3T and not One plus 3 …
Hi Alexandre,
OnePlus seemingly used the A3003 model for both the OnePlus 3 and 3T model. You can try opening the “About Phone” page in the settings menu to see what the phone lists itself as.
The OnePlus 3T has a bigger battery (3400 mAh vs. 3000 mAh), so there is a strong chance that the two are incompatible.
Great guide, replacement went smoothly
Replaced my battery recently. It went well. Thanks for the guide!
The need for my own adhesive isn't mentioned anywhere except at the very bottom. I ended up not using any because I don't have any. It'd be nice if it were listed as a "tool" or "part" at the top.
I followed the steps to calibrate the battery, but for several days now, my phone's shutting down due to low battery (like extreeemely low, not the usual "hmmm I'm low on battery I'm gonna turn myself off" but rather instant death). Any tips? I do have LineageOS instead of Hydrogen or Oxygen.
I'm in the same situation. Is the phone ok without the adhesive on the battery?
Vorador -
I've just realized that. I have a 3T and bought from ifixit a battery replacement for a One plus 3. because it was "Global (A3003)" compatible. Which my 3T indicates on the back frame... It is misleading, don't buy this battery.