Salta al contenuto principale
Sony VAIO VPCEE26FX Hard Disk Drive Replacement

Sony VAIO VPCEE26FX Hard Disk Drive Replacement

Christopher Hover

Christopher Hover e 3 altri collaboratori

Ultimo aggiornamento il December 10, 2022

3 minuti
Facile

Introduzione

Vai al passo 1

This guide shows how to remove/replace the hard disk drive on the Sony VAIO VPCEE26FX laptop computer.

Cosa ti serve

Kit di riparazione

Questi kit contengono tutti i ricambi e gli strumenti necessari per completare questa guida.

Ricambi

Strumenti

Mostra di più…

  1. Sony VAIO VPCEE26FX Hard Disk Drive Replacement, Battery: passo 1, immagine 1 di 2 Sony VAIO VPCEE26FX Hard Disk Drive Replacement, Battery: passo 1, immagine 2 di 2
    • Ensure that the laptop is powered off before disconnecting the battery.

    • Flip the laptop over so the underside of the laptop is facing up.

  2. Sony VAIO VPCEE26FX Hard Disk Drive Replacement: passo 2, immagine 1 di 2 Sony VAIO VPCEE26FX Hard Disk Drive Replacement: passo 2, immagine 2 di 2
    • Slide the two tabs towards each other until the battery disconnects slightly from its position.

    • Carefully lift the battery out of its position away from the laptop.

    • The battery is not pictured here, since it is missing from this particular device.

  3. Sony VAIO VPCEE26FX Hard Disk Drive Replacement, Hard Disk Drive: passo 3, immagine 1 di 2 Sony VAIO VPCEE26FX Hard Disk Drive Replacement, Hard Disk Drive: passo 3, immagine 2 di 2
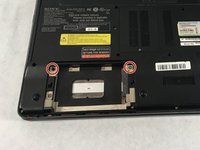
    • Using a JIS #0 screwdriver, remove the two 4mm screws securing the hard drive cover to the laptop.

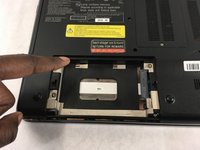
    • Lift the hard drive up and out of its place.

    • The drive cover and hard drive are not pictured. They are both missing from this particular device.

Conclusione

To reassemble your device, follow these instructions in reverse order.

0 Commenti

Aggiungi Commento

Visualizza Statistiche:

Ultime 24 Ore: 1

Ultimi 7 Giorni: 3

Ultimi 30 Giorni: 9

Tutti i Tempi: 1,844