Introduzione
Nel caso non ne abbiate ancora sentito parlare, c'è un nuovo Switch in circolazione: è il Nintendo Switch Lite e ha meno roba per poter costare di meno. Ha anche dei nuovi colori vivaci, che finiscono per distrarci e farci dimenticare per un attimo che siamo qui per uno smontaggio. Attrezzi alla mano, vieni con noi a fare a pezzi il nuovo Switch Lite.
YouTube? Instagram? Twitter? Facebook? Fai la tua scelta e dacci un click in modo che possiamo tenerti al corrente di ogni futuro smontaggio. E, se sei più avvezzo alle newsletter, abbiamo anche queste.
Cosa ti serve
Panoramica Video
-
-
È comparso un nuovo Switch Lite selvatico! Che cosa ne dice Nintendex?
-
Processore NVIDIA Tegra personalizzato
-
Schermo LCD integrato da 5,5" con touchscreen capacitivo e risoluzione 1280 × 720.
-
32 GB di memoria interna (fino a 2 TB in più tramite schede microSDHC o microSDXC)
-
Wi-Fi 802.11 a/b/g/n/ac, Bluetooth 4.1, NFC, porta USB-C (solo per ricarica), jack audio da 3,5 mm
-
Accelerometro e giroscopio integrati
-
Batteria al litio-ioni ricaricabile per 3,0-7,0 ore di gioco
-
Evoluto con controller non staccabili
-
-
-
Prima di iniziare, attiviamo il nostro Game Genie a raggi X, grazie ai nostri compari di Creative Electron.
-
Rispetto ai moderni smartphone, in questo dispositivo c'è un bel po' di cornice, quindi il classico trattamento per i nostri wallpaper di smontaggio potrebbe non risultare l'ideale. Forse se facessimo anche una skin...
-
-
-
Abbiamo provato a strattonare duramente i controller nella speranza di vincere due nuovi Joy-Con in tinta giallo brillante ma, ahimè, non si staccano proprio.
-
Sembra che si renda necessaria una procedura di smontaggio più tradizionale.
-
I controlli integrati non comprendono, comunque, un vero e proprio D-pad.
-
Altri cambiamenti esteriori: la scure si è abbattuta sul blaster a infrarossi del Joy-Con di destra e gli altoparlanti sono migrati dalla parte anteriore (OG Switch) al retro (Switch Lite).
-
Il Lite è privo anche del braccetto di supporto originale, il che lo rende lo Switch più aerodinamico di sempre.
-
-
-
La strada è bloccata da viti (tri-wing) insormontabili. Non possiamo proseguire finché non troviamo e compriamo lo strumento speciale.
-
Oggi però evitiamo ricerche collaterali che ci potrebbero distrarre: siamo in missione e quindi abbiamo portato con noi tutti gli strumenti necessari per arrivare alla fine del gioco. Cacciavite Y00, sei il prescelto!
-
Sotto la cover posteriore, troviamo: un'altra cover. Andiamo avanti.
-
Notiamo che ora il lettore di schede SD è attaccato in modo permanente alla scheda principale, mentre maneggiando il vecchio Switch a questo punto l'avevamo già rimosso.
-
In generale, la modularità va a favore della semplicità di riparazione, quindi dal nostro punto di vista questo rappresenta un piccolo passo indietro.
-
Andiamo a dare un'occhiata sotto la schermatura metallica per una prima visuale delle parti interne nello spettro della luce visibile.
-
-
-
-
Prendiamoci un momento di pausa per scoperchiare lo Switch rivisitato per il 2019 ed effettuare alcune comparazioni con il Lite.
-
Il cambiamento più importante: nel Lite la batteria non è più capovolta. Un fatto che, da solo, vale il prezzo del biglietto del nostro smontaggio.
-
Passando ad altre variazioni, ecco due verità e una bugia: (1) la batteria è più piccola fisicamente ed è adiacente a un tubo di calore con un calibro inferiore; (2) il jack cuffie è diventato completamente modulare; (3) la gomma da masticare che fissa il dissipatore di calore ora è all'aroma di ciliegia.
-
Cavando fuori la batteria con violenza, scopriamo... un fazzolettino imbevuto? Può darsi che qualcuno abbia cercato di tirar via tutta la colla appiccicosa sotto la batteria.
-
La batteria da 13,6 Wh ti sarà sufficiente per 3-7 ore di gioco, secondo Nintendo. È più di quanto può fare lo Switch originale con la sua batteria da 16 Wh (ma meno dello Switch aggiornato, che può andare avanti per 9 ore).
You should add the dimension of the battery among other parts. I am finding it very hard to find this information.
I don’t know how you removed the battery on this thing, but I destroyed a few tools prying the bigger off. Plus the battery itself got bent beyond repair where I had to order a new one. Whether the water made the adhesive extra sticky I don’t know. (When I found the Switch, it had water damage)
The battery is definitely pretty difficult to remove. It just takes time and patience! Our guide details the process: Sostituzione batteria Nintendo Switch Lite
-
-
-
Un hardware più efficiente non solo comporta una maggiore autonomia della batteria, ma anche una minor produzione di calore. Per questo siamo piacevolmente non sorpresi nel constatare che questo Switch integra un dissipatore di calore e una ventola più piccoli.
-
Un'altra piccola differenza: i grilletti L e R precedenti azionavano direttamente un pulsante su un circuito stampato, mentre i nuovi trigger propongono un tasto a membrana. Questa soluzione aiuta a proteggere il dispositivo da intrusioni e senz'altro porta con sé un azionamento più piacevole.
-
I driver degli altoparlanti sembrano gli stessi dello Switch originale, ma sono incapsulati in un modo del tutto nuovo.
-
Non solo ora il suono è indirizzato verso il basso, ma gli altoparlanti hanno anche guadagnato più spazio espandendosi nella zona in precedenza riservata alle due batterie dei Joy-Con. Anche se non abbiamo effettuato un confronto audio diretto, non ci sorprenderebbe se il Lite risultasse il migliore della serie.
-
-
-
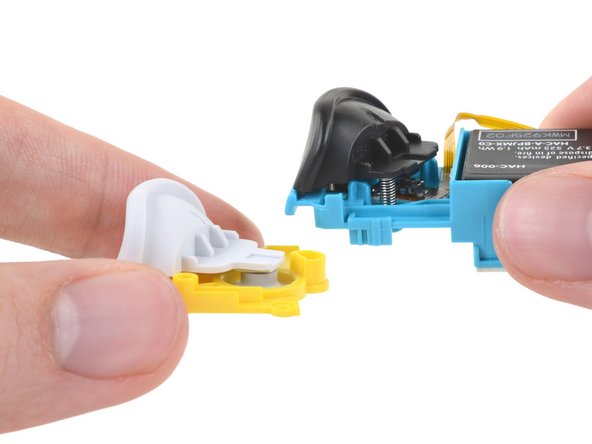
Mettendo da parte una scheda mini-joycon dedicata, affrontiamo un punto controverso degli Switch più recenti: il joystick.
-
Mentre apriamo l'involucro, questi joystick ci appaiono molto simili a quelli dello Switch del 2019, ma gli agganci attorno ai bordi sono disegnati in modo un po' diverso e il case risulta in generale più facile da aprire.
-
Nella speranza di trovare qualche tipo di miglioramento relativo al drift, apriamo i gruppi joystick sia dello Switch Lite (in alto) sia dello Switch 2019 (sotto) e li disponiamo uno di fianco all'altro per il tuo piacere visivo.
-
Sul momento, le cose all'interno non sembrano molto diverse, ma notiamo un diverso percorso dei conduttori, un pulsante più stretto per il clic e dei contatti metallici a strisciamento di aspetto lievemente allargato.
Ich habe die neue Version der analog sticks genauer unter die Lupe genommen, sie mit meinem problembehafteten verglichen und dabei etwas festgestellt. Ich habe es in einem Tweet zusammengefasst
Just replaced my left joystick, I didn’t even take off the main heatshield to disconnect the battery (had been dead for awhile). The ribbon cables went back in easily with a drop of de-oxit for lubrication. This is a smart design because the left joystick gets much more abuse than the right. PROTIP: The ribbon cables are all fixed in place via a clasp that must be lifted up first. Failure to do so will damage the ribbon cables and your board. The riskiest part of this repair is losing screws. PH000 and Y00 drivers are needed. About a 30 minute repair for a first timer.
-
-
-
Quando rimuoviamo la scheda, notiamo che la memoria flash, in precedenza modulare, ora è saldata (nello Switch originale la sostituzione fai-da-te della memoria non funzionava, ma se non altro era fisicamente possibile).
-
Lato A di questo capibara di silicio:
-
Nvidia ODNX10-A1 (SoC basato su Tegra X1, presumibilmente una personalizzazione della variante T210B01).
-
2x DRAM LPDDR4X Samsung K4U6E3S4AM-MGCJ da 16 Gb (4 GB totali)
-
32 GB di memoria flash eMMC Samsung KLMBG2JETD-B041
-
ST Micro NFCDDR A92049 13 e FT9CJ DAN915
-
Codec audio Realtek ALC5639
-
SoC Wi-Fi 802.11ac + Bluetooth 5.0 Cypress CYW4356X
You mention the Cypress chip to be Bluetooth 5.0, but list in the tech specs as Bluetooth 4.1. Which is it?
Nintendo’s official specs for the Switch Lite say BT 4.1. The Cypress chip is an off-the-shelf design that may have some un-utilized capabilities.
Is it possible to resolder ram chips with highrler capacity to boost a performance?
-
-
深蓝色框框里的芯片是什么芯片?
Maxim Integrated MAX17050 Battery Charge Meter.
-
-
E lo Switch Lite come si comporta?
-
Un po' di calore e di azione di leva è tutto ciò che serve a staccare il gruppo display dalla scocca: fin qui tutto bene.
-
Con un'azione di convincimento un po' più incisiva, lo schermo/digitizer si separa dal display. Bene! La reputazione della linea Switch rimane intatta.
I’d say IPS would made sense since in whatever posture the Switch Lite fell to ground the screen won’t be directly contacted (joysticks and buttons acts like a cushion layer), it does not appear often to encounter a fractured screen so swapping to IPS gives better visual experience and more chassis space(for batteries?)
Given that the majority of replacements are screen-related, this is a really poor explanation. What about the gasket? The adhesive? You didn’t touch on that at all - and it’s SUPER important to get right.
As stated in the banner at the top of the page, these are not instructions. Our hardware teardowns are intended to give a first look at the device and assess it for repairability, and that’s all. Step-by-step repair guides will come later! You can use this document for reference, but it’s not meant to be exhaustive.
la verdad es que en el desmontaje y separacion no os habeis esmerado pero nada de nada, una foto de un despiece que ademas no tiene ni un resto de pagamento y creo que no va aser tan facil como decis y menos el volver a montar, como se monta? que adhesivo? no queda nada nada claro nada.
I agree with the posters above - it’s the most important and dangerous step (separating the screen from the digitizer) and they choose to go with “something magic happens here”! Disappointing and frustrating.
Looking at replacing a LCD, is the LCD glued to the glass or just adhesive around the edge?
It’s just a strip of black adhesive all the way around - not glue. Just warm it up with a heat gun or hair dryer and carefully peel apart the LCD and digitizer. That said, if you’re replacing a broken LCD it might be easier just to get the complete LCD+digitizer assembly (the digitizer is cheap).
-
-
-
Leggero per il portafoglio, leggero quanto a caratteristiche, ecco qui il Lite.
-
La modularità è una caratteristica a cui si è rinunciato in questo diet Switch, al quale difettano controller, memoria e lettore scheda SD sostituibili.
-
Display e digitizer non fusi in un pezzo solo sono una buona cosa, così come il fatto di poter sostituire il lettore di Game Card e il jack cuffie.
-
Non attraente quanto lo Switch, non sovraffollato di funzionalità come il 3DS, questo Lite sembra inserirsi perfettamente nella gamma. Ma che ne sarà del punteggio di riparabilità?
-
- La maggior parte dei componenti è tenuto insieme da viti e non da colla.
- Molti componenti, compresi i joystick, la ventola e il jack cuffie, sono modulari e possono essere sostituiti in modo indipendente.
- La batteria, benché fortemente incollata, può essere sostituita poco dopo aver rimosso il case posteriore.
- Il digitizer e lo schermo non sono fusi in un pezzo unico, ma sono tenacemente incollati alla scocca.
- La memoria flash e il lettore di schede SD ora sono saldati direttamente alla scheda madre.
- Le viti di tipo poco comune (tri-wing) intralciano ogni riparazione.


Considerazioni Finali
Punteggio Riparabilità


(10 è il più facile da riparare)
Un ringraziamento speciale a questi traduttori:
80%

albertob ci sta aiutando ad aggiustare il mondo! Vuoi partecipare?
Inizia a tradurre ›
34 Commenti
The L and R triggers on the old style joycons pressed onto a fragile PCB mounted tactile switch, and were both fragile and a common point of failure. The new ones will hopefully be more robust, especially important as now they are part of the main unit and not a replaceable accessory.
Ethan…..first of all why is it important that you posted first? Second of all, you said, “Looks like the Switch Lite is based off of the original Switch.” Really, Ethan? You think? Sorry for the sarcasm but c’mon man, how is your comment helping?
You are getting waeker and weaker. No exact descripton or OEM of the fan. Boy that’s weak for because the bearing of the fan can be an issue over time too. Sleevebearings would be horror for a unit like this. I hope it is ball or hydrodynamic. This fan has to run high speeds becaus of its small diameter.
So now this begs the question, can you reuse the joycons from the OG switch, remove the buttons and place them into the lite?
Say if you wanted a different color for your buttons, seems the triggers are a nono since they use a different button system but what about a,b,x,y,+,- ect?
awful teardown guide, please give better details regarding screw placement, etc
The top of the teardown explicitly says it’s not a service guide. iFixit does have separate guides on Switch repair.
You might find the repair guides more helpful, they highlight all the screws and everything :)
Probably -
Just bought a turquoise lite and it comes with standard phillips screws
The four screws on the top and bottom of the switch lite’s case are PH000, while the 4 on the back are Y00. Look again. The screws inside are all PH000 as well.
walczyk -
Would anyone know where one could source the ‘dedicated mini-joycon board’? They seem to be the one part you cannot find anywhere.
How easy would it be for a total novice to take this apart for the purposes of re-painting the switch? I was thinking about taking it apart and doing a custom paint job on it but wanted to see if anyone else has tried it before I give it a go.
I'm a total novice and did this its very straight forward just don't get the screws mixed up and be mindful of ribbon cables also have the right tools otherwise you will strip the
Does anyone know where to get a replacement fan for the lite (in the UK). Mine sounds like its grating rocks most of the time.
Can someone point me in the direction of which ribbon connectors/sockets are for which function?
I took my boys apart to replace a snapped analogue stick and now it has sound and come on but the screen is blank, not even back-lit, and I'm not sure where I need to go next to troubleshoot it.
Took mine apart today and there are three ribbon cables that come from the screen two are under the gamecard slot those are for picture and backlight the power runs to the otherside near the battery
I’m just curious in respect to future repairability of my own switch lite - if I was to theoretically crack it open and replace the right stick (since that’s the only one that’s shown any issues whatsoever with my original set of joycons, also very pleased to see that one at least looks reasonably easy to get at) - would I need to replace the thermal compound? Or would it be fine if I just put it all back together as is?
I think it might be fine/preferable to leave/reuse the purple goop between the heatpipe and the topmost shield, as that seems to be quite a bit more spreadable than usual thermal paste used on computers.
For the blue/greyish goop between the heatsink and the SoC shield, and between the SoC shield and the SoC, you might be able to scoop up some of the excess goop that seeped out that are still kinda liquid, and slap it back on to the chip die and copper part of the shield. Though decent thermal paste aren’t all that expensive.
If you were to break a corner of the game card reader (brother decided to rip instead of gently unscrew a stripped screw), where could we get a replacement card reader? My understanding is that the switch lite and switch have different game card reader parts.
I for one disagree with this repairability score. If you’re fixing any handheld electronic and you don’t have access to a tri-wing screwdriver, you are probably just new to fixing these things. Every Nintendo handheld since the original gameboy has had them and apple adopted the use of the same bit in their very popular iPhone 7 (albeit a tad smaller). Also the adhesive on the digitizer comes off like butter with a guitar pick and some heat. Getting a new digi on without taking out the MB is an exercise in futility so that is a bit annoying, but overall I think this handheld is pretty easy to work on all things considered.
agreed regarding the Y0 driver bits, your toolkit should have them and if they don’t then you are gonna be ordering replacement parts anyway…
walczyk -
Broke my power/volume flex cable trying to put it back into the connector, anyone know when i can get a replacement, if at all?
omg that sucks, how would you break it putting it back in? I don’t know if mine is fully inserted, but de-oxit helped. BTW I found them on ebay for $7 just google something “Nintendo “Switch Lite” Power Volume Button Ribbon Flex Cable” and do not buy the non switch-lite version since they are different.
walczyk -
Why are there NO videos or howtos that show the trick in separating the digitizer from the LCD? I’ve disassembled everything but I’m stuck at that point. My LCD is good - just the digitizer is scratched and I don’t want to crack the LCD separating it from the digitizer. What’s the trick? Just a heat gun and careful prying? Note the Switch is different from the Lite - in the Switch the LCD and digitizer are not glued together, so it’s simple to replace just one. Not in the Lite tho. Any suggestions?
Okay, I took the plunge and tried separating the LCD and digitizer - it worked! The trick is to use a heat gun to heat one end of the digitizer side and then very carefully and slowly bend/peel it back from the LCD. There is a thin frame (about 2 mm wide) of black adhesive that goes all the way around. Once you’ve pulled them apart you’ll need to peel off that adhesive strip and move it to the new digitizer (if that’s what you’re replacing). Reattach the digitizer to the Switch Lite frame (reuse or use new clear adhesive if necessary), and then carefully align and stick the LCD to the backside of the digitizer. Then just reassemble everything and you’re good to ho.
¿sonde podré encontrar la tarjeta del joycon, la que aparece en la imagen uno del paso 7? vivo en Guatemala, de preferencia si la puedo conseguir en Latino américa, muchas gracias por su respuesta
japanese versions have only phillips screws
I’m interested in whether or not it is possible to add some kind of rumble motors (small, slim profile, like used in mobile phones) to the Switch Lite, there seems to be space inside the casing but does anyone know if there is an output on the board that could be used? Tied into the speakers somehow perhaps?
Also, I can’t see a NFC antenna anywhere in this tear down, yet it’s on the right stick as per the joy-cons. Is it just missing from the tear down or is it physically built into the right stick this time around?
What chip can I replace to restore video? I get audio, but no video. And No, its NOT the backlight or backlight cable/connector.
Does anyone know where exactly the NFC touch point is? I couldn’t see it in any of the pictures.
I would love it if there was an update to this video to replace the wifi antenna, as I can see the connections, but it glanced over on the video. Because this is essential to it's operation, that would be a great thing to inclue.
Is there a guide without all the cringe pokemon references? Preferably one where the first two steps are actually steps.
Harley Stout - Replica
This isn’t a guide, this is a teardown.
Duck -