
Smith-Corona Standard Portable Ribbon Replacement

Introduzione
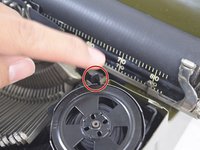
Vai al passo 1Use this guide to replace the ribbon on your 1931 Smith-Corona Standard “flat-top” portable typewriter. This guide will also apply to any of the 1930s Corona Standard, Sterling, or Silent flat-top models. Even if your typewriter is not any of the mentioned models, it may still be useful for replacing the ribbon on your manual portable typewriter since the process is largely universal.
The ribbon is responsible for getting print on paper. If you’re looking to use a typewriter that has not been used in years, it will most likely be printing dully and will require a fresh ribbon. New ribbons come wound on new plastic spools, however it is also possible to re-thread the new ribbon onto the original metal spools that came with your typewriter.
You may find it easier to replace the ribbon with the typewriter removed from its carrying case, however it is not necessary.
Avoid typing without any paper in the platen, especially when the new ribbon is installed.
For clarification on part names used in this guide, refer to the owner’s manual found.
Cosa ti serve
Ricambi
Strumenti


Install the cover plate by placing the rear of the cover against the body first, and in reverse to step number 1.
Install the cover plate by placing the rear of the cover against the body first, and in reverse to step number 1.
Annulla: non ho completato questa guida.
Altre 6 persone hanno completato questa guida.

Team

Embry-Riddle Aeronautical University, Team S4-G5, Ives Fall 2019 Membro di Embry-Riddle Aeronautical University, Team S4-G5, Ives Fall 2019
ERAU-IVES-F19S4G5
3 Membri
1 Guida realizzata
2 Commenti
My smith corona vintage typewriter ribbon won't advance. The left side is tight. The ratchet is not turning the bar. The square spring is not broken.The bar does go back and forth, better on the right side. I don't know how to lubricate the spindle shaft on the left side to make it turn more easily. The little ratchet is not grabbing as well as it might, and thus the bar is not turning. I can turn the bar with my fingers.
You're going to have to disassemble the body as much you can to get to the spool assembly and attack it with mineral spirits/rubbing alcohol to dissolve the gunk around the gears. Apply a small amount of gun oil. Typical issue for some typewriters.