Salta al contenuto principale
Seville Classics MSC10166 Buttons Replacement

Seville Classics MSC10166 Buttons Replacement

Queena Phung

Queena Phung e 11 altri collaboratori

Ultimo aggiornamento il June 8, 2023

Nessuna stima
Moderato
Foto Azione
Necessarie Immagini Migliori
Dettagli Mancanti

Introduzione

Vai al passo 1

If the buttons on the Seville Classics MSC10166 Tower Fan become broken or sticky, you can use this guide to replace the buttons.

Broken buttons can make it hard turn on or change the settings, which can impact the functionality of your fan.

You will not need any special skills in order to complete this project.

Before you begin, make sure the fan is off and unplugged, as you will be touching wires and circuit boards.

Cosa ti serve

iFixit guadagna commissioni quando acquisti tramite questi link.
  1. Seville Classics MSC10166 Buttons Replacement, PCB (Printed Circuit Board): passo 1, immagine 1 di 1
    • Use the Phillips #2 screwdriver to remove the four 6 mm screws by unscrewing counterclockwise.

    Hi I had the same problem where the fan would turn on it just wouldn't rotate. So I read all these solutions and right before I started to take the fan apart,my husband toke it and sprayed some WD-40,along the base above the plug where it rotates. Spray all around. Wait about 3mins,plug it in, and BAM it works great…. Thank God for husband's,

    tiffany Gallardo - Replica

  2. Seville Classics MSC10166 Buttons Replacement: passo 2, immagine 1 di 1
    • Pull the front and back cover apart.

    • Be careful not to pull the front cover off completely. It holds the wires.

  3. Seville Classics MSC10166 Buttons Replacement: passo 3, immagine 1 di 1
    • Remove the Phillips 6 mm screw that holds the circuit board to the outer shell of the fan.

    • Shock warning: Make sure the fan is unplugged before removing the circuit board.

  4. Seville Classics MSC10166 Buttons Replacement: passo 4, immagine 1 di 1
    • Remove the top cover containing the circuit board and the wires by pulling it away from the outer shell of the fan.

  5. Seville Classics MSC10166 Buttons Replacement: passo 5, immagine 1 di 2 Seville Classics MSC10166 Buttons Replacement: passo 5, immagine 2 di 2
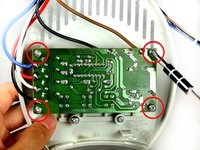
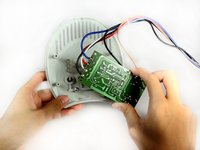
    • Remove the screws from the four corners of the circuit board.

    • Remove the circuit board from the top cover.

    • Do not touch the other side of the circuit board to avoid damaging the circuit elements.

  6. Seville Classics MSC10166 Buttons Replacement, Buttons: passo 6, immagine 1 di 1
    • Remove the two 8 mm screws that attach the buttons to the top cover of the fan.

  7. Seville Classics MSC10166 Buttons Replacement: passo 7, immagine 1 di 1
    • Remove the buttons from the top cover.

  8. Seville Classics MSC10166 Buttons Replacement: passo 8, immagine 1 di 1
    • Wipe down any dirt on the buttons.

  9. Seville Classics MSC10166 Buttons Replacement: passo 9, immagine 1 di 1
    • Wipe down the frame that holds the buttons.

Conclusione

To reassemble your device, follow these instructions in reverse order.

Altre 2 persone hanno completato questa guida.

Queena Phung

Membro da: 09/26/12

114 Reputazione

3 Guide realizzate

Team

Cal Poly, Team 15-46, Forte Fall 2012 Membro di Cal Poly, Team 15-46, Forte Fall 2012

CPSU-FORTE-F12S15G46

5 Membri

6 Guide realizzate

2 Commenti

Great work but our problem is the micro switch itself, after exposing the circuit board I shorted the backside solder connections to cycle the fan on and off, everything works perfectly…..now I only need to know a part number so I can find a on/off micro switch.

any suggestions?

Thanks for any help you can provide

rickkingsbury@comcast.net

Rick - Replica

Is there a way to keep the fan in ALWAYS ON position. So I can control it’s ON/OFF using a smart plug?

Vish Talreja - Replica

Aggiungi Commento

Visualizza Statistiche:

Ultime 24 Ore: 1

Ultimi 7 Giorni: 3

Ultimi 30 Giorni: 20

Tutti i Tempi: 4,172