Salta al contenuto principale
Repairing Nintendo 64 Controller Joystick Replacement

Repairing Nintendo 64 Controller Joystick Replacement

Zillatron

Zillatron e 6 altri collaboratori

Ultimo aggiornamento il December 18, 2019

5 - 10 minuti
Molto facile
Guida In Evidenza
Guida fornita dalla comunità

Introduzione

Vai al passo 1

This is a quick guide on replacing a faulty joystick on an N64. If you have a controller with a wobbly joystick, this is the way to resolve your issue.

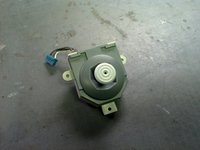
This can also be considered a mod if you are upgrading the joystick to a redesigned replacement. Upgrading is recommended because the Nintendo 64 has a poorly designed joystick that is prone to breaking and because the redesigned joystick has better control.

Cosa ti serve

Ricambi

Strumenti

  1. Repairing Nintendo 64 Controller Joystick Replacement, Controller Joystick Replacement: passo 1, immagine 1 di 3 Repairing Nintendo 64 Controller Joystick Replacement, Controller Joystick Replacement: passo 1, immagine 2 di 3 Repairing Nintendo 64 Controller Joystick Replacement, Controller Joystick Replacement: passo 1, immagine 3 di 3
    • Begin by removing the 7 #0 Phillips screws from the back of the controller grips as shown.

    • Remove the 2 #00 Phillips screws from the expansion slot

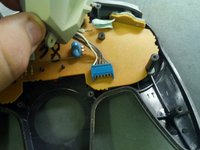
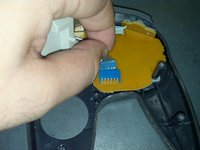
    • Remove the rear housing and set aside.

  2. Repairing Nintendo 64 Controller Joystick Replacement: passo 2, immagine 1 di 3 Repairing Nintendo 64 Controller Joystick Replacement: passo 2, immagine 2 di 3 Repairing Nintendo 64 Controller Joystick Replacement: passo 2, immagine 3 di 3
    • Gently remove the Z-Button membrane and board by sliding them to the left and pulling out of the joystick assembly.

    • Remove the 3 #00 Phillips screws holding the joystick assembly in place.

  3. Repairing Nintendo 64 Controller Joystick Replacement: passo 3, immagine 1 di 3 Repairing Nintendo 64 Controller Joystick Replacement: passo 3, immagine 2 di 3 Repairing Nintendo 64 Controller Joystick Replacement: passo 3, immagine 3 di 3
    • Disconnect the joystick data cable and remove the old joystick.

    • To install your new joystick, simply follow these instructions in reverse.

Conclusione

Test out your controller! It should be feeling like new.

Altre 33 persone hanno completato questa guida.

Zillatron

Membro da: 08/28/12

1.511 Reputazione

1 Guida realizzata

4 Commenti

If you don't line up the z button accurately it can be tricky getting the case back on.

Rainer De Temple - Replica

I have a couple thumbstick replacements that do not have the connector. They are from Sodial, and I was wondering if there was a way that they can be easily connected.

derocher1 - Replica

Hi, I've been trying to put a Zedlabz N64 joystick replacement in, and I've managed to install it but having so much trouble trying to get the case back on. I put the original back on and had no issues at all. I've tried everything but can't seem to match it up. Anyone got any ideas?

Gary Ogilvie - Replica

Is the new one too big? Hitting somewhere? You might need to dremel the places where it hits.

Jeff Miller -

Aggiungi Commento

Visualizza Statistiche:

Ultime 24 Ore: 5

Ultimi 7 Giorni: 53

Ultimi 30 Giorni: 164

Tutti i Tempi: 46,430