Salta al contenuto principale
Razer Deathadder Elite Feet And Grips Replacement

Razer Deathadder Elite Feet And Grips Replacement

David Cedrone

David Cedrone e 2 altri collaboratori

Ultimo aggiornamento il May 7, 2024

10 - 15 minuti
Facile

Introduzione

Vai al passo 1

If your Razer Deathadder Elite is not gliding well on a mouse pad and/or the mouse grips are no longer staying in place, use this guide to replace the mouse feet and grips.

The mouse's feet help the mouse glide on a surface. Overused mouse feet produce skipping and uneven gliding. The mouse grips help provide the user with more precise mouse movements. If these are damaged, the mouse is not as accurate.

Before using this guide, check to see if dirt buildup on the mouse feet is causing skipping or uneven gliding.

Before starting this guide, make sure to fully unplug the mouse from any external power source.

Cosa ti serve

iFixit guadagna commissioni quando acquisti tramite questi link.
  1. Razer Deathadder Elite Feet And Grips Replacement, Feet And Grips: passo 1, immagine 1 di 3 Razer Deathadder Elite Feet And Grips Replacement, Feet And Grips: passo 1, immagine 2 di 3 Razer Deathadder Elite Feet And Grips Replacement, Feet And Grips: passo 1, immagine 3 di 3
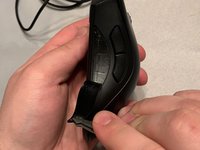
    Attrezzo utilizzato in questo passaggio:
    Tweezers
    $4.99
    • Peel the mouse foot away with the tweezers. Repeat for all the mouse feet.

  2. Razer Deathadder Elite Feet And Grips Replacement: passo 2, immagine 1 di 3 Razer Deathadder Elite Feet And Grips Replacement: passo 2, immagine 2 di 3 Razer Deathadder Elite Feet And Grips Replacement: passo 2, immagine 3 di 3
    • Apply isopropyl alcohol to each of the areas where the mouse feet were.

  3. Razer Deathadder Elite Feet And Grips Replacement: passo 3, immagine 1 di 3 Razer Deathadder Elite Feet And Grips Replacement: passo 3, immagine 2 di 3 Razer Deathadder Elite Feet And Grips Replacement: passo 3, immagine 3 di 3
    • Peel the replacement foot away from the sticky paper and make sure to not touch any of the glue underneath.

    • Align one of the edges of the replacement foot and with the mouse.

    • Place the foot onto the mouse and apply pressure for one minute so the glue sets.

  4. Razer Deathadder Elite Feet And Grips Replacement: passo 4, immagine 1 di 3 Razer Deathadder Elite Feet And Grips Replacement: passo 4, immagine 2 di 3 Razer Deathadder Elite Feet And Grips Replacement: passo 4, immagine 3 di 3
    • Lift the white paper/film off of the back of the mouse foot with a pair of tweezers to ensure proper gliding on the mouse pad. Repeat for each of the mouse feet.

  5. Razer Deathadder Elite Feet And Grips Replacement: passo 5, immagine 1 di 3 Razer Deathadder Elite Feet And Grips Replacement: passo 5, immagine 2 di 3 Razer Deathadder Elite Feet And Grips Replacement: passo 5, immagine 3 di 3
    • Rotate the mouse 90 degrees counterclockwise and peel away the old mouse grips.

  6. Razer Deathadder Elite Feet And Grips Replacement: passo 6, immagine 1 di 3 Razer Deathadder Elite Feet And Grips Replacement: passo 6, immagine 2 di 3 Razer Deathadder Elite Feet And Grips Replacement: passo 6, immagine 3 di 3
    • Peel away the grip from the sticky paper.

    • Potential for device damage: Do not touch the bottom of the grip, otherwise the glue will be less effective.

    • Align one of the edges of the grip with the corresponding edge on the mouse and press firmly on it for 30 seconds once placed.

Linea Traguardo

Altre 2 persone hanno completato questa guida.

2 Commenti

Fantastic. thanks for the guide. Much easier than what I was going to do.

HIS - Replica

should probably note that you should clean the area where the new grips will go with some alcohol, my sons was extremely greasy, hence why the adhesive from the original probably failed.

Lewis Enright - Replica

Aggiungi Commento

Visualizza Statistiche:

Ultime 24 Ore: 2

Ultimi 7 Giorni: 30

Ultimi 30 Giorni: 81

Tutti i Tempi: 5,502