Salta al contenuto principale
PSP 300x Front Casing Replacement

PSP 300x Front Casing Replacement

kbrunner

kbrunner e 16 altri collaboratori

Ultimo aggiornamento il March 24, 2025

5 minuti
Moderato
Immagini Non Adeguate

Introduzione

Vai al passo 1

Steps for replacing the outer casing of a Sony PSP-3000.

Cosa ti serve

Ricambi

Strumenti

  • Phillips #00 Screwdriver
    Phillips #00 Screwdriver
  • Spudger
    Spudger

Mostra di più…

  1. PSP 300x Front Casing Replacement, Battery: passo 1, immagine 1 di 3 PSP 300x Front Casing Replacement, Battery: passo 1, immagine 2 di 3 PSP 300x Front Casing Replacement, Battery: passo 1, immagine 3 di 3
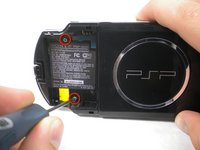
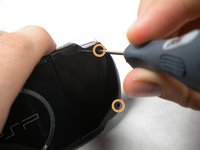
    • Place the PSP face down and locate the battery cover on the left side of the device.

    • Lift and remove the battery cover to reveal the battery.

    • Remove the battery.

  2. PSP 300x Front Casing Replacement, Front Casing: passo 2, immagine 1 di 1
    • Peel back the warranty sticker that is behind the battery with a spudger or your fingernail.

  3. PSP 300x Front Casing Replacement: passo 3, immagine 1 di 2 PSP 300x Front Casing Replacement: passo 3, immagine 2 di 2
    • Unscrew all four screws from the back of the PSP with the Phillips #00 Screwdriver.

    • Two are located behind the battery's warranty sticker.

    • Two are located on the right side of the PSP.

  4. PSP 300x Front Casing Replacement: passo 4, immagine 1 di 1
    • Next, unscrew the two screws located at the top of the PSP.

  5. PSP 300x Front Casing Replacement: passo 5, immagine 1 di 1
    • Then, remove the single screw from the bottom edge of the PSP (which is positioned next to the barcode).

  6. PSP 300x Front Casing Replacement: passo 6, immagine 1 di 2 PSP 300x Front Casing Replacement: passo 6, immagine 2 di 2
    • Slide the spudger in between the outer casing of the PSP, beginning at the "R" shoulder button, and gently pry off the casing.


    • Remove the front casing completely.

Conclusione

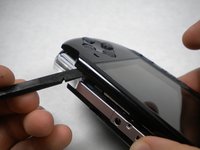
To reassemble your device, follow these instructions in reverse order.

Altre 28 persone hanno completato questa guida.

kbrunner

Membro da: 11/05/09

81 Reputazione

1 Guida realizzata

Team

Cal Poly, Team 19-2, Maness Fall 2009 Membro di Cal Poly, Team 19-2, Maness Fall 2009

CPSU-MANESS-F09S19G2

3 Membri

12 Guide realizzate

Un commento

This is only the faceplate, not a casing replacement, come on

Dick - Replica

Aggiungi Commento

Visualizza Statistiche:

Ultime 24 Ore: 11

Ultimi 7 Giorni: 106

Ultimi 30 Giorni: 350

Tutti i Tempi: 19,590