Salta al contenuto principale
Unisciti alla Community delle riparazioni - Crea un account
Nvidia Shield Controller Buttons Replacement

Nvidia Shield Controller Buttons Replacement

Daniel Eberhart

Daniel Eberhart e 6 altri collaboratori

Ultimo aggiornamento il January 22, 2024

20 minuti
Facile

Introduzione

Vai al passo 1

This guide help you replace your Nvidia Shield Portable buttons if they are faulty or broken. If the buttons on your controller are faulty or broken it is important to replace those buttons as they can interfere with the controllers ability to receive the users inputs (button presses).

Before starting the guide make sure to have a clean work area to disassemble the controller and that you have the replacement buttons.

Feel free to use any replacement parts you are most comfortable with and fit the Nvidia Shield Portable controller.

Cosa ti serve

Strumenti

  • T5 Torx Screwdriver
    T5 Torx Screwdriver
  • Spudger
    Spudger

Mostra di più…

  1. Nvidia Shield Controller Buttons Replacement, Remove Front Panel: passo 1, immagine 1 di 3 Nvidia Shield Controller Buttons Replacement, Remove Front Panel: passo 1, immagine 2 di 3 Nvidia Shield Controller Buttons Replacement, Remove Front Panel: passo 1, immagine 3 di 3
    • Remove the seven 6.4mm T5 Torx screws from the back panel.

    • Use the spudger to separate the front and back panels.

    For the rubber screw covers, it is easiest to push at them at the top, otherwise you have the possibility of damaging the surrounding rubber.

    Any hints at getting the center plastic screw cover out?

    Miles Raymond - Replica

  2. Nvidia Shield Controller Buttons Replacement, Remove Green Grill: passo 2, immagine 1 di 2 Nvidia Shield Controller Buttons Replacement, Remove Green Grill: passo 2, immagine 2 di 2
    • The green grill is not screwed in so it can be pulled right out.

  3. Nvidia Shield Controller Buttons Replacement, Remove Battery Cables: passo 3, immagine 1 di 3 Nvidia Shield Controller Buttons Replacement, Remove Battery Cables: passo 3, immagine 2 di 3 Nvidia Shield Controller Buttons Replacement, Remove Battery Cables: passo 3, immagine 3 di 3
    • Remove the six 6.5mm T5 Torx screws.

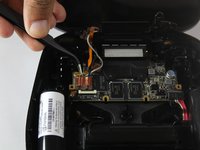
    • Disconnect the power wires.

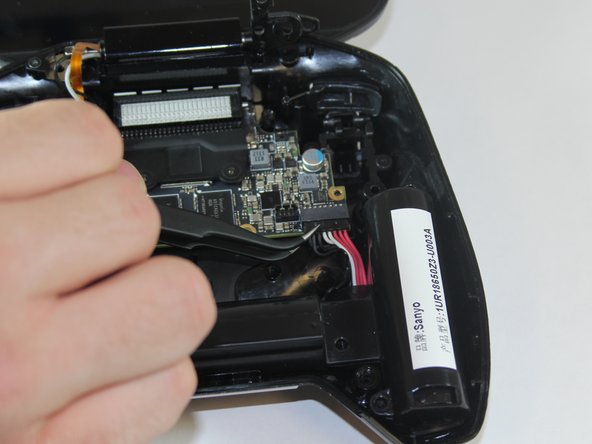
    • Peel back the copper tape and disconnect the black and white wires.

  4. Nvidia Shield Controller Buttons Replacement, Remove Battery Apparatus: passo 4, immagine 1 di 1
    • Pull the battery apparatus out once all cables are removed.

  5. Nvidia Shield Controller Buttons Replacement, Removing Button Board: passo 5, immagine 1 di 3 Nvidia Shield Controller Buttons Replacement, Removing Button Board: passo 5, immagine 2 di 3 Nvidia Shield Controller Buttons Replacement, Removing Button Board: passo 5, immagine 3 di 3
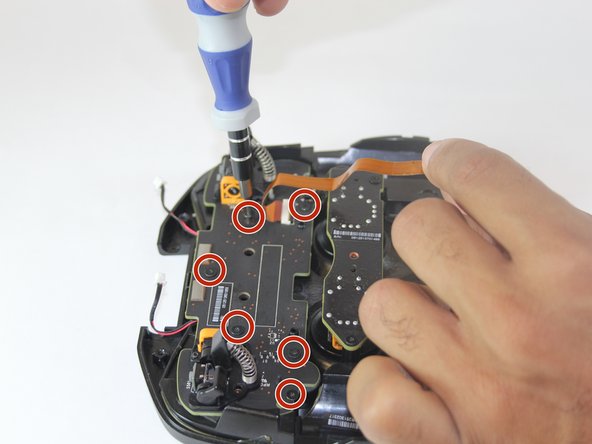
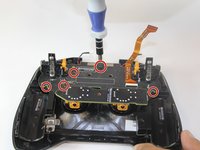
    • Remove seven 6.5 mm T5 torx screws from the button board.

    • Refer to the second image as some screws are not visible in the first image. One of these screws is covered by the orange ribbon.

    • Remove the button board.

Conclusione

To reassemble your device, follow these instructions in reverse order.

Altre 7 persone hanno completato questa guida.

Team

USF Tampa, Team 1-1, Hickman Fall 2014 Membro di USF Tampa, Team 1-1, Hickman Fall 2014

USFT-HICKMAN-F14S1G1

4 Membri

18 Guide realizzate

2Commenti sulla guida

From where can I get the buttons?

Chirag Khatri - Replica

Hey:) I am not sure

Knut Gunnar Walle - Replica

Aggiungi Commento

Visualizza Statistiche:

Ultime 24 Ore: 0

Ultimi 7 Giorni: 4

Ultimi 30 Giorni: 20

Tutti i Tempi: 6,223