
Nikon coolpix P7000 internal memory battery Replacement

-
-
If your camera forgets all its settings as soon as you remove its battery it is most likely caused by a faulty internal battery. In this guide I will show you how to replace it for the p7000 model.
-
Please do this at your own risk, even though losing settings might be annoying. The risk of damaging the camera might not be worth the fix.
-
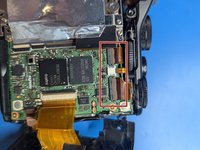
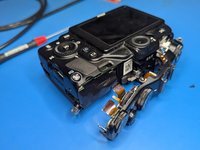
During my initial disassembly of the camera I lost track of the location of the different screws. Don't make the same mistake. There are three lengths of screws, note where they all come from.
-
This fix will also require soldering. If you are not comfortable, I would not attempt this fix. The part is small and mistakes could cost you your camera. The second picture is of the battery we are chasing, this should give you an idea of the size we are working with.
-
-
-
Remove all screws from the back, and sides of the device except for the bottom screw on the left hand side of the device.
-
It is very important which screw comes from where as there are three different lengths you will find during this repair. One of them is a longer one right next to the viewfinder.
-
-
-
Remove the remaining screws connecting the back from the bottom of the device
-
-
-
Now the back can be lifted. Be careful with the delicate ribbon cables. I have chosen to keep the back connected and to work extra carefully not to put excessive strain on the ribbon cables. You might want to disconnect them by lifting the tab of the smaller ribbon, and pulling out the black part of the larger cable.
-
BE CAREFUL! the left side of the device contains a capacitor that can hold a charge for quite a while, and deliver a nasty shock. DO NOT TOUCH!
-
-
-
-
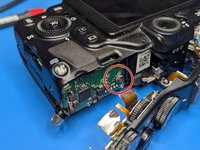
Disconnect the three ribbon cables that go to the top assembly. The two outer ribbons have a clip that has to be lifted before the cables can slide out. Again, be careful not to damage them.
-
-
-
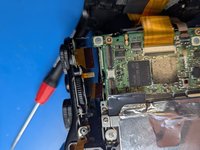
Remove the last screw burried deep in the device, right next to the viewfinder. A magnetic screwdriver will help to get it back in place.
-
The ribbon cable with the two leds on the left side of the eyepiece will have to lifted as well, as it is stuck in place with tape.
-
-
-
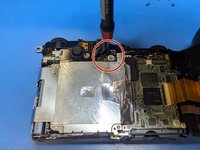
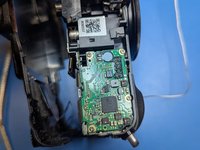
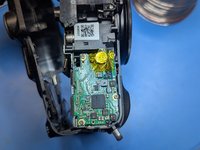
Now the top of the device can be lifted and the black tape can be removed to reveal the board that contains the internal battery. Measuring the voltage on the battery will indicate if it needs replacement (less than 2v is probably too low).
-
The circle marks the battery we've been after.
-
-
-
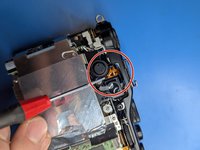
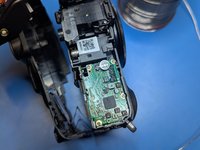
The original battery seems to be a FDK UT414 with solder tabls. It is best to find an exact replacement, but any 3v rechargeable battery with solder tabs will work. Please note the polarity of the tabs. With the solder tabs facing towards you the right leg should be positive.
-
-
-
Now the new battery can be soldered into place. Make sure the new battery does not get shorted while soldering. Removing the old solder and re-tinning the pads should make soldering a lot easier.
-
Because my replacement battery is slightly larger I covered it in kapton tape for insulation.
-
-
-
Now its time to get it all back together and looking like the picture. Do not forget the black sticker covering the pcb, and to get all the screws back in their right place.
-
Good luck!
-


To reassemble your device, follow these instructions in reverse order.
To reassemble your device, follow these instructions in reverse order.
Annulla: non ho completato questa guida.
Un'altra persona ha completato questa guida.
4 Commenti
Klasse, übersichtliche und ermutigende Anleitung.. würdest du das nochmal machen können/wollen - mit meiner P7000? Natürlich gegen Aufwandsentschädigung..
Thank you for your comment, but I currently do not have time to do any repairs. Also the fee and shipping would probably be enough to buy another p7000. Finding a local repair shop would be better. Thanks again!
daniel s -
It worked for me using this one: SEIKO SII MS621FE Lithium 3V (https://www.ebay.de/itm/123832021252). It's a bit larger than the tiny one inside (that is diameter 5mm, height 1mm) but still you can stow it without problems. It may come close to the first pin of this row seen in step 9, image 2, although not touching. Taped it to be sure. Manual is really proper as I soldered two or three times in my life, so with the right tools (I got some help from a magnifying glass) it's fun and took me 2-3 hours without hustle.
Niko L -