Salta al contenuto principale

Nikon D300 Rubber Grips Replacement

  1. Nikon D300 Rubber Grips Replacement, Rubber Grips: passo 1, immagine 1 di 1
    • Here are the tools I used. You probably only need one knife. The alcohol is for removing adhesive residue and dirt.

  2. Nikon D300 Rubber Grips Replacement: passo 2, immagine 1 di 1
    • Getting the old grips off is easy using the sculpting tool, but note the right hand grip is secured with a screw, arrowed. See next step.

  3. Nikon D300 Rubber Grips Replacement: passo 3, immagine 1 di 1
    • The grip is attached to the body via a tab which is fastened by a small screw, that is accessible from the battery compartment. Remove the battery, you can see it in the photo upper right towards the front of the camera. unscrew this and keep the screw safe.

  4. Nikon D300 Rubber Grips Replacement: passo 4, immagine 1 di 1
    • Take the new handgrip rubber and use tweezers to peel off the paper backing. These parts are very well cast, but the adhesive backing does not seem to be factory standard.

  5. Nikon D300 Rubber Grips Replacement: passo 5, immagine 1 di 2 Nikon D300 Rubber Grips Replacement: passo 5, immagine 2 di 2
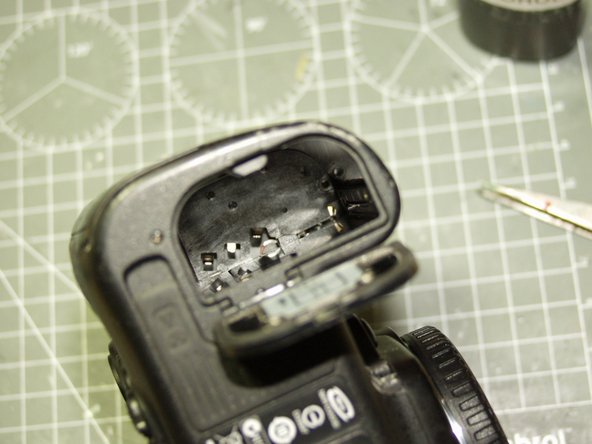
    • Clean off any adhesive left behind, and attach the new part starting by inserting the plastic tab back where the old one went and re-securing the screw. Carefully reattach the grip, tucking it in to the apertures in the body using the sculpting tool, or worn screwdriver - avoid piercing the rubber.

  6. Nikon D300 Rubber Grips Replacement: passo 6, immagine 1 di 3 Nikon D300 Rubber Grips Replacement: passo 6, immagine 2 di 3 Nikon D300 Rubber Grips Replacement: passo 6, immagine 3 di 3
    • Remove the left hand grip, after turning the socket covers back out of the way. Remove dirt and adhesive residue. Cut the adhesive away from the socket hole before attaching. The rubber must be seated into the various body apertures, esp. behind the focus selection lever and beside the remote socket.

  7. Nikon D300 Rubber Grips Replacement: passo 7, immagine 1 di 2 Nikon D300 Rubber Grips Replacement: passo 7, immagine 2 di 2
    • Remove the thumb grip. Note that here the old adhesive has melted, which required cleaning up with alcohol. The new rubber is easy to replace.

  8. Nikon D300 Rubber Grips Replacement: passo 8, immagine 1 di 1
    • The finished job. Dust etc. should be removed from the new rubber with adhesive tape. Ensure everything is properly seated, and you're ready to go.

Conclusione

To reassemble your device, follow these instructions in reverse order.

Altre 6 persone hanno completato questa guida.

laskey712

Membro da: 06/26/16

410 Reputazione

2 Guide realizzate

0 Commenti

Aggiungi Commento

Visualizza Statistiche:

Ultime 24 Ore: 0

Ultimi 7 Giorni: 14

Ultimi 30 Giorni: 30

Tutti i Tempi: 5,960