Salta al contenuto principale
Nikon Coolpix S9050 LCD Screen Replacement

Nikon Coolpix S9050 LCD Screen Replacement

Kyle Gildner

Kyle Gildner e 3 altri collaboratori

Ultimo aggiornamento il August 13, 2020

10 minuti
Moderato
Necessarie Immagini Migliori

Introduzione

Vai al passo 1

Overtime, the components in a camera are likely to fail or become faulty. One component that may become faulty overtime is the screen. If your camera is not properly displaying the images you’ve taken or if there are dead pixels on your screen, the screen may need to be replaced. This guide will assist you in replacing the LCD Screen on the Nikon Coolpix S9050.

Cosa ti serve

Ricambi

Strumenti

  • Phillips #000 Screwdriver
    Phillips #000 Screwdriver
  • Spudger
    Spudger

Mostra di più…

  1. Nikon Coolpix S9050 LCD Screen Replacement, Menu Wheel and OK Button: passo 1, immagine 1 di 3 Nikon Coolpix S9050 LCD Screen Replacement, Menu Wheel and OK Button: passo 1, immagine 2 di 3 Nikon Coolpix S9050 LCD Screen Replacement, Menu Wheel and OK Button: passo 1, immagine 3 di 3
    • Using a Phillips #000 screwdriver, remove the two 3.2mm black screws on both sides of the camera.

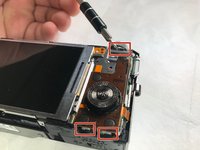
    • Set the camera face down and remove the four 3.2mm silver screws using the same screwdriver.

  2. Nikon Coolpix S9050 LCD Screen Replacement: passo 2, immagine 1 di 1
    • Remove the display frame and trim from the main body of the camera.

  3. Nikon Coolpix S9050 LCD Screen Replacement: passo 3, immagine 1 di 3 Nikon Coolpix S9050 LCD Screen Replacement: passo 3, immagine 2 di 3 Nikon Coolpix S9050 LCD Screen Replacement: passo 3, immagine 3 di 3
    • Press down and pull the Menu Wheel/OK Button panel toward the screen.

    • This releases the panel from the slots.

  4. Nikon Coolpix S9050 LCD Screen Replacement: passo 4, immagine 1 di 3 Nikon Coolpix S9050 LCD Screen Replacement: passo 4, immagine 2 di 3 Nikon Coolpix S9050 LCD Screen Replacement: passo 4, immagine 3 di 3
    • Lift the black plastic tabs, which are securing the panel.

    • Gently pull the panel out to separate the display ribbon cable from the camera body.

  5. Nikon Coolpix S9050 LCD Screen Replacement, LCD Screen: passo 5, immagine 1 di 1
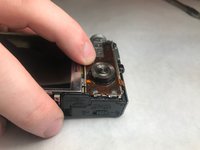
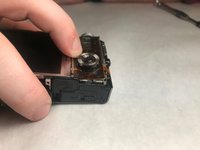
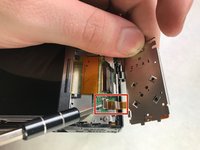
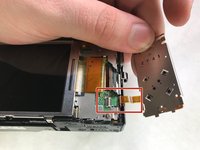
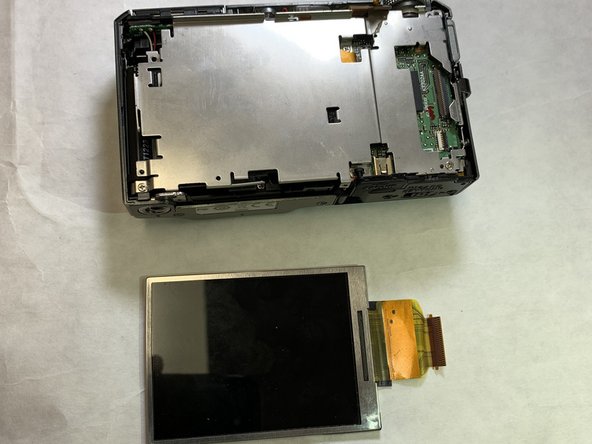
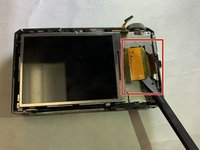
    • Remove the silver 3.2 mm Phillips #000 screw on the corner of the device to remove the screen.

  6. Nikon Coolpix S9050 LCD Screen Replacement: passo 6, immagine 1 di 2 Nikon Coolpix S9050 LCD Screen Replacement: passo 6, immagine 2 di 2
    • Gently remove pin connector using the spudger to disconnect the screen.

Conclusione

To reassemble your device, follow these instructions in reverse order.

Kyle Gildner

Membro da: 11/05/19

199 Reputazione

2 Guide realizzate

Team

IUPUI, Team S1-G5, Stella Fall 2019 Membro di IUPUI, Team S1-G5, Stella Fall 2019

IUPUI-STELLA-F19S1G5

3 Membri

5 Guide realizzate

0Commenti sulla guida

Aggiungi Commento

Visualizza Statistiche:

Ultime 24 Ore: 0

Ultimi 7 Giorni: 0

Ultimi 30 Giorni: 6

Tutti i Tempi: 273