
Nikon Coolpix L820 Shutter Button Replacement
Introduzione
Vai al passo 1The shutter is a very important part of the camera because without it you can't take pictures. This guide will give you the steps to access this button and replace this button.
Cosa ti serve


-
-
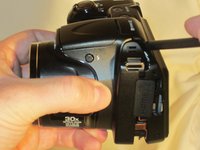
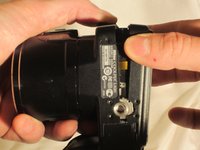
Use a Phillips #0 screwdriver to remove the screws on the front casing. There are 10 screws around the casing. 3 are located on the left side of the camera, 6 are located on the bottom near the product label, and 1 is located on the right side of the camera.
-
-
-
-
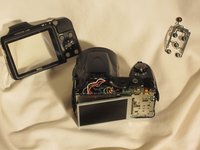
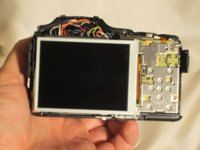
Remove the five screws from the back of the camera using a Phillips #0 screwdriver.
-


To reassemble your device, follow these instructions in reverse order.
To reassemble your device, follow these instructions in reverse order.
Annulla: non ho completato questa guida.
Altre 2 persone hanno completato questa guida.
Team

UMass Dartmouth, Team 1-4, Miles Spring 2015 Membro di UMass Dartmouth, Team 1-4, Miles Spring 2015
UMASSD-MILES-S15S1G4
3 Membri
10 Guide realizzate
3 Commenti
Muy bueno pero falta documentar 3 tornillos.
1. En el paso 1, en la tercera foto debajo del sticker del código de barras.
2. En el paso 2, justo en el fondo del compartimento de una de las baterías (la del extremo). Incluso se alcanza a apreciar en la foto.
3. En el paso 8, en esa misma pieza de metal a un lado está el otro tornillo.
My shutter button still works but doesn’t give feedback. It’s hard to tell when I’ve taken a picture because it doesn’t “click.” I’m wondering if that’s something that can be fixed, but I can’t tell if the mechanism for that feedback is in the mechanical portion above (and maybe a piece of metal broke) or built into the switch soldered on the circuit board.
Dove si può acquistare il bottone a buon prezzo? grazie
Where can you buy the button at a good price? Thank you