Salta al contenuto principale
Nikon Coolpix 3500 Motherboard Replacement

Nikon Coolpix 3500 Motherboard Replacement

richard guenther

richard guenther e 10 altri collaboratori

Ultimo aggiornamento il January 9, 2025

40 - 50 minuti
Moderato
Foto Azione

Introduzione

Vai al passo 1

The Nikon Coolpix 3500 is a beautiful camera for easily taking 16-megapixel photos and Full HD videos, even in difficult lighting. This camera can have occasional issues, one of which includes the camera not turning on. If your Nikon Coolpix 3500 is not turning on and you have tried charging it, or even replacing the battery, then the motherboard may be your issue. Please visit Nikon Coolpix 3500 Battery Replacement for more information on battery replacement.

The motherboard is commonly known as the “main board”. It is the part of many devices that essentially connects all the different bits of the device in one big circuit.

This repair could be challenging for beginners. It is recommended to have some assistance from someone with experience with motherboards. Detaching the wiring is the most involved task in this repair, but iFixit believes in you. If you are struggling with this repair, or finding that the instructions are not clear, iFixit encourages you to reach out to our Answers Forum.

Cosa ti serve

Strumenti

  • Phillips #00 Screwdriver
    Phillips #00 Screwdriver
  • Spudger
    Spudger
  1. Nikon Coolpix 3500 Motherboard Replacement, Battery: passo 1, immagine 1 di 1
    • Unlatch the battery cover and slide the cover out. Place cover to the side, it will not be needed for the next few steps.

    • Remove the battery.

    • Remove the battery cover without using excessive force. Keep in mind this cover is fragile.

  2. Nikon Coolpix 3500 Motherboard Replacement, Front Cover: passo 2, immagine 1 di 1
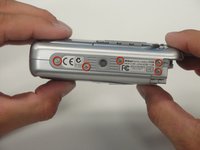
    • Remove the two 4.5 mm screws that sit next to the battery slot.

    • Remove the 3 mm screw that sits below the CF card slot.

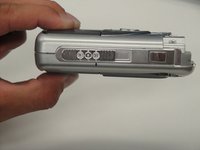
    • Remove the 4.5 mm screw that sits above the digital I/O cover.

  3. Nikon Coolpix 3500 Motherboard Replacement: passo 3, immagine 1 di 1
    • Remove the two 4.5 mm screws that sit inside the battery slot.

  4. Nikon Coolpix 3500 Motherboard Replacement: passo 4, immagine 1 di 1
    • Remove the two 5 mm screws that sit near the camera strap eyelet.

    • Remove the camera strap eyelet.

  5. Nikon Coolpix 3500 Motherboard Replacement: passo 5, immagine 1 di 1
    • Remove the 5 mm screw and cap that were underneath the camera strap eyelet.

  6. Nikon Coolpix 3500 Motherboard Replacement: passo 6, immagine 1 di 2 Nikon Coolpix 3500 Motherboard Replacement: passo 6, immagine 2 di 2
    • Remove the five 3.5 mm screws that sit at the bottom of the camera.

    • Remove the grey plastic piece, which the five screws held in place, by gently detaching the front cover.

    • Do not apply too much force; two wires still connect the front cover to the motherboard.

  7. Nikon Coolpix 3500 Motherboard Replacement: passo 7, immagine 1 di 2 Nikon Coolpix 3500 Motherboard Replacement: passo 7, immagine 2 di 2
    • Using a spudger, detach the white-capped wire.

    • Using a spudger, detach the orange-capped wire and set the front cover aside.

  8. Nikon Coolpix 3500 Motherboard Replacement, Motherboard: passo 8, immagine 1 di 1
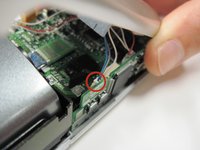
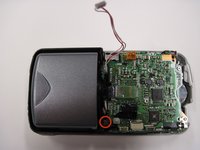
    • Detach the grey-capped wire found near the edge of the board.

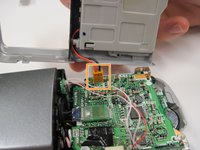
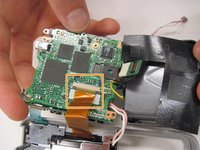
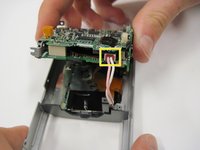
    • Located next to the blue wires is a green chip. Detach that green chip.

  9. Nikon Coolpix 3500 Motherboard Replacement: passo 9, immagine 1 di 2 Nikon Coolpix 3500 Motherboard Replacement: passo 9, immagine 2 di 2
    • Remove the 3.5 mm screw that sits next to the rotating lens.

    • You will find that the motherboard is mobile. Flip, or invert the motherboard. Be cautious of the orange and blue ribbon cables. They should still connect the board to the LCD screen.

  10. Nikon Coolpix 3500 Motherboard Replacement: passo 10, immagine 1 di 2 Nikon Coolpix 3500 Motherboard Replacement: passo 10, immagine 2 di 2
    • Detach the blue ribbon cable.

    • Using a spudger, detach the orange ribbon cable by pushing it out horizontally.

    • Detach the red-capped wire.

    • Lift the motherboard and lens out of the back cover. Be sure that they are connected.

  11. Nikon Coolpix 3500 Motherboard Replacement: passo 11, immagine 1 di 1
    • Lift the black covering.

    • Remove the orange ribbon cable that connects the lens to the motherboard.

Conclusione

To reassemble your device, follow these instructions in reverse order.

Team

Cal Poly, Team 30-38, Garner Spring 2010 Membro di Cal Poly, Team 30-38, Garner Spring 2010

CPSU-GARNER-S10S30G38

5 Membri

11 Guide realizzate

0 Commenti

Aggiungi Commento

Visualizza Statistiche:

Ultime 24 Ore: 0

Ultimi 7 Giorni: 18

Ultimi 30 Giorni: 20

Tutti i Tempi: 2,146