
Nikon COOLPIX S9500 Outer Case Replacement
5 - 10 minuti
Facile
Solo Prerequisita
Questa guida è destinata a essere usata solo come prerequisito per altre guide. Da sola è incompleta.
Introduzione
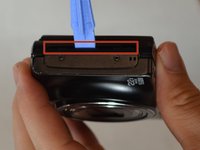
Vai al passo 1In order to access any of the inner parts of the camera, the outer case must be taken apart first. [PREREQUISITE ONLY]
Cosa ti serve


-
-
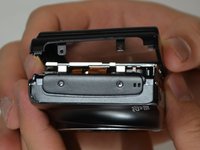
Remove the three 4 mm screws from the bottom of the camera using a #00 Phillips screwdriver.
-
Remove the single 3.5 mm screw from the bottom of the camera using a #00 Phillips screwdriver.
-
-


Quasi finito!
To reassemble your device, follow these instructions in reverse order.
Conclusione
To reassemble your device, follow these instructions in reverse order.
Team

USF Tampa, Team 1-4, Blackwell Winter 2015 Membro di USF Tampa, Team 1-4, Blackwell Winter 2015
USFT-BLACKWELL-W15S1G4
4 Membri
12 Guide realizzate