Salta al contenuto principale
Nexus 5 Antenna Cable Replacement

Nexus 5 Antenna Cable Replacement

Tyler Caldwell

Tyler Caldwell e un altro collaboratore

Ultimo aggiornamento il July 26, 2019

10 minuti
Molto facile
Guida fornita dalla comunità

Introduzione

Vai al passo 1

This guide will take you through the necessary steps to replace the antenna cables on your Nexus 5. Your antenna cables may need to be replaced if you frequently lose service.

Cosa ti serve

Ricambi

Strumenti

  • Phillips #00 Screwdriver
    Phillips #00 Screwdriver
  • Spudger
    Spudger

Mostra di più…

  1. Nexus 5 Antenna Cable Replacement, Remove the Battery Door: passo 1, immagine 1 di 1
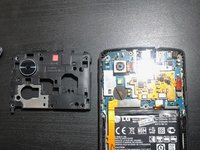
    • The battery door of the Nexus 5 is held together with plastic clips.

    • Use the plastic spudger to separate the battery door.

  2. Nexus 5 Antenna Cable Replacement, Unscrew the Midframe and Speaker Assemby: passo 2, immagine 1 di 3 Nexus 5 Antenna Cable Replacement, Unscrew the Midframe and Speaker Assemby: passo 2, immagine 2 di 3 Nexus 5 Antenna Cable Replacement, Unscrew the Midframe and Speaker Assemby: passo 2, immagine 3 di 3
    • Using your #00 Philips Screwdriver, remove the six screws holding the midframe in place.

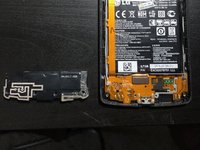
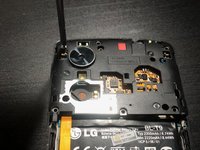
    • Remove the four screws at the bottom of the device holding the speaker assembly in place.

    • The screw on the far right may be covered in adhesive. Use your plastic spudger to remove the adhesive covering the screw.

  3. Nexus 5 Antenna Cable Replacement, Remove the Midframe and Speaker Assembly: passo 3, immagine 1 di 2 Nexus 5 Antenna Cable Replacement, Remove the Midframe and Speaker Assembly: passo 3, immagine 2 di 2
    • Remove the midframe and speaker assembly.

  4. Nexus 5 Antenna Cable Replacement, Remove and Replace the Antenna Cables: passo 4, immagine 1 di 3 Nexus 5 Antenna Cable Replacement, Remove and Replace the Antenna Cables: passo 4, immagine 2 di 3 Nexus 5 Antenna Cable Replacement, Remove and Replace the Antenna Cables: passo 4, immagine 3 di 3
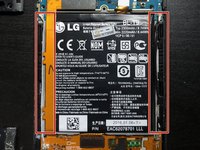
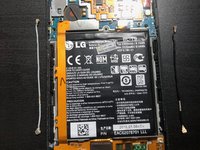
    • The antenna cables are located on the right and left side of the battery (one is gray, the other is black).

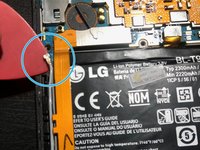
    • Using your plastic spudger, disconnect both ends of the antenna cables.

    • Connect your new antenna cables.

    • Make sure the antenna cables are securely connected.

  5. Nexus 5 Antenna Cable Replacement, Reassemble the Device: passo 5, immagine 1 di 2 Nexus 5 Antenna Cable Replacement, Reassemble the Device: passo 5, immagine 2 di 2
    • Screw the midframe and speaker assembly back into place.

    • Push the outer edges of the battery door down until you hear the plastic clips "click."

    • Hold the power button until you feel the phone vibrate and/or see the Google logo displayed.

Linea Traguardo

Un'altra persona ha completato questa guida.

Team

IUPUI, Team S1-G1, Baechle Fall 2017 Membro di IUPUI, Team S1-G1, Baechle Fall 2017

IUPUI-BAECHLE-F17S1G1

2 Membri

6 Guide realizzate

0 Commenti

Aggiungi Commento

Visualizza Statistiche:

Ultime 24 Ore: 0

Ultimi 7 Giorni: 2

Ultimi 30 Giorni: 10

Tutti i Tempi: 2,883